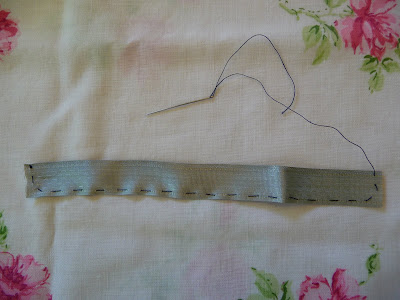
Here are the instructions for making the ribbon flowers and leaves I used in making the china pincushion from the giveaway in my last post. If you need a pincushion don't forget to leave a comment on the previous post. I really do love how these turn out and have used them to embellish bags, pin cushions, garter belts and dolls so far. I'm sure their uses are many more than I have tried. Maybe you can think of some even better ones....they are dead easy, so give them a go if you think of a good use for them.
Ribbon Flower- Cut a piece of ribbon with a length 9 times it's width. I really like to find soft ribbon for these...you can even use wired ribbon...but remove the wire from the side along which you will be sewing. The remaining wired edge will allow you to shape the outside edge of the flower nicely.
- With a thread colour that matches the ribbon, tie a knot in the end of the thread. (I have used a contrasting thread here as it is easier to see in the photo)
- With ribbon laying flat,(for descriptive purposes only......hold it how ever you like when you sew it) sew with large running stitches starting at the top left and moving down, then across the bottom and finally up the right side as shown in photo. Don't make delicately small stitches here....long ones will gather better!
- Now gather the ribbon down by pulling on the thread and needle and bunching the ribbon towards the knotted end where you first started stitching.
- Move the ribbon with your fingers into a circular shape with the ends of the ribbon tucked on the underneath side. (Ideally you will treat the ends of the ribbon with fray check to prevent unsightly threads from unraveling from your flower)
- Once you flower is shaped the way you like....stitch a few stitches on the back side of the flower to knot everything securely. Leave the long length of thread hanging from the back and use this to attach your flower when you are ready.
- You can also use this thread to attach beads to the front of the flower at center and then return the thread to the back side for later attachment.

- Cut a piece of ribbon with a length 6.5 times or more it's width.
- Treat ends with fray check or even white glue will do.
- Fold the ribbon in half (as in photo above left with fold on the left and cut ends on the right)
- Take a piece of matching thread with a knot in the end and sew long running stitches starting at the fold and running along the bottom edge (sewing the two layers together) all the way to the cut ends.
- Now, gather the long edge and sew a few back stitches to hold the ribbon in place, (so it remains gathered and then sew running stitches (smaller ones this time as this will be a seam and if not gathered) up along the cut edges (sewing the two layers together).
- Back stitch to fasten......but do not gather the cut ends.
- Open leaf with stitching to back and finger press to the shape you like.
- Use remaining thread to attach leaf by hand stitching to its final position.
- Now open up leaf and press it into shape with your fingers


2 comments:
This is a great tutorial! But wanted to ask if hubby ok now? Hope he's feeling much better!
Carole
Thanks I love making these.....and Jim is resting today, but is feeling much better than before. He should be back to normal in another week I think.
Post a Comment