Tuesday, April 28, 2009

Knitting with my Peeps and Cocoa

It's been quickly cleaning up around here with regards to the snow. Some days have been bright and warm and others have been deceptively bright and not so warm. Still cool enough to enjoy a cup of hot cocoa with some left over Easter peeps. The weather has been luring me outside with grand visions of all the landscaping I could do this year since I'm off work..........This weekend I cleaned up the very back corner of my yard in anticipation of planting all sorts of perennials back there. I have very limited garden space as it is, and it's even more frustrating that the people before us put the garden in just about the poorest spot on the property. One of these years we may address this issue. As with every job we ponder.....we over think it and plan it until it becomes a job of such immense scale and expense that it becomes intimidating. What more would you expect from two engineers.....I suppose:(
On the chilly days, I've been working on a few swaps. This one was for crocheted or knitted cleaning products. I found this free pattern and thought it was just adorable. Oddly enough.....I do not use knit dish cloths and the like. They always seem so soggy and dirty to me. However, they are a nice super quick make, they are mindlessly easy, and although I have little use for them....I know my MIL likes them......SO......those that I will receive from this swap will be making their way to a good home. I could not resist these puffs as they are so darned cute. I've got about 5 out of each ball of Bernat Handicrafter (100%) cotton 42.5g worsted weight. There is also a pattern for the plain dishcloth to go with it as a set if you like. Have a look and give it a try right here from knitability. There is also a really nice crocheted version here if you'd rather crochet.
Be warned....these little guys are addictive. Don't they just look like little peppermint candies in this colour? Already, I'm wondering what to do with the 5 sitting in my project bag?? Anyone want one?...or two?

Monday, April 27, 2009

Cheesecake with The Daring Bakers

I'm happy to report that this month's Daring Bakers Challenge turned out to be cheesecake. Cheesecake is something that I seldom make. Due to it's denseness I have rarely had enough people over for dessert to consume such an item. So I was quite pleased when the daring bakers challenge forced me to make one. And I think the neighbours are pretty pumped about it too!....at least I hope they are:)

While we were allowed great leeway in what flavour combinations we wanted to try with the original recipe....I decided to play it safe and not rock the boat too much on this one. I like a plain cheese cake with a topping and didn't want to get carried away trying to come up with what might end up being a big mess of too much going on.
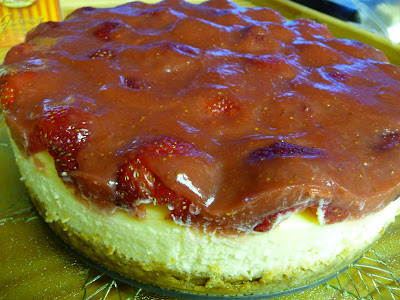
I added only the zest of one lemon and 1 tbsp of Godiva Liqueur to the original recipe. I hummed and hawed for days trying to decide what type of topping..........plain cheese cake with raspberry coulis?.....a chocolate sauce?......blueberry?.....Classic Cherry?......sliced fruit in a crab apple glaze or another classic.......strawberry sauce. In the end, I decided to go with fresh strawberries (probably because I just picked up a litre on sale this week) sliced in half and laid on top with a strawberry pureed glaze to hold them in place.
Let me just say that I whole heartedly loved this recipe.......as did my family.......neighbours are just eating theirs now....so no news yet from them.
I baked the cake in a water bath as suggested, and the cheesecake baked up perfectly flat....without cracks.....and was super creamy inside. The strawberry topping had an ample amount of glaze.....which was thickened just enough not to run away......so that there was a perfect amount of topping for each piece. I was a little hesitant to cut into the cake as it had not been in the fridge the recommended 4 hours yet......but under severe pressures from the two boys to have it for bedtime snack......I buckled..............and then unbuckled the world's most perfect and beautifully set cheesecake. It sliced perfectly with a hot wet knife each and every time.......and the crust stayed together perfectly! The recipe for the strawberry topping is from The Joy of Cheesecake and is included at the end of this post. And now for the details...............

The April 2009 challenge is hosted by Jenny from Jenny Bakes. She has chosen Abbey's Infamous Cheesecake as the challenge.
Abbey's Infamous Cheesecake:

crust:
2 cups / 180 g graham cracker crumbs
1 stick / 4 oz butter, melted
2 tbsp. / 24 g sugar
1 tsp. vanilla extract

cheesecake:
3 sticks of cream cheese, 8 oz each (total of 24 oz) room temperature
1 cup / 210 g sugar
3 large eggs
1 cup / 8 oz heavy cream
1 tbsp. lemon juice
1 tbsp. vanilla extract (or the innards of a vanilla bean)
1 tbsp liqueur, optional, but choose what will work well with your cheesecake

DIRECTIONS:
1. Preheat oven to 350 degrees F (Gas Mark 4 = 180C = Moderate heat). Begin to boil a large pot of water for the water bath.

2. Mix together the crust ingredients and press into your preferred pan. You can press the crust just into the bottom, or up the sides of the pan too - baker's choice. Set crust aside.

3. Combine cream cheese and sugar in the bowl of a stand-mixer (or in a large bowl if using a hand-mixer) and cream together until smooth. Add eggs, one at a time, fully incorporating each before adding the next. Make sure to scrape down the bowl in between each egg. Add heavy cream, vanilla, lemon juice, and alcohol and blend until smooth and creamy.

4. Pour batter into prepared crust and tap the pan on the counter a few times to bring all air bubbles to the surface. Place pan into a larger pan and pour boiling water into the larger pan until halfway up the side of the cheesecake pan. If cheesecake pan is not airtight, cover bottom securely with foil before adding water.

5. Bake 45 to 55 minutes, until it is almost done - this can be hard to judge, but you're looking for the cake to hold together, but still have a lot of jiggle to it in the center. You don't want it to be completely firm at this stage. Close the oven door, turn the heat off, and let rest in the cooling oven for one hour. This lets the cake finish cooking and cool down gently enough so that it won't crack on the top. After one hour, remove cheesecake from oven and lift carefully out of water bath. Let it finish cooling on the counter, and then cover and put in the fridge to chill. Once fully chilled, it is ready to serve.

Pan note: The creator of this recipe used to use a spring form pan, but no matter how well she wrapped the thing in tin foil, water would always seep in and make the crust soggy. Now she uses one of those 1-use foil "casserole" shaped pans from the grocery store. They're 8 or 9 inches wide and really deep, and best of all, water-tight. When it comes time to serve, just cut the foil away.

Prep notes: While the actual making of this cheesecake is a minimal time commitment, it does need to bake for almost an hour, cool in the oven for an hour, and chill overnight before it is served. Please plan accordingly!

Some variations from the recipe creator:

** Lavender-scented cheesecake w/ blueberries - heat the cup of heavy cream in the microwave or a saucepan until hot but not boiling. Add 2 tbsp of lavender flowers and stir. Let lavender steep in the cream for about 10-15 minutes, then strain the flowers out. Add strained cream to cheesecake batter as normal. Top with fresh blueberries, or make a quick stove top blueberry sauce (splash of orange juice, blueberries, a little bit of sugar, and a dash of cinnamon - cook until berries burst, then cool)

** Cafe au lait cheesecake with caramel - take 1/4 cup of the heavy cream and heat it in the microwave for a short amount of time until very hot. Add 1-2 tbsp. instant espresso or instant coffee; stir to dissolve. Add this to the remainder of cream and use as normal. Top cheesecake with homemade caramel sauce (I usually find one on the food network website - just make sure it has heavy cream in it. You can use store-bought in a pinch, but the flavor is just not the same since its usually just sugar and corn syrup with no dairy).

** Tropical – add about a half cup of chopped macadamias to the crust, then top the cake with a mango-raspberry-mandarin orange puree.

** Mexican Turtle - add a bar of melted dark chocolate (between 3 and 5 oz., to taste) to the batter, along with a teaspoon of cinnamon and a dash of cayenne pepper (about 1/8 tsp.). Top it with pecan halves and a homemade caramel sauce.

** Honey-cinnamon with port-pomegranate poached pears – replace 1/2 cup of the sugar with 1/2 cup of honey, add about a teaspoon or more (to taste) of cinnamon. Take 2 pears (any variety you like or whatever is in season), peeled and cored, and poach them in a boiling poaching liquid of port wine, pomegranate juice/seeds, a couple of "coins" of fresh ginger, a cinnamon stick, and about a 1/4 cup of sugar. Poach them until tender, then let cool. Strain the poaching liquid and simmer until reduced to a syrupy-glaze consistency, then cool. Thinly slice the cooled pears and fan them out atop the cooled cheesecake. Pour the cooled poaching syrup over the pears, then sprinkle the top with chopped walnuts and fresh pomegranate seeds.

Some variations from Jenny (from JennyBakes):

**Key lime - add zest from one lime to sugar before mixing with cream cheese. Substitute lemon juice, alcohol, and vanilla with key lime juice.

**Cheesecakelets - put in muffin tins, ramekins, or custard cups. Try baking 20-35 minutes, or until still a little jiggly, and cool as before.

The Joy of Cheesecake's Strawberry Glaze

Fresh fruit may travel better it it's fixed to the cake with a glaze, and a touch of lemon juice can bring out the flavour in many fruits. Frozen fruit may also be used. Experiment.
Ingregients:
1 quart fresh strawberries or other fresh fruit
1/2 cup sugar
2 tbsp corn starch
1/4 cup water
1 tsp butter
1 tsp lemon juice

  1. Hull and wash berries. Crush enough berries to make a cup of pulp. (I used my stick blender) Cut the remaining ones in half and arrange them on the cake.
  2. In a small saucepan, mix together the sugar and the cornstarch. Add the water and stir to dissolve.
  3. Add the berry pulp to the saucepan and bring to a rapid boil. Stir constantly while the mixture boils for 2 minutes.
  4. Remove the sauce pan from the heat and add the butter and lemon juice. Let the mixture cool to room temperature, then pour the glaze over the strawberries. Refrigerate until set, about 4 hours.

Saturday, April 25, 2009

Pyrohy Making with Mom

Mom's visit would not have been complete (for me anyway) with out the obligatory making of the Pyrohy. I have always considered it to be one of the world's most perfect foods and Ike has inherited my love for them. Mom rarely makes them....she strongly favours making Holubtsi (Cabbage Rolls). Funny I am just the opposite, and will make Pyrohy, but find the Holubtsi too much work for me. Well, we managed to make both on mom's trip out......but for now anyway....here is the Pyrohy recipe. We made two recipes...or about 130 pyrohy........Dad always laughs at mom because she must....and mean must count them....you can see from her neat rows she's trying to make the counting faster. We even made a few blueberry pyrohy for Ike to try:)

Varenyky (pyrohy) (perogies)

3 cups flour
1/2 tsp. salt
2 tblsp. canola oil
2 eggs lightly beaten
1 cup warm potato water from boiling the potatoes
3 large red or yukon gold potatoes
2 tsp. melted butter
1/2 pound (1 cups shredded cheddar (old)
2 large cooking onions, small dice
1 tsp. onion powder
1/2 tsp. white pepper

Potato/Cheese filling:

Place three large potatoes in pot, cover with water and 1 tsp. salt. Boil as you would for mashed potatoes. When potatoes are fork tender, drain and save 1 cup of the potato water for the dough.
Discard the rest. Add the cheddar cheese, 1 tsp. onion powder and the 1/2 tsp. white pepper. Mash potato mixture and taste for seasoning. You may need a touch more salt.

Pan Fried Onions:
Heat a skillet (medium heat) fry onions in 1 tblsp oil/1 tblsp butter and a sprinkle of salt, fry till onions start to caramelize for optimum flavour. Set aside.

Dough:

In a large stainless steel bread basin (rinse under hot tap water) put 3 cups flour. Make a well in the centre and add the salt, canola oil, eggs, 3/4 cup of the potato water. With a fork bring the mixture together. You may need to add a little more water to get a nice soft dough. Put the dough on to a wooden warm work area. Pour the melted butter on to the work surface and knead the dough gradually in to the melted butter. Knead two to three minutes until dough is elastic and smooth. Rinse/dry the bread basin and put a few drops of oil into the bowl. Roll the dough ball into the oil to coat the surface. Place a damp tea towel touching the dough ball and leave to rest 30 minutes. Cut the dough in half; knead l minute to form a nice smooth ball and cover again with a damp tea towel, let rest 10 minutes or when you are ready to roll out the dough.

Lightly flour wooden work surface and roll out dough to 1/16 inch. Use a round 2 1/2 inch cookie cutter to cut out the circles and place them on to a large tray lined with a cotton tea cloth. Remove excess dough from board and keep under the damp cloth to keep the dough soft.

Place a teaspoonful of potato filling in the centre of each circle. Bring both opposite side up to the top to seal with your fingers; then pressing the filling down slightly continue pinching each side firmly to seal in the filling. When all pyrohy are filled cover them with a clean cotton tea cloth to stay fresh while you roll out the second half of the dough.

Fill a 2.5 litre pot with water ( 1 inch from the top ) add 1 tsp salt and bring to boil. When water begins to boil add 15 pyrohy to the water ( one at a time ) Reduce heat to about seven but the water must be continuously boiling. They will sink to the bottom. Stir gently with the end of a wooden spoon to avoid them sticking to the bottom. They will rise to the surface in about two to three minutes. When they are visible rolling around on the surface leave them cooking at the surface for 1 more minute ( if you leave them too long at surface they may begin to inflate and open and you will lose your filling and must then fill the pot with clean water to start over again). After one minute on the surface ladle out with a slotted spoon to a sieve and rinse under warm tap water 15 seconds to rinse off any starchy water. Immediately place them into a large oven proof basin. Sprinkle some of the fried onion over them. Add a tsp. canola oil and shake the pan to distribute the onion and oil to coat the pyrohy and avoid sticking together. Place cover over basin and put into 200 degree oven to rest. Must rest at least 20 minutes to tenderize before serving.

When second dough ball is rolled out and shaped into phyrohy repeat again: cut, fill, seal, boil, remove from water, rinse through sieve, add to basin in oven, add more fried onion, sprinkle oil over phyrohy, shake to distribute and remove to oven, covered, to rest again. Serve with a dollop of Dairy Land sour cream or your favourite brown or mushroom gravy.

yield: approximately 65

Monday, April 20, 2009

More Cooking With Mom

This is a recipe that my DH has been hounding me to make ever since we watched the episode on America's Test Kitchen. Finally I got around to it. The recipe called for a 12 inch skillet and I only had a 10 inch and it worked out perfectly. I am a little sorry that I dragged my feet on this one as I absolutely loved it. It was quick, simple and very tasty and I will certainly make it again. I liked that it has no bottom crust so that the ratio of filling to pie crust was perfect for me. Not to say that the pastry was something I liked less than the filling. On the contrary, the pastry was perfectly tender, light and flaky. Overall this recipe got two thumbs up from everyone:)

Skillet Apple Pie from America's Test Kitchen

If your skillet is not heat proof, precook the apples and stir in the cider mixture as instructed, then transfer the apples to a 13 X9 inch baking dish. Roll out the dough to a 13 X9 rectangle and bake it as instructed. If you do not have apple cider, reduce 1 cup apple juice at a gentle simmer until the volume equals 1/2 cup. This takes about 10 minutes. Serve the pie warm or at room temperature with vanilla ice cream or whipped cream. Use a combination of sweet, crisp apples such as Golden Delicious and firm, tart apples such as Cortland or Empire.


Serves 6

Crust
1 cup flour, plus more for rolling
1 tbsp sugar
1/2 tsp table salt
2 tbsp vegetable shortening, chilled
6 tbsp (3/4 stick) cold unsalted butter, cut into 1/4 inch pieces
3-4 tbsp ice water

Filling
1/2 cup apple cider
1/3 cup maple syrup
2 tbsp fresh lemon juice (from one lemon)
2 tsp corn starch
1/8 tsp ground cinnamon (optional)
2 tbsp unsalted butter
2 1/2 pounds apples, peeled, cored, cut into 1/2 inch thick wedges

1 egg white, lightly beaten
2 tsp sugar

Crust- Pulse flour, sugar and salt in the food processor until combined. Add shortening and process with1 seconds pulses until mixture has the texture of coarse sand. Scatter butter pieces and pulse until mixture is pale yellow and resembles coarse crumbs, with butter bits no smaller that small peas, about ten pulses. Transfer to medium bowl.
Sprinkle 3 tbsp ice water over the mixture. With blade of spatula, use folding motion to mix. Press down on the dough with side of spatula until dough sticks together, adding up to 1 tbsp more ice water if dough does not come together. Turn dough out onto sheet of plastic wrap and flatten into 4 inch disc. Wrap and refrigerate 30 minutes, or up to 2 days, before rolling out. (If dough is refrigerated longer than 1 hour, let stand at room temperature until malleable)

Filling- Adjust the oven rack to upper-middle position (between 7-9 inches from the heating element) and heat the oven to 500 F. Whisk cider, syrup, lemon juice, corn starch, and cinnamon (if using) together in medium bowl until smooth. Heat butter in 12 inch skillet over medium-high heat. When foaming subsides, add apples and cook, stirring 2 or 3 times until apples begin to caramelize, about 5 minutes. ( Do not fully cook apples) Remove pan from heat, add cider mixture, and gently stir until apples are sell coated. Set aside to cool slightly.

Assemble- Roll out dough on lightly floured work surface, or between 2 large sheets of plastic warp, to 11 inch circle. Roll dough loosely around rolling pin and unroll over apple pie filling. Brush with egg white and sprinkle with sugar. With sharp knife, gently cut into 6 pieces by making 1 vertical cut followed by 2 evenly space horizontal cuts (perpendicular to the first cut). Bake until apples are tinder and crust is a deep golden brown, about 20 minutes. Let cool 15 minutes and serve.

Sunday, April 19, 2009

Cooking With Mom:)

Just in case you've been wondering where I've been......I've had my mom visiting us for the last week and a half. Her visit is almost coming to a close, and it is now time to start thinking about finding a box big enough to send all her purchases home with her. The two week visit has gone quickly and it seems like we have done a lot (and I mean a lot of cooking and eating). So here is one of the things that mom made during her visit.

Mom had a hankering for some cream puffs and I needed some baking to take to the PAC meeting that night. It seems to me that cream puff making is a bit of a lost art as I honestly cannot think of anyone who makes them anymore. It could just be that it's a recipe that people just don't think of making anymore or that people haven't made them in so long they think they are difficult. When in fact they are a quick bake and dead easy. Cream Puffs were something that her mom (Grama K) had made while mom was growing up quite often and I even remember my mom making them for me to bring in to school parties when I was a kid. There is not a lot in them....and with their own cream, butter, and eggs it was probably a pretty inexpensive make. And that would have really appealed to my grama....and it would to me too. It doesn't get much better than easy, yummy and inexpensive! We were just talking last night about how berry picking is just about as exciting as getting something for free......at least that's the way I feel about it. The snow here is slowly creeping away and I am already getting giddy in the anticipation of all the 'free' things summer has to offer....like....raspberries, blueberries, huckleberries, Saskatoons, rhubarb, pin cherries, mushrooms, apples etc. There is little else that gives the satisfaction of putting up supplies for the winter to come. Although in this day and age it is certainly more recreational than it is necessary. But I digress....
The cream puffs with filled with stabilized whipping cream and flavoured with two drops of Banana Cream flavouring.........and there were none left at the end of the meeting. I love Cream Puffs for their versatility. You can even use them with savoury fillings...although I think that whipped cream is the most common. These particular cream puffs remained beautiful with no weeping of the cream even the next morning when they were promptly eaten...thanks to the stabilizer. Try them.....I bet you'll like them.

Mom's Cream Puffs

1/2 c water
1/4 c unsalted butter, cut into small cubes
2 tsp sugar
pinch salt
1/2 c flour
2 large eggs

Preheat oven to 400 F and line a baking sheet with parchment. In a heavy bottom saucepan with deep sides, combine the water, butter, sugar, salt on medium high heat until butter is melted and mixture begins to bubble.
Add flour all at once, remove from the heat, and stir vigorously to combine.
Add 1 egg at a time beating vigorously to combine. Beat mixture until it leaves the sides of the pan.
At this point it is easiest to pipe the dough onto the parchment to make 1 tablespoon sized balls of dough. You can also scoop the dough into balls using a heaping teaspoon amount. Makes about 24 golf ball sized cream puffs.
Bake for 22-24 minutes until they are golden in spots and the sides sound hollow and firm when tapped. Remove to cool on wire rack.
Slice off top 1/3, and pipe whipped cream filling. Replace cap and sift generously with icing sugar.

Filling

1 cup whipping cream
1 envelope stabilizer
2 tsp sugar
flavouring optional

Beat whipping cream and all other ingredients until stiff peaks are formed.

Saturday, April 4, 2009

Pretty Teacup Pin Cushions:)

Another swap completed! This time it was a pin cushion swap, and I had been interested to try a new pattern, and also to make another cup and saucer pincushion. About six years ago I made 3 cup and saucer pin cushions and gave them all away. As a result, I had no picture to post......that is until now! Since that time I have kept damaged cup and saucer sets rather than throwing them away just so that some day I would make some more cup and saucer pin cushions. Looks like today is the day! It is best to have a cup with a pattern on the outside of the cup as any pattern inside the cup will not be visible after assembly. The other pattern I wanted to try is cut and waiting for assembly....pictures to come soon...hopefully! When You least expect it, you might just find a cup and saucer set perfect for this project.....like this one....Don't you think it would make a gorgeous pincushion???

Tea Cup Pin Cushion

Tea Cup and Saucer
Coordinating fabric piece about 5" X 5" or about 13cm X 13 cm
Styrofoam ball about 3" or 8cm in diameter (should be a bit larger in diameter than your cup)
Ribbon, Gimp, buttons or charms to embellish the top
Super Fine Steel Wool
Hot glue gun with glue sticks
Glue suitable for gluing porcelain

Select a suitable cup and saucer and glue any repairs necessary so that the cup and saucer are sturdy. Choose a coordinating fabric that will compliment your cup and saucer. I like the way velvet looks for this purpose so that's what I use. (If you do not want to use a Styrofoam center you can stuff a circle of fabric lined with steel wool and fill it with poly batting, stitching it closed at the bottom) Cut your Styrofoam ball in half with an Exacto knife and trim the edges to fit into your cup. (You will only need one half of the Styrofoam ball for each pin Cushion...so keep the other half for another project) This time, the cup I chose to use had fairly straight sides so I needed to trim in some on the outside of the ball to make the Styrofoam fit nicely into the cup. My top ended up looking like a cone shape with a rounded or domed top and the point cut off at the bottom, or I suppose....like a cupcake! (Hopefully that helps to visualize it) To help with the shaping, I placed the cup upside down onto of the domed side of the Styrofoam ball and traced around the edge of the cup onto the ball. Keep in mind that once covered in fabric it will stand an eighth of an inch or so higher in the cup....trim more if necessary. Once the ball half fits nicely into your cup, cut a layer of steel wool large enough to cover the domed top. ( They say that the steel wool will help to sharpen your pins as you insert them) Lay your fabric down, centered over the steel wool covered dome. Wrap the edges around to meet at the bottom. Clip away any excess fabric. Stitch all four corners together nice and snug at the bottom. No one will ever see this part so don't worry about neatness. Then, pull snug and secure the fabric at the four spots midway between each of the corners.
Your pin cushion top is now ready to be decorated. Your embellishments may be glued in place or stitched depending on what they are. I prefer to stitch them in place if at all possible. You can use silk flowers and leaves, buttons, charms, lace, sequins, whatever works for you! The first embellishment to apply, is gimp, ribbon, rickrack, or a strand of beads. In this project I have used gimp which I positioned while holding the pin cushion top in the cup, and tacking the gimp trim in place with pins. I positioned only an inch or two at a time then tacked it in place with small stitches until I had made it all the way around. I could have also used fabric glue. I have used ribbon to make leaves and flowers for this project. I followed these directions from the book The Artful Ribbon making the standard posy, the ruffled posy, the five petal flower, and the boat leaf.
Once the embellishments are stitched in place, or glued as the case may be, you are ready to insert the cushion top into the cup. Decide which way you want the top to be positioned in the cup. Apply a bead of hot glue gun glue around the edge of the cushion top or inside the cup 1/4 inch down from the top edge, and plunk in your top. Usually less messy to apply the glue to the inside edge of the cup. Firmly press it down for a few seconds until the glue sets up. Now, all that is left to do is to glue the cup into the saucer. Since I have reservations about the goodness of hot glue to hold the cup and saucer together, I have used a silicone glue.

If I had found my two component epoxy kit, that would have been my preference. You may further embellish the cup handle or glue embellishments into the saucer to make it your own unique creation. This is an inexpensive, quick and easy project for a nice handmade gift to gift to someone who likes to sew.

Thursday, April 2, 2009

Look What the Mailman Brought :)

I've had a pick up slip from the post office sitting on my front hall table for the last few days. Just waiting for the right moment to pick it up. It didn't look like it was going to happen today.....because it snowed AGAIN! But as the day wore on the snow on the roads melted and it became safe to drive. Lots is going on with the school's next social event coming up tomorrow, so after meeting to discuss last minute duties, I hopped over to the post office and collected this little package. I've been patiently awaiting its arrival for the last two months. It came all the way from Australia, and arrived today without a scratch! I've been wanting a tennis set or snack set for some time now and this one fit the bill. I got to try it out already with a new cookie recipe I found here while checking the blogs. Nice cookie.....very fudgey! I was being pestered to fill up the cookie jar.......and while this recipe didn't fill it....it did make enough to not have the cookie jar feel so empty. For me the recipe made 30 nice sized cookies and they did not flatten out too much in the baking so it's a good thing I flattened them by hand before baking! I found at 350 F (using convection) they were done in 8 minutes. Next time I'll try even a few minutes less to get a more chewy center.
Double Chocolate Pecan Cookies (Julie Le Clerc Magazine)

125g butter
1 ¼ c brown sugar
1 egg
1 c flour
¼ c self raising flour
1 tsp baking soda
1 tbsp ground ginger
1/3 c cocoa powder
¾ c chopped pecans
¾ c chocolate chips

· Beat together butter and sugar , then add egg
· Mix in all dry ingredients and then the pecans and chocolate chips
· Roll into balls and put on tray, leaving room for spreading
· Flatten slightly and bake at 180c for 15-18 minutes
Cool on wire racks

Wednesday, April 1, 2009

One of my Favourites... Green Peppercorn Steak

Having been off work for 3 months now ........you'd think I'd be getting bored! No such luck. Everything seems to be just as busy as ever....go figure. It has given me more time to cook though and to try some new things. Last week, I decided to invite neighbours over for dinner without much thought over what I should make. It's not yet clear off snow on the deck , so BBQ was not really in the picture as an option...although I'm certain I could have shoveled a path to it. After a lot of angst, I decided to make Green Peppercorn Steaks, oven roasted baby potatoes, and roasted asparagus. When I was in university, I used to wait tables at a restaurant that made the yummiest Green Peppercorn Steak and this recipe is pretty close to it. There's not much too it....and it's dead easy. The roast potatoes were a good choice for company as the potatoes can be started an hour before eating, and once done can be kept warm in the oven while everything else comes along. I ended up buying beef tenderloin steaks and I'm happy I did since they were so very tender even cooked to medium well. Since there was a lot going on with company over at the house, I did not get to snap a photo of the meal......but with one left over steak to cook up the next day....I had a second chance. I made the potatoes again since they were so easy and so delicious but changed the vegetable to broccoli this time since Ike is not fond of asparagus.

If you want to try a steak that presents nicely for company....give this a try. It is really good and very easy. And if you're lucky....they might bring you some of these:)

Green Peppercorn Steak

4 steaks, fillet or rib steaks
1/3 cup green peppercorns
2 tbsp Dijon mustard
3 tbsp butter
1 cup whipping cream or half and half
Set steaks out 30 minutes to come to room temperature before preparing. Blot steaks with paper towel to remove moisture on both sides. Pour boiling water over peppercorns and set aside for 15 minutes. Drain and blot between paper towels. Crush peppercorns with rolling pin between two sheets of waxed paper. Blend peppercorns with mustard and spread this mixture on both sides of the steaks. Melt 3 tbsp butter on medium high heat in non stick fry pan large enough to hold all steaks without crowding. For 1 inch thick steaks, fry steaks 2-3 minutes on each side for rare steak and about 4 minutes per side for medium rare. If your steaks are quite thick, you are better off to use an instant read thermometer. Once steaks are done, remove them to a platter and tent with foil. Add cream and 1/4 tsp salt to pan. Let bubble and stir till slightly thickened. About 2 minutes. Pour sauce over steaks and serve.