Saturday, November 24, 2012

How do you eat your Chow Chow?

I have friends who travel a few hours south of here every summer to pick the very best tomatoes, which they bring back to town and sell them.  The first year I learned of their tomato migration, I had them pick Roma tomatoes for me to can into sauce.  The following year, I noticed they had picked  a lot of green tomatoes, and I decided to get some and try a recipe for green tomato mince meat.....which is fabulous by the way.  This summer, with an interest in finding other recipes using green tomatoes, I decided to make Chow Chow.  We have quite a few friends who are transplants from the east coast who miss their Chow Chow since it is not something you can find on the store shelves out here in B.C.  Turns out I just couldn't make enough of this stuff.  Between mincemeat and Chow Chow....I used 40 pounds of green tomatoes this year and I am quickly getting to the end of my Chow Chow and Mince Meat.  I can tell already, next year, I could devote 60 pounds to Chow Chow alone.  I get it....this Chow Chow is tasty.....it's sweet (although you can adjust to your liking), and it tastes of pickling spice with a little bite from the vinegar.  I'm told it's nice served along side meat, on a cheese sandwich, and apparently straight out of the jar.  When you have some green tomatoes to use up....consider giving this a try.  If you are already a fan of Chow Chow....what do you eat it with?  I'm curious....

Chow Chow(makes 10 pints)

9 pounds green tomatoes washed
6 pounds onions peeled
Slice tomatoes and onions thinly ( I used a mandoline slicer) which makes the job very quick!  Set aside the sliced tomato and onion in a large bowl and sprinkle with 1/2 cup coarse pickling salt and mix in a little......cover and leave over night.
In the morning, drain in a colander and transfer tomato and onion to a large pot. 

Add to the pot:
4 cups pickling vinegar
2 cups water
1 red pepper cored, and chopped in 1/4 inch squares
7 cups white sugar (or less to taste)
a spice ball or piece of cheese cloth filled with 2 tsp mixed pickling spice

Put pot on medium high heat until bubbling.  Reduce heat to a simmer and cook until vegetables are tender. (this will take 10 -15 minutes)  Remove 1/2 cup of liquid from the pot and set aside to cool.  Once cool ....

Add to the cooled 1/2 cup of liquid:
1/2 cup corn starch
2 tsp dry mustard
1 tsp turmeric
Whisk this mixture smooth, then stir it into the Chow Chow to thicken.  Once the cornstarch mixture is added, you must stir the Chow Chow often to make sure it does not burn on the bottom.  Cook a further 15 minutes on medium low heat stirring frequently.  Remove spice bag.  Fill sterilized canning jars to within 1/4 inch from the top.  Seal and process in a hot water bath.

Sunday, November 18, 2012

Where did the Time go?

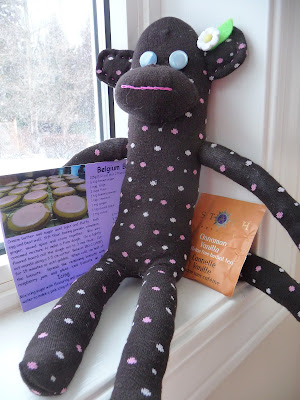
It has been very busy here with work and life in general....But I did take a week off work with no place to go.  Tomorrow is back to work for me, and while I don't feel like I accomplished quite enough on my week off, it wasn't unproductive either.  I managed to get a few swaps prepared and mailed like the felt ornament above.......and the sock monkey below.
 And even managed to finish up and mail some quilt blocks for some nice ladies preparing quilts for the Hurricane Sandy Help quilt project.  The blocks were super simple and I may be tempted to pull out all my vintage sheet fabric to make a lap quilt using this pattern.....just to see how it turns out.
I also took a trip to the yarn shop and bought some beautiful Malibrigo chunky to knit a hat....just need to sew in the yarn tails .....almost finished.......and am just about to start on a knit shawl.  Once they are done, I'll be sure to post a picture......lots to catch up on....and Christmas is coming!  Yikes...

Saturday, November 3, 2012

Mom Makes Yogurt


These past few months have been busy.....you may have guessed.  I have lots to catch up on.  While accompanying my father to a surgery in London, my mother got addicted to the yogurt served at the hotel she was staying at.  Once home she set about recreating it on her own.  After 8 batches now....she is pretty sure she has got the recipe down.  It is now on my' to try' list:)  Perhaps you might like to try it as well.  Here are my mother's instructions....
Greek Yogurt in a Slow Cooker
1 litre whole milk
1/4 cup whipping cream
2 tablespoons Greek "Skotidakis" plain yogurt (Safeways) or your favourite plain yogurt that has active culture in it
3 teaspoons liquid honey
Small sized slow cooker

Put milk, and whipping cream into slow cooker. Blend liquids with a whisk. Turn slow cooker to "Hi" and heat just to 180 degrees F.
This will take about one hour, however, check at 45 minutes with a thermometer as it rises quickly near 180 degrees. When temperature is reached, immediately transfer to ice cold water bath in the sink until temperature falls to 120 degrees.

Remove insert of cooker from sink to the counter. Arrange a folded tea towel under it to absorb water from the sink. When milk temp reaches 110 degrees, take out a half cup of milk and add the 2 tablespoons plain yogurt. Whisk to blend and add back to the milk in the slow cooker. Put the lid back on and wrap slow cooker insert with a large bath towel. Lower the grill in your oven and turn the oven to lowest temperature for 15 seconds just to get a blast of heat to the oven. Shut off immediately; place a thermometer laying flat on bottom grill just so you can read the temp. It will probably show 100 - 105 degrees. This is ideal. Place the towel wrapped slow cooker insert with the milk inside the oven. Shut the door and do not peak for four hours.


After four hours remove from the oven. The yogurt will have finished the fermentation process; it will be one solid mass and it is ready to be poured into a cloth over a colander. I used an old white clean t shirt front. Lay the cloth over the colander and over a large pot; pour entire contents on to the cloth. Bring up four sides and secure with twine. Leave to let the whey drip into the pot for two hours.

After two hours remove twine, open the cloth and empty the yogurt into a large mixing bowl. You will want to add back two or three tablespoon of whey back to the yogurt and blend this in with a Bamix or hand mixer. Keep adding a little more whey until you get the exact texture of yogurt you are after. It should look like a smooth meringue or whipped cream. If it's not creamy and light beat it a little longer.  It will have a nice gloss. It will look awesome!!


At this point remove two or three tablespoons of culture to keep refrigerated for you next batch of yogurt. It will keep refrigerated for a week to ten days with a tight lid in a small tupperware container.

After reserving a few spoons for the next batch, add three teaspoons of liquid honey and whisk/blend this in well. It will give a smooth taste, unlike any commerically purchased yogurts available from the market.

The yogurt is ready for serving but the flavour will be enhanced when chilled in the refrigerator. Store in a tightly sealed container. Keeps one week to 10 days refrigerated.