Wednesday, December 31, 2008

Happy New Years

Wow another new year is upon us again, and hard to believe we are well into the 2000's now! New Years here has always been a fairly quiet event for us, especially since he had Ike. This year will mark the third year we have been invited over to the neighbours for appetizers and I am looking forward to a relaxing evening. There have been lots of things going on here and some changes yet to take place so I am really REALLY looking forward to the chance to sit and chat with the neighbours a bit. The diet can start tomorrow.


I think they (the neighbours) all know what I will likely bring so I don't think I will surprise them either. These are my two favourite standby, really quick appetizers... And they are Bacon and Waterchestnut Rollups and Hot Chicken Wing Dip. The Bacon Rollups are always popular....well come on...who doesn't like bacon right? Well I've never met a smoked pig I didn't like.....and I think I'm pretty normal?? Some of you might argue.....I know...I know! And the Hot Wing Dip is something I tried at a lady's home down in Atlanta and is usually popular with the guys. It's just the perfect thing to make for a Superbowl party or some other manly type event. But since I like hot and spicy, it's right up my alley too:)


Bacon & Waterchestnut Rollups

1cup ketchup
1 cup brown sugar
2 tbsp vinegar
2 tbsp Worcestershire sauce

2 small cans whole water chestnuts
2 lbs bacon

Cut bacon strips in half and cut water chestnuts in half. I usually count the number of half strips of bacon and cut enough waterchestnuts in half so the numbers of each are the same. Roll chestnut pieces in bacon and secure with wooden toothpick through the chestnut. Place the rollups on a rack on a cookie sheet and bake at 350F for about 1/2 hour or until the bacon is almost crisp. Mix all sauce ingredients together in a small saucepan and heat. Once rollups are cooked, drain on paper towel and move to a covered casserole dish and pour heated sauce over. Heat in 325F oven for 1/2hour with the cover on. Can be reheated the next day.


Buffalo Chicken Dip


4 boneless chicken breasts (about 2 pounds)
1 (12 ounce) bottle Frank's Hot Sauce
2 (8 ounce) packages of cream cheese
1 (16 ounce) bottle blue cheese salad dressing (or ranch)
8 ounce shredded cheddar, Monterey Jack or a combination

In a large saucepan, boil the chicken in water until cooked through (about 15 minutes), drain and shred with two forks. Preheat oven to 350 F. In a 13X9 inch baking pan, combine the shredded chicken meat with the hot sauce, spreading to form an even layer. In a large saucepan over medium heat, combine the cream cheese and blue cheese dressing, stirring until smooth and hot. Pour the mixture evenly over the chicken. Bake uncovered for 20 minutes, then sprinkle the shredded cheese over the top and bake uncovered for another 10 minutes. Let stand 10 minutes before serving. Serve with taco or corn chips.


I have used left over chicken meat from roasted chickens for this if I have some around and I have also cooked chicken breast in the oven rather than using the method above. Today I used left over turkey breast from the Christmas turkey dinner and it was great too.


Friday, December 26, 2008

Seasons Greetings to Everyone

Well, it's been a very busy season for everyone including us. I hope everyone had a great Christmas day! We are now on to boxing day here, so after a bit of post Christmas shopping, it should be a nice relaxing time from here on in. Ginger found her cozy spot under the tree as I was off cooking the turkey and Ike was off playing with new toys. I am super happy with all my Christmas gifts and looking forward to get my time to start playing with them too. Now that the house is well stocked with left overs I should be able to find the time. Wishing you all the best of the holidays:)
During the holidays especially I may find myself in need of a really quick and kid friendly supper option. This recipe was given to me by a swap-bot swapper (Adolpha) in a recipe post card swap. It was interested to try this recipe for my son......but after trying it.....I also liked it. You do need to be very sparing on the bottom (first macaroni layer) as those boxes of KD are not as big as they used to be. And I use an extra 1/4 cup of cheese and salsa over what is called for in the recipe below.

TACO BAKE
1 pkg (14oz) Macaroni and Cheese Dinner
1 lb. ground beef or turkey
1 pkg (1-1/4 oz) Taco Seasoning Mix
3/4 cup water
3/4 cup sour cream
1-1/2 cups shredded Cheddar cheese, divided
1 cup salsa

Preheat oven to 400F. Prepare macaroni dinner as directed on package. While macaroni cooks, brown meat, and drain any fat. Add taco seasoning mix and water to the meat and simmer 5 minutes. Stir sour cream into the prepared macaroni and cheese. Spoon 1/2 of the macaroni into a 8 inch square baking dish. Top with layers of the meat mixture, 1 cup of the cheese and the remaining macaroni and cheese dinner. Cover with foil and bake 15 minutes. Top with the salsa and remaining 1/2 cup of cheese. Bake, uncovered, for an additional 5 minutes or until the cheese is melted. You might want to make sure to use mild salsa if you are making this for your kids.
And just in case you don't have a packet of taco seasoning mix....like me.....Here's a recipe to make your own.

TACO SEASONING MIX

1/4 cup dried minced onion
2 Tbsp chili powder
2 tsp paprika
2 tsp crushed red pepper flakes
1-1/2 tsp dried oregano
1/2 tsp marjoram
1 Tbsp salt
1/4 tsp pepper
2 Tbsp cornstarch
1 Tbsp garlic powder
1 tsp ground cumin

Mix all together in a small bowl. Store in a sealed container. Use 2 Tbsp to equal 1 packet of taco seasoning mix. Makes enough for 6 packets.

Wednesday, December 24, 2008

Handmade Holidays Idea #9 Beaded Jewelry

Another Christmas Swap I sent out has been received. This one was a surprise pick based on your partners profile, and in a Christmas/Winter theme. Mine liked the colours turquoise and pink so this is what I ended up with. There is a flower shop that offers beading classes quite close to my home and still having last years Christmas gift certificate in my hands......I booked a private lesson on bracelet making. They let you pick out any beads you were interested in , let you pick a layout and showed you how to use the crimping beads and tools to string up the bracelet. I ended up adding the snowflake charm a few days later after I realized the swap was to be in a winter theme. I figure she can switch out the seasonal charms as the weather dictates. The longest portion of time was spent arranging the beads in a pleasing layout........and this is really a matter of personal choice as you can see. If I had been thinking more when I made this, I would have put in another split ring about a 1/2 inch in from the end to make the bracelet more adjustable since I had no idea how tiny or how big the wrist of the recipient was going to be.........but this was my first kick at the can. I can see that going down the road of beading could be a very large money pit. It's so easy to buy beads like candy hoping for the right time or project to use them. Much like fabric and yarn I guess. No need to contain my purchasing addiction to just fiber I suppose? Now I have some beads that I picked up at Michael's on sale just waiting to make something with.....Now if I only get some tools for Christmas.....I'll be all set.
Along with the bracelet, I sent a few other turquoise and pink things and this felt ornament as well.

Tuesday, December 23, 2008

Good Old Chocolate Sauce N Cake

What better to warm you up on a -35C day than a bowl of Chocolate Sauce N Cake. Perfect with a scoop of vanilla ice cream. Since at -35C I did not feel like making a batch of ice cream, I just picked up a tub of Cool Whip at the grocer. I cannot say for certain if there ever was a tub of Cool Whip in the freezer in my house while growing up....but I don't remember it at all. This is much better with a scoop of vanilla ice cream......IMHO.......but I was out voted:( Chances are good that if you have a container of cocoa powder in the cupboard....you already have everything you need to make this little number.......So give it a go.....If you like chocolate........You are bound to love this!
Chocolate Self Saucing Pudding Cake (10 minutes to make......45 minutes to bake) 

Cake 
1 cup flour 
2 tsp baking powder 
2 tbsp cocoa powder 
3/4 cup sugar 
1/2 cup milk, plus a bit extra 
1 tsp vanilla 
2 tbsp butter, melted 

Sauce 
3/4 cup brown sugar, packed 
1/4 cup cocoa powder 
1 3/4 cup hot water

 
Grease a 2 L ( 8cup) ovenproof dish and preheat oven to 350F (convection) or 375F for non-convection. Sift four, baking powder, cocoa powder, together in a medium bowl and add sugar, to make the cake batter. Add the 1/2 cup milk, vanilla and melted butter to the flour mixture and stir well with a whisk until smooth. I aways find the need to add about 3 Tbsp extra milk to be able to stir it easily. Batter will be a bit thick, like a brownie batter. Pour into prepared dish and set aside while making the sauce.
Combine the brown sugar, 1/4 cup cocoa powder, and hot water in a small bowl. Stir until all is dissolved. Slowly pour this liquid over the back of a spoon as you pour it on top of the cake batter which is already in the pan.
Bake for 40-50 minutes until the pudding (cake) is firm to the touch. You can make this in individual ramekins if you wanted to be a little more fancy. This has many times been my quick dessert when we have company for dinner and I have not planned a dessert since it is so fast to make up.......it can bake while you eat your dinner. Serve a generous scoop of cake and sauce and a scoop of vanilla ice cream to yield about 6 servings.

Monday, December 22, 2008

Handmade Holidays Idea #8 Amigurumi

How happy is he? This little guy just arrive a few days ago to his new home in the US. If you can crochet....(and even if you can't because I really can't) these are a really quick and cute gift idea. Of course if you're gifting these to a very small child you might want to sew on crocheted features rather than buttons etc....and like for the crocheted ball......it could be an excellent cat toy if stuffed with a little cat nip etc. There are plenty of free patterns available on the net for these like here and here and here and here. The one shown here was made from a purchased pattern. I had to modify it so much because it looked nothing like the cover photo that I'll have to make note of what I ended up doing. This was for a swap-bot mushroom stuffie swap I hosted and I have a feeling I'll be making quite a few more of these as there seem to be still quite a few no sends in my swap:(

Sunday, December 21, 2008

Ho Ho Hectic Holidays


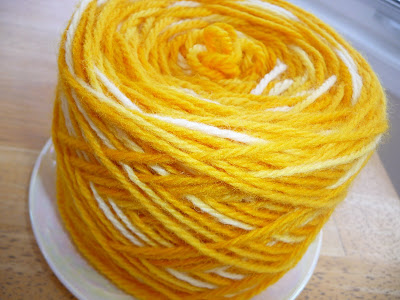
Wow, it's been very busy here as I'm sure it has been everywhere. Finally finished with all the Christmas parties, cookie exchanges, school parties, Christmas concerts, mailing parcels etc . Just a few odds and ends now to finish up. I just cannot seem to stop knitting these slipper socks....they're so quick, easy, (and forgiving due to the felting process). I had it on my list to make a yellow pair for a swap and had absolutely no luck in finding the right colour. So I ended up dying two balls of cream coloured Bernat merino into a mottled cream and yellow. I had always wanted to try koolaid dying, but at this time could not find any yellow coloured flavours........so the koolaid dyeing is still on my to do list...for someday! So....I bought a packet of yellow Rit dye and with some hints from a library book unrolled the ball and wound it into a skein. Once in a skein, I took plastic wrap cut about4-8 inches wide and wrapped them the yarn at random places. At either end of the plastic wrap covering the yarn, I tied the ends of the plastic wrap down with 6 inch lengths of acrylic yarn to hopefully stop the dye from transferring to the plastic covered areas. So it was kind of like tie dying. Then I dissolved the dye packet into hot simmering (not boiling) water and submerged the two skeins. I actually had to add more water to be able to submerge both skeins. After gently poking at the yarn to make sure it all submerged for 30 minutes, I removed them to the sink and rinsed them several times to remove excess dye. You needed to be careful not to agitate the yarn too much or it would start to felt. After squeezing the excess water out with an old towel, I let it set by the fire to dry until the next day.
Then I rolled it into a ball with a ball winder I just happened to have in the basement. I was very happy with the way the yarn patterned up with the cream and yellow, and even happier with the overall result after felting in the washing machine. I did have some concern that the yellow dye would get washed out in the hot water felting process in the washing machine.
There was a little loss of dye into the wash water, but no noticeable loss in the colour of the knitted item. Thank goodness. I had a spare packet of yellow dye just in case I needed to redye the slippers afterwards, but there was no need. They turned out a very happy yellow indeed. I also finished felting up the (purple/blue/turquoise)Lion Brand wool slippers I had shown here. And was much happier with the look of the colours after the felting was done.

Monday, December 8, 2008

Handmade Holidays Idea #7 Something for the Cat?

Well as an update to Non Commercial November..........I'm happy to say it went along quite well......until we got this cat. After a lot of debate over the work and responsibility involved in caring for a pet we came to the conclusion that we could fit a cat into the mix. Ike has really liked playing with the kitten so far. I'm sure much more, in fact, than the cat has enjoyed it. Well so far she has been highly entertaining for everyone. So this Christmas we are faced with the opportunity to share Christmas with a pet. While it seems that 'Ginger' has been quite happy to play with scrap yarn (and some that was not), a ball of tin foil, a bell on a string, and let's not even talk cat nip what are some proper cat toy options? So this really begs the question.....do I really need to even get something for the cat to play with?

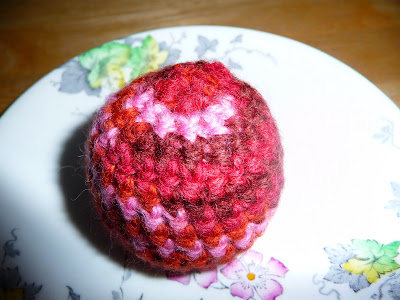
But....if you feel the need to make something like I did...here's an idea. A simple crocheted ball, much like a hakisack is a quick and fun toy. Make 3 or 4 and fill them with rice or pellets and you are good to juggle or even play hakisack. Fill them with light stuffing, some crinkley paper, and a bell and you have a safe baby toy. You may use any scrap yarn you have laying around. I had left over variegated red yarn from a knitted scarf project which was a nice colour for the holidays. I stuffed mine with some crinkley paper (wrappers from pop tarts), a bell, polyester stuffing, and some cat nip. It has no hanging or sewn on parts that might be detached and pose a choking hazard. With out any more fuss....here it is.


Crocheted Stuffed Ball

Supplies:
4 mm crochet hook
scrap yarn
polyester stuffing
bell
crinkley paper
darning needle


To start...chain 2
Rnd 1: Work 6 sc into the first chain. Place marker.
Rnd 2: Work 2 sc in each sc all the way around ( you now have 12 sts)Move marker.
Rnd 3: *work 2 sc into next st, sc into next st, repeat from * (you will now have 18 sts) Move Marker.
Rnd 4: *work 2 sc into next st, sc into next 2 st, repeat from * ( you will now have 24 sts)Move Marker.
Rnd 5-11: sc into each sc all the way around. Move marker.
Rnd 12: *sc2tog, sc into next 2 sts, repeat from * (you will now have 18 sts) Move Marker.
Stuff with desired stuffing.
Rnd 13: *sc2tog, sc into next st, repeat from * ( you will now have 12 sts) Move marker.
Rnd 14: sc2tog all the way around (you will now have 6 sts)
Break end of yarn and fasten off. With darning needle weave in yarn ends.


Note:

sc2tog= Insert hook into st and draw up loop. Insert hook into next st and draw up a second loop. Yarn over and draw through all three loops.