Showing posts with label Handmade Holidays. Show all posts

Wednesday, December 23, 2009

Make Salt Dough Ornaments With the Kids

Earlier this year Ike made a batch of salt dough ornaments to enter into the local fall fair. They turned out to be a perfect addition to the packages of homemade candy and baking mixes that we had prepared for family and friends. This year we made up Ginger Sparkle Cookies, Almond Roca, and Ike's Special Brownie Mix. I found these cute gift bags and the ornaments were perfect to finish them off. The salt dough ornaments are a nice easy craft for the kids to cut out and paint. They make a nice gift for teachers, and family too. Ike brought in one of these bags with a dozen Ginger Sparkles and his favourite ornament to gift to his teacher before Christmas break.

Salt Dough Recipe

2 cups flour
1 cup salt
3/4 cups water

Mix all ingredients and knead to make a pliable dough. If the dough is too sticky...add more flour. If it seems crumbly....add a few more drops or water. Roll dough to desired thickness and place on cookie sheet to bake. I found it helpful to put a layer of parchment under the cut outs. Push a wire loop into the top of the ornament to use for hanging. We took a paper clip and cut it into a U shape 1/2 inch long to make the hanging loop.

Dry in oven at 170F. Allow one hour or drying time per 1/4 inch thickness of dough.

Once cooled, paint and varnish.

Friday, December 18, 2009

Knitting To Go

Since the weather turned cold this season.....I've had the urge to knit. To knit something......well to knit anything. So after quite a bit of internet searching for just the right pattern......I found this cozy looking knit cowl pattern........ And decided that I would crank out copious amounts of this pattern. I liked that it was quick......because I have limited attention span for projects that might take too many days to finish, and I liked the overall squishy softness of it....plus with the cold weather we've been having....there have been quite a few days where I would have enjoyed one myself. So for this project, you can top it all off with fabulous practicality. Not too much better than that! You will require one ball of Lion Brand Wool Ease to make this project or any other soft to the touch bulky class yarn with 98m. I end up with less than 10m left in the ball. It's a very quick knit which you can easily finish in an evening of tv watching. The pattern is repetitive and easy enough to memorize after your first one.....so you may as well keep making more:) The perfect quick knit gift. I'll be knitting up a few more on our drive home for the holidays......Who know...you might be getting one.

Wednesday, December 16, 2009

You Really Can't go Wrong with Christmas Baking

Baking is always a reliable Christmas Gift. Almost everyone appreciates the time and hopefully quality of home baked goodness. Especially for those friends that would never make it for themselves. This year I ended up making a ridiculous number of Ginger Sparkle cookies for gifting and for donation to our school bake sale. They are generally well liked and even by kids which surprised me as I don't know if I would have liked them as a kid.........You know what.....I take that back......I must have liked them when I was a kid because I asked for the recipe from my friend Luanne's mother when I was growing up. I went through quite a few years of not making them and then a few years back now....I had a craving for them and made them again for the first time in a long time. Now it seems I make them through the fall and winter every year. The recipe is enormous in that it makes about 100 cookies. Well at least it does if you make them with a #60 scoop like I do. That makes each ball a little over 1 1/4 inches in diameter. I found the dough scoop to be an invaluable time saver when it come to cookie baking. Who has the time to roll 100 balls of dough???? So if you know someone who likes to bake....get them a few dough scoops.....it's a perfect stocking stuffer.
Another old reliable recipe for Christmas Gift giving is Almond Roca. I've made three batches so far this year and it is another recipe of universal yumminess. It's quick to make up and requires few ingredients.......most of which you probably have on hand. You can find the recipe in this post along with a few others.
Package it all up in a gift tin or on a pretty thrifted plate with paper doilies and cellophane and you are good to go. Easy Peasy!
Wishing you all a very sweet holiday:)

Saturday, December 5, 2009

Handmade Holiday Gift #2 Knit Cloth

Knitted Dish cloths can be the perfect quick make for the holidays. If you know of someone who likes to use them, there is an abundance of free patterns available over the internet. I was looking for a holiday themed pattern and liked this one so much that I broke down and purchased the pattern here. It was quick (I received the PDF file within a minute) and pretty inexpensive (only $2) After I got into the payment process, which was very simple, I discovered that the pattern was coming from my home town across the country and from a woman whose husband had cousins that I grew up going through grade school with. It is amazing how small the internet makes the world isn't it? If you can knit, even a bit, these knit up pretty quick (two lazy evenings watching tv) and even if you chose to purchase an online pattern like I did you could be knitting away in just a few moments.
If you have only 20 minutes to spare, you could make some of these swirl scrubbies in a festive green and white mix or an equally delicious looking red and white mix. I have listed the link for the swirl scrubbies pattern on knitability on the older post as well.

Saturday, April 4, 2009

Pretty Teacup Pin Cushions:)

Another swap completed! This time it was a pin cushion swap, and I had been interested to try a new pattern, and also to make another cup and saucer pincushion. About six years ago I made 3 cup and saucer pin cushions and gave them all away. As a result, I had no picture to post......that is until now! Since that time I have kept damaged cup and saucer sets rather than throwing them away just so that some day I would make some more cup and saucer pin cushions. Looks like today is the day! It is best to have a cup with a pattern on the outside of the cup as any pattern inside the cup will not be visible after assembly. The other pattern I wanted to try is cut and waiting for assembly....pictures to come soon...hopefully! When You least expect it, you might just find a cup and saucer set perfect for this project.....like this one....Don't you think it would make a gorgeous pincushion???

Tea Cup Pin Cushion

Tea Cup and Saucer
Coordinating fabric piece about 5" X 5" or about 13cm X 13 cm
Styrofoam ball about 3" or 8cm in diameter (should be a bit larger in diameter than your cup)
Ribbon, Gimp, buttons or charms to embellish the top
Super Fine Steel Wool
Hot glue gun with glue sticks
Glue suitable for gluing porcelain

Select a suitable cup and saucer and glue any repairs necessary so that the cup and saucer are sturdy. Choose a coordinating fabric that will compliment your cup and saucer. I like the way velvet looks for this purpose so that's what I use. (If you do not want to use a Styrofoam center you can stuff a circle of fabric lined with steel wool and fill it with poly batting, stitching it closed at the bottom) Cut your Styrofoam ball in half with an Exacto knife and trim the edges to fit into your cup. (You will only need one half of the Styrofoam ball for each pin Cushion...so keep the other half for another project) This time, the cup I chose to use had fairly straight sides so I needed to trim in some on the outside of the ball to make the Styrofoam fit nicely into the cup. My top ended up looking like a cone shape with a rounded or domed top and the point cut off at the bottom, or I suppose....like a cupcake! (Hopefully that helps to visualize it) To help with the shaping, I placed the cup upside down onto of the domed side of the Styrofoam ball and traced around the edge of the cup onto the ball. Keep in mind that once covered in fabric it will stand an eighth of an inch or so higher in the cup....trim more if necessary. Once the ball half fits nicely into your cup, cut a layer of steel wool large enough to cover the domed top. ( They say that the steel wool will help to sharpen your pins as you insert them) Lay your fabric down, centered over the steel wool covered dome. Wrap the edges around to meet at the bottom. Clip away any excess fabric. Stitch all four corners together nice and snug at the bottom. No one will ever see this part so don't worry about neatness. Then, pull snug and secure the fabric at the four spots midway between each of the corners.
Your pin cushion top is now ready to be decorated. Your embellishments may be glued in place or stitched depending on what they are. I prefer to stitch them in place if at all possible. You can use silk flowers and leaves, buttons, charms, lace, sequins, whatever works for you! The first embellishment to apply, is gimp, ribbon, rickrack, or a strand of beads. In this project I have used gimp which I positioned while holding the pin cushion top in the cup, and tacking the gimp trim in place with pins. I positioned only an inch or two at a time then tacked it in place with small stitches until I had made it all the way around. I could have also used fabric glue. I have used ribbon to make leaves and flowers for this project. I followed these directions from the book The Artful Ribbon making the standard posy, the ruffled posy, the five petal flower, and the boat leaf.
Once the embellishments are stitched in place, or glued as the case may be, you are ready to insert the cushion top into the cup. Decide which way you want the top to be positioned in the cup. Apply a bead of hot glue gun glue around the edge of the cushion top or inside the cup 1/4 inch down from the top edge, and plunk in your top. Usually less messy to apply the glue to the inside edge of the cup. Firmly press it down for a few seconds until the glue sets up. Now, all that is left to do is to glue the cup into the saucer. Since I have reservations about the goodness of hot glue to hold the cup and saucer together, I have used a silicone glue.

If I had found my two component epoxy kit, that would have been my preference. You may further embellish the cup handle or glue embellishments into the saucer to make it your own unique creation. This is an inexpensive, quick and easy project for a nice handmade gift to gift to someone who likes to sew.

Saturday, February 14, 2009

Easy Teachers Gift Idea


Here is the recipe for the bath bombs Ike made the other day. I first tried this recipe about 5 years ago and gave these to friends and relatives for Christmas. It is really easy and is a project that kids can do with supervision. It can take a bit of trial and error to get the amount of water right, and it is always best to error on the side of too little rather than too much.

Bath Bombs
(makes 6 muffin tin sized bath bombs)
1 1/2 cups Baking Soda (sodium bicarbonate)
1/2 cup citric acid
30 drops fragrance oil or essential oils
food colouring (optional)
water (in a fine misting spray bottle)
molds

Combine baking soda, and citric acid in a bowl and mix well. Add food colouring (if using) start with 6-8 drops and work in with gloved hands. You can do this in a large ziploc bag squeezing and working the colouring through the powder just as you would when colouring sugar. Do the same when adding the fragrance or essential oils. Once the mixture is homogeneous begin to spray water with a fine mist sprayer onto the surface of the powder. Stir the mixture with your hands to bring dry powder to the surface and spray some more. You will have sprayed enough when you can squeeze a small amount of the mixture in your hand and the powder stays together in a clump. Once this happens, DO NOT spray any more. Pack the mixture into molds and press in very hard. The more firmly they are packed, the better! They will be stronger the more firmly packed they are, and will be less likely to prematurely crumble. Release from molds onto waxed paper lined cookie sheets and let dry for 8 hours.

Note:
In my batch I used these ingredients, but you can use what ever you like.

10 drops red food colouring
15 drops patchouli essential oil
8 drops tangerine oil
10 drops lemon grass
the contents of one camomile tea bag

This combination smells like something you would find at lush and has a bright citrus and floral smell. The most time consuming part or the entire process is working the food colouring evenly through. You could likely do this in a blender, but I would NOT add the fragrance oils or essential oils in a blender unless that blender is solely used for craft purposed and not used for food preparation. You can make individual balls by hand (like making snow balls) but you must pack them very tight. You can buy actual bath bomb molds (ball type) at some hobby stores and I have seen them at times in Walmart. But muffin pans works very well, especially the cute seasonal pans Wilton makes. I have used the snowman muffin pans from Wilton which are very cute for Christmas time. They have cute heart pans for Valentines as well. The baking soda is very inexpensive when purchased at the bulk food section of the grocery store and they should also have citric acid available in the pharmacy section. If the citric acid is not available there most health food stores would have some, although I think the pharmacy might be less expensive. Essential oils are available at health food stores and sometimes in the pharmacy section of the grocery store in the homeopathic section. If you decide you really love making bath bombs and want to buy large quantities of essential oils you are better off looking on line.

As I eluded to earlier if you add too much water to the mix, it will become sticky and more difficult to work with. Also and most importantly it will probably stick in the molds. If this happens you can pack them into cookie cutters and you will more easily be able to push them through after packing them in hard. So err on the dry side, as long as it will clump when you squeeze it together, you are good to go. If you pack them in and they won't stay together, you can always dump it back into the bowl and spray more water.

Wednesday, December 24, 2008

Handmade Holidays Idea #9 Beaded Jewelry

Another Christmas Swap I sent out has been received. This one was a surprise pick based on your partners profile, and in a Christmas/Winter theme. Mine liked the colours turquoise and pink so this is what I ended up with. There is a flower shop that offers beading classes quite close to my home and still having last years Christmas gift certificate in my hands......I booked a private lesson on bracelet making. They let you pick out any beads you were interested in , let you pick a layout and showed you how to use the crimping beads and tools to string up the bracelet. I ended up adding the snowflake charm a few days later after I realized the swap was to be in a winter theme. I figure she can switch out the seasonal charms as the weather dictates. The longest portion of time was spent arranging the beads in a pleasing layout........and this is really a matter of personal choice as you can see. If I had been thinking more when I made this, I would have put in another split ring about a 1/2 inch in from the end to make the bracelet more adjustable since I had no idea how tiny or how big the wrist of the recipient was going to be.........but this was my first kick at the can. I can see that going down the road of beading could be a very large money pit. It's so easy to buy beads like candy hoping for the right time or project to use them. Much like fabric and yarn I guess. No need to contain my purchasing addiction to just fiber I suppose? Now I have some beads that I picked up at Michael's on sale just waiting to make something with.....Now if I only get some tools for Christmas.....I'll be all set.
Along with the bracelet, I sent a few other turquoise and pink things and this felt ornament as well.

Monday, December 22, 2008

Handmade Holidays Idea #8 Amigurumi

How happy is he? This little guy just arrive a few days ago to his new home in the US. If you can crochet....(and even if you can't because I really can't) these are a really quick and cute gift idea. Of course if you're gifting these to a very small child you might want to sew on crocheted features rather than buttons etc....and like for the crocheted ball......it could be an excellent cat toy if stuffed with a little cat nip etc. There are plenty of free patterns available on the net for these like here and here and here and here. The one shown here was made from a purchased pattern. I had to modify it so much because it looked nothing like the cover photo that I'll have to make note of what I ended up doing. This was for a swap-bot mushroom stuffie swap I hosted and I have a feeling I'll be making quite a few more of these as there seem to be still quite a few no sends in my swap:(

Monday, December 8, 2008

Handmade Holidays Idea #7 Something for the Cat?

Well as an update to Non Commercial November..........I'm happy to say it went along quite well......until we got this cat. After a lot of debate over the work and responsibility involved in caring for a pet we came to the conclusion that we could fit a cat into the mix. Ike has really liked playing with the kitten so far. I'm sure much more, in fact, than the cat has enjoyed it. Well so far she has been highly entertaining for everyone. So this Christmas we are faced with the opportunity to share Christmas with a pet. While it seems that 'Ginger' has been quite happy to play with scrap yarn (and some that was not), a ball of tin foil, a bell on a string, and let's not even talk cat nip what are some proper cat toy options? So this really begs the question.....do I really need to even get something for the cat to play with?

But....if you feel the need to make something like I did...here's an idea. A simple crocheted ball, much like a hakisack is a quick and fun toy. Make 3 or 4 and fill them with rice or pellets and you are good to juggle or even play hakisack. Fill them with light stuffing, some crinkley paper, and a bell and you have a safe baby toy. You may use any scrap yarn you have laying around. I had left over variegated red yarn from a knitted scarf project which was a nice colour for the holidays. I stuffed mine with some crinkley paper (wrappers from pop tarts), a bell, polyester stuffing, and some cat nip. It has no hanging or sewn on parts that might be detached and pose a choking hazard. With out any more fuss....here it is.


Crocheted Stuffed Ball

Supplies:
4 mm crochet hook
scrap yarn
polyester stuffing
bell
crinkley paper
darning needle


To start...chain 2
Rnd 1: Work 6 sc into the first chain. Place marker.
Rnd 2: Work 2 sc in each sc all the way around ( you now have 12 sts)Move marker.
Rnd 3: *work 2 sc into next st, sc into next st, repeat from * (you will now have 18 sts) Move Marker.
Rnd 4: *work 2 sc into next st, sc into next 2 st, repeat from * ( you will now have 24 sts)Move Marker.
Rnd 5-11: sc into each sc all the way around. Move marker.
Rnd 12: *sc2tog, sc into next 2 sts, repeat from * (you will now have 18 sts) Move Marker.
Stuff with desired stuffing.
Rnd 13: *sc2tog, sc into next st, repeat from * ( you will now have 12 sts) Move marker.
Rnd 14: sc2tog all the way around (you will now have 6 sts)
Break end of yarn and fasten off. With darning needle weave in yarn ends.


Note:

sc2tog= Insert hook into st and draw up loop. Insert hook into next st and draw up a second loop. Yarn over and draw through all three loops.


Thursday, November 27, 2008

Handmade Holidays Idea #6 Everybody Loves Candy

Candy is always a perennial favourite. It can be quick, easy, and fun too! Here are some of our standby candy recipes that we commonly make for the holidays. Funny, that I really never make these recipes throughout the rest of the year. There are lots of nice packaging options available at this time of year. The traditional Chinese take out container has to be one of my favourites!

Sponge Toffee

1 cup sugar
1 cup dark corn syrup
1 tbsp white vinegar
1 tbsp baking soda, sifted

Line an 8 or 9 inch square cake pan with foil. Generously butter the foil. Combine the sugar, corn syrup and vinegar in a heavy deep sauce pan. Stir over medium heat until the sugar dissolves. Continue to heat without stirring until thermometer reads 300F, swirling the pan occasionally. (about 18 minutes) Remove from heat and immediately add the baking powder and stir to combine well. Quickly pour into prepared pan. Cool completely. Lift out of pan using the foil edges. Cut or break into large pieces. Store in an air tight container. Small bite sized pieces are delicious dipped in chocolate coating. This is a really fun recipe to make with kids as it really foams up when you add the baking soda. But remember that the candy is hot and be careful not to get burned!

Almond Roca

1 cup butter
1 cup sugar
3 tbsp water
1 tsp light corn syrup
1 cup finely toasted almonds
1 cup milk chocolate chips

Melt butter in a medium sauce pan. Add in the sugar, water, and corn syrup. When the sugar dissolves and the mixture begins to boil raise the heat and bring to 290 F on a candy thermometer. Quickly stir in 1/2 cup chopped toasted almonds. Immediately pour onto a baking sheet lined with foil. After 2-3 minutes sprinkle the top of the candy with the chocolate chips and let them soften for a few minutes. Once softened, spread them in a smooth layer over the candy. Then sprinkle with remaining chopped nuts. When the chocolate has hardened, crack candy into pieces and store in a covered container.

Clodhoppers Candy

3 cups white chocolate melt wafers
2-3 cups cashews chopped
2 cups golden grahams cereal crumbled

Melt wafers in a double boiler. Crush cereal in a zip loc type bag until pieces are slightly smaller than 1/4 inch. For the cashews I usually buy a tin of broken cashew bits and further process them to a little smaller size. Not too much though. Add nuts and cereal to the melted wafers and stir to coat. Pour out onto cookie sheet and chill to set the chocolate. Once hard, break into serving sized pieces and store in a covered container. This recipe is also good with milk chocolate wafers substituted for the white melt wafers. Dried cranberries is also a nice addition.

Tiger Butter Fudge

1 lb of white chocolate
1 lb milk chocolate
3/4 cup peanut butter

Chop chocolates and set to melt in separate bowls. To the melted white chocolate add the peanut butter and stir until smooth. Stir the milk chocolate until smooth.Line a 8 X 12 inch pan with waxed paper. Pour in the milk chocolate. Pour in the white chocolate and peanut butter mixture randomly over the top of the milk chocolate layer. With tip of a knife, drag it through the surface of the candy making a swirling marbled pattern over the entire surface. Be careful not to get carried away swirling or you will mix it in too much and not keep a marbled appearance. Chill until firm. Slice at room temperature.

Saturday, November 22, 2008

Handmade Holidays Idea #5 Mixes


Handmade Holiday ideas continue with mixes. Over the years we have tried a few of these. We have tried drink mixes, brownie mixes, popcorn seasoning, dip mixes and even dog biscuit mixes. A quick google search will get you a list of mix options in no time at all.......but here are some recipes that we have tried over the years.

Drink Mixes

Hot Cocoa Mix

2 cups powdered milk

1 cup sugar or (splenda sugar substitute)

3/4 cup cocoa

1/2 cup non dairy coffee creamer

Add all ingredients together in a food processor and process until mixture is powdered.

*To make raspberry cocoa, replace 1/2 of the sugar with raspberry powdered drink crystals.

*To make mint cocoa, add 6 hard peppermint candies and process. Use sugar free if you are making sugar free cocoa mix. To serve, add 2 heaping tbsp of mix to a cup of hot water.


Toffee Coffee Mix

1 cup instant coffee

2 cups milk powder

1 cup powdered non dairy creamer

1/3 cup cocoa

1 cup brown sugar

1/2 cup white sugar

1/4 cup instant butterscotch pudding mix


Mix all together in food processor until finely powdered. To serve, add 2-3 heaping tsp to a mug and fill with boiling water.


Vanilla Spice Latte

1/2 cup instant coffee

2/3 cup sugar

1/2 cup powdered milk

1/4 cup dry non dairy creamer

1 tsp cinnamon

1/4 cup vanilla instant pudding mix


Mix all together in food processor until finely powdered. To serve, add 2-3 heaping tsp to a mug and fill with boiling water.


Dip Mixes

Garden Herb Dip


1T dried parsley

1 tsp dried dill

1 tsp granulated garlic

1/2 tsp dried rosemary

1/4 tsp dried sage

2 T dehydrated onion

3-4 T dehydrated carrot, celery, scallions


Mix all together and store in Ziploc bag until needed. To make, use 3-4 T of dip mix and mix into 1/2 cup mayonnaise and 1/2 cup sour cream or yogurt. Mix well and let sit in refrigerator for 2 hours before serving. If you cannot find dehydrated carrots, celery and scallions......you can make your own by mincing vegetables and placing them on a baking sheet in a 250 F oven for 45 minutes. Watch them carefully to make sure they dry completely but do not brown.

Ranch Dip Mix

1 1/2 T dried parsley

1 1/2 tsp dried chives

3/4 tsp dried tarragon

1 1/2 tsp lemon pepper

1 T salt

3/4 tsp oregano

1 1/2 tsp garlic powder

Mix all together in a medium bowl and keep in ziploc bag until needed. For dressing, whisk 1 tsp dip mix together with 1/2 cup mayonnaise and 1/2 cup butter milk. Refrigerate 1 hour before serving. For a dip, Combine 2 tbsp mix with 1 cup mayonnaise and 1 cup sour cream or lowfat yogurt. Refrigerate 2 hour before serving.


Special Brownie Mix

3/4 cup flour

1/2 tsp baking powder

1/2 tsp salt

1/2 cup cocoa powder

3/4 cup sugar

1/2 cup brown sugar

1/2 cup white baking chips

3/4 cups chopped walnuts

1 50 mL bottle of liqueur like Baileys or Grand Marnier

Layer all ingredients in a one quart jar and screw lid on. Attach liqueur bottle with ribbon. Include directions.....

Preheat oven to 350 F. Grease bottom of 8inch or 9 inch square pan. Melt 1/2 cup butter or margarine. Beat melted butter, two eggs, and the liqueur in a medium bowl until blended. If you are not using the liqueur substitute it with 1/4 cup water. Stir in brownie mix. Spread batter in prepared pan and bake 30-35 minutes for 8 inch pan and 25-30 minutes if using a 9 inch pan or until toothpick inserted in center comes out clean. Cool and slice into 16 squares


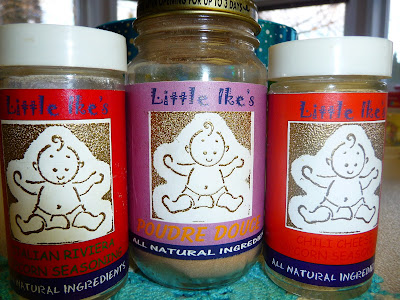
Popcorn Seasonings

Chili Cheese

1 1/2 tsp chili powder

1/3 cup powdered cheddar cheese

1 tsp garlic salt

1/8 tsp cayenne pepper

Combine all in a small bowl. Spoon into small jars with tight fitting lid. Makes 1/3 cup.


Mexican Blend

1 1/4 oz (one envelope) taco seasoning mix

1 tsp dried oregano

1/2 tsp basil

3/4 tsp garlic powder


Combine all in a small bowl. Spoon into small jars with tight fitting lid. Makes 1/3 cup.


Mediterranean Blend

1 tsp chili powder

1 1/2 0z ( one envelope) of spaghetti sauce mix

1 tsp sugar

1/2 tsp garlic salt

1/4 tsp cayenne pepper

Combine all in a small bowl. Spoon into small jars with tight fitting lid. Makes 1/3 cup.

Dog Biscuits

1 3/4 cups flour

1 cup whole wheat flour

1/2 cup rye flour

3/4 cup corn flour

3/4 cup bran

2 T kelp

2 T wheat germ

1 cup corn meal

2 T garlic powder

1 T parsley

1 1/2 tsp rosemary

1 T beef soup base powder

2 T skim milk powder

2 T instant yeast

Mix all together. Divide dry mixture into two equal portions. To prepare biscuits, add 1 cup tomato or vegetable juice to one portion of dry ingredients to make a stiff dough. Add an additional 2 T of water if necessary. Roll out dough, cut shapes and bake in a 300 F oven for 1 hour. Turn off oven and leave in oven to dry.


As with all handmade gifts, the trick is in finding the right packaging or presentation. The coffee and Hot Chocolate mixes fit nicely into empty tins from General Mills 'Internationals Coffee'. I just printed up some paper labels to wrap over the sides of the tins. If your house is tidier than mine because you actually throw things out, you may not have any empty coffee tins laying about.......in which case a quick trip to the paint store may be in order. You can purchase empty paint tins there in a size you feel is appropriate and than print up your own custom label or decorate the tin in a scrapbook style.

For the dip mixes, I found the tall size baby food jar worked very well, and again if you don't have these floating around your house, there is probably a new mom in the neighbourhood who would love to part with some. For baby food jars, I again printed up a label to wrap around the jar and painted the lid with acrylic paints in a coordinating colour.

The brownies presented a problem for me as they are meant to be packaged in a canning jar, and I really was not overly fond of the country look associated with this packaging. I ended up packaging the brownie mix in clear cellophane bags from the dollar store, and then putting them inside a brown paper lunch bag with a personalized label glued to front and back with instructions on them. To close, I folded down the top of the bag inch, then again and punched two holes with a hole punch through the folded top about one inch apart. Run a piece of ribbon through both holes and tie in the front with a gift tag and you are done.

Popcorn seasonings were quite easy as you can purchase empty spice bottles from the bulk section of the grocery store or from your dollar store quite easily. Again a simple label from the printer and you're done. All my label making has been done with regular white paper which I cut to size and wrap the container with about a 1 cm overlap. Just enough to glue it in place. If you have scrap booking supplies at your disposal, two way tape will work well too.

The dog biscuit mix was packaged in the same fashion as the brownie mix with the addition of a bone shaped cookie cutter which I tied to the top of the bag closure.

Well, there are a few more ideas for you. Mixes are generally quite quick to prepare especially in larger numbers as you get a bit of an assembly line going.


Thursday, November 20, 2008

Handmade Holidays Gift Idea #4 Knit & Felt Slippers


Handmade Holiday Gift # 4

This one requires some very basic knitting skills. But only very minimal ones as the felting process will hide any lack of knitting skill. I found this pattern at knitty.com and found that they could be easily knit up in just a few evenings......and of course the felting is a bit addictive. You'll need one ball of Bernat Lana or Patons Classic Merino wool or two balls of Noro Kuyreon. Any wool which has a high percentage wool (at least 85%) will do. If you catch them on sale, all the better. The Noro Kuryeon has some absolutely beautiful colourways, but is more expensive and does not felt up quite as quickly nor as thick as the Patons or the Bernat. If you are looking to do this on the cheap....you are better off with the Bernat, Patons, or Lion Wool. Those, you can get on sale at Michaels with a 50% off coupon or at least on sale most days. Here in Canada that means a cost of probably about $3.50 to $4.00. Which is really not too bad. If you go for the Kuryeon it will be more like $20.00 as it is tough to catch on sale. The Patons Classic is now available in variegated shades so we'll soon see how those turn out. I have a set on my needles right now. Another fun option is to purchase the off white wool yarn and give your hand a try at kool-aid dyeing. This is another thing on my "to do" list.......One of these days....Maybe pretty soon??? Anyway, they do knit up quite quickly and I am told wear very well. So click here to go Knitty.com and get yourself a free pattern and make yourself (or someone else) some Fuzzy Feet.....Good Luck:)


Sunday, November 16, 2008

Idea #3 Felt Covered Book

Back again with Handmade Holiday gift idea #3 for you. Here's one that's quick and easy and cute too....I think. I used to have tonnes of these free 4X6 picture albums. The kind the developing shops used to give away free with each roll of film developing. (Remember film developing???) They are usually quite junky looking so I didn't mind covering them up. What I found was that you can make a quick cover for one with felt quite easily. Felt is fun to work with because you can leave the edges unfinished as it will not fray and it is really very inexpensive. If you can find wool felt, that is even better. It will cost a little more, but your project will be more sturdy. You could also do this project with ultra suede if you are lucky enough to be able to get some and this would be the most sturdy option but also a little more expensive. I just happen to have a pile of acrylic felt that needs to be used up, so that's what I'm using today. I also happened to find a stash of these photo albums for 19 cent each at my local liquidation world, so I stocked up on them. Once you are finished with this project, you can use it as a photo album if you like, but I've found that I like to fill them with 4X6 recipe cards and give them away as little recipe books. It works out pretty well as each recipe is inside the little plastic sleeve and is protected from spills and splashes etc. You could also use them like a mini scrap album too.

So to start with...you'll need a cheapy little photo album like this one, two sheets of felt for the cover, some felt scraps, some embroidery floss for embellishment and a needle.......You could try your local dollar store, Walmart or Michaels for all of these supplies.

Then, open it up and take it's measurement. Mine measured 9 1/2 inches by 6 3/8 inches when open. The fabric needed to cover this book will have to be slightly larger to allow for seam allowances. So...... add 1 inch to the shorter side, and 1 1/4 inches to the longer side. I added a little extra ease (1/4 inch extra) to the longer side since this side will need to bend around the spine of the book and you don't want it to be tight. This means in my case I needed to cut my felt out to be 10 3/4 inches by 7 3/8 inches. You will also need to cut two pieces of matching felt for the inside flaps. Cut these to be the same width as your cover piece, and tall enough to cover a good way up the page. In my case this was 2 pieces cut out 3 1/2 inches by 7 3/8 inches. You can decorate the front of your book in any way you see fit. Keep in mind where the cover will be folded, and arrange your design accordingly. I have chosen to embellish the book front with blanket stitched shapes and some embroidery like this.......I did all my embroidery with 3 strands of embroidery floss.


Once you are satisfied with your cover design, then you can machine sew the inside flap pieces to the ends of your cover piece using a 3/8 inch seam allowance along the three outside edges of each flap, wrong sides together like this.......

To finish, if you'd like, clip along the edges with pinking shears and you are done! If you are opposed to machine sewing, you could sew the flaps on using a blanket stitch with a coordinating embroidery thread. This would have a more country look which is cute too, and would look very similar to the wool felt needle books I made here. Now you have a felt covered book ready to fill with photos, recipes or what ever you might like to gift. My project cost for materials was under $1 and it took a little bit of time depending on how much you wanted to embellish the cover. I spent about an hour watching TV and embellishing this cover. This makes a nice little gift filled will family recipes for those kids leaving the house or newlyweds starting out or anyone who just likes to cook. Of course you could use it as a photo album or fill it with craft pattern instructions written on 4X6 cards, or instead of starting with a photo album, you could start out with a blank journal.....you see.......lots of possibilities:)

Wednesday, November 5, 2008

Handmade Holidays Idea #2 Baked Goodness


Now who doesn't love home baked cookies??? Most people like to have home baking around for the holidays, but not everyone likes to bake themselves. So if you don't mind baking, why not make someones day with some serious home baked goodness. Here's a recipe that is perfect for the holiday season. It's easy, it keeps well, looks beautiful, and is just right for the Christmas Season. Of course it's all in the presentation, but do make it a tightly sealed container as these are a delicious chewy cookie and you want them to stay that way. I had not made this recipe in over 25 years, and today I made them.......and they were as good as I remembered and I'm so glad I made them again. I think you might be too.......Go on...you know you waaannnnaa.


Ginger Sparkles

Ingredients
1 1/2 cups butter
2 cups sugar
2 eggs
1 cup molasses
1 teaspoon vanilla
4 1/2 cups flour
4 teaspoons baking soda
2 teaspoons baking powder
1 teaspoon salt
2 teaspoons cinnamon
1 teaspoon ground cloves
1 teaspoon ground ginger


In a large bowl cream the butter and sugar. Add eggs, molasses, and vanilla and mix well. Stir in baking soda, baking powder, salt, cinnamon, cloves, and ginger. Add flour and mix to incorporate. Roll into 1 inch balls, then roll in a small dish of white sugar to coat the ball of dough. Place on cookie sheet and bake 8-10 minutes at 350 F. No need to flatten the dough balls as they will spread out as they bake. The recipe makes a whole bunch....over 80 for the one inch balls I made and is a total snap in a stand mixer.

Tuesday, November 4, 2008

Non-Commercial November

I had a conversation with a friend a few weeks ago about commercialism in North America. It seems that in North America, we do a lot of unnecessary shopping, in comparison to other developed countries. This conclusion was reached after a move to the other side of the world by my friend, and by what she noticed while settling into her new neighbourhood. The number of kids toys that her family owned was well in excess of that of the kids in their new neighbourhood. It seems that where she now lives, children are pretty much only receive toys at Christmas and Birthdays. And the comment was made that there is not nearly as much window shopping or hanging out at the mall as there is in North America. Now, at first I thought she was not thinking clearly with too much blood flow to her head.....I mean she is living upside down now....it could happen. But as I thought about it.....I could not argue that my child alone has enough toys for 4 kids... mostly because of a parent who is a gadget freak. I'm sure in general this happens in North America for the most part just because we can. I'll admit that I have a bad habit of buying things that I don't need immediately. I tend to squirrel things away as I find them on sale. This tactic is OK if you can keep track of your inventory, but really falls apart if you don't keep on top of it.
So in light of this new realization that I purchase too much junk, I've decided to have a non-commercial November. For the month of November, I'll be trying to not purchase anything other than the basics. No new toys for Ike, no hot crafting supplies on clearance. I'm even going to try and use up all the stuff deep down in the bottom of my freezer!
Your probably thinking......"no spending in November with Christmas coming up???"......that's just crazy isn't it! So it I'll be posting my Handmade gift giving suggestions through the month of November to help give you some less expensive options than buying gifts from the store.
To start out with, how about a homemade Salt Scrub? I love these and find no difference in what you buy in the store vs what you can make at home. In fact, I made some last night. This one is so easy it's an ideal gift for kids to make for mom or teacher. You just might want to supervise the addition of the essential oils.


Handmade Gift Idea #1

Salt & Sugar Scrub

1 cup Sea Salt
1/2 cup brown sugar
1 cup grape seed oil
1 tsp glycerin
10 drops essential oil or fragrance oil

Mix all together to combine. You can start with less than the recommend amount of oil and add all or more if you feel it's necessary. I've used sugar scrubs before and have a preference for the salt scrub as I think the sugar scrubs dissolve much too quickly. You may want to pulse the sea salt a little in a food processor to reduce the particle size a little bit. Chunks that are too big will just fall away from your hand when you go to use them anyway. You can use coarse pickling salt if you happen to have some of that, and substituting in some Epsom salts will work as well.

The batch I made last night is scented with peppermint for the holidays, and tinted green with some spirulina powder that I had in the cupboard. Once you've finished the mixing then you just need to find a pretty container to put it in...... Something with a well fitting lid so the oil won't leak out. A nice little gift tag, and a bit of ribbon and you're done. Perfect for girlfriends or teachers gifts. Your cost to make this is about $2, compared to $8 for the store bought version.

What kinds of things has your family tried for a Handmade Holiday Gift?? Leave a comment......I'd love to hear your ideas.