Showing posts with label Daring Cooks Challenge. Show all posts

Saturday, May 14, 2011

A First Try at Gumbo

I have honestly never even thought of making gumbo.  But as it happens.....Our May hostess, Denise, of There’s a Newf in My Soup!, challenged The Daring Cooks to make Gumbo! She provided us with all the recipes we’d need, from creole spices, homemade stock, and Louisiana white rice, to Drew’s Chicken & Smoked Sausage Gumbo and Seafood Gumbo from My New Orleans: The Cookbook, by John Besh.
As I read through the instructions....I mean the recipe..... I was intrigued by the process.  I didn't want to have to go and buy a whole bunch of ingredients so I tried to work for the most part with what I had on hand.  I know I have seen andouille sausage in town here....but I did not feel like going 30 minutes clear across town to 'maybe' find it......So I substituted for a farmers smoked sausage.  I had chicken breast and shrimp in the freezer and my neighbourhood grocery store had frozen okra so my plan was taking shape.  I used an Emeril recipe off the internet and scaled it down a little bit as I was not sure how this was going to be received.  In the end I think it was pretty good!  Here is what I did.
Smoked Sausage, Chicken Breast and Shrimp Gumbo
1 1/4 cup flour
1 cup vegetable oil
1 1/3 cup onion diced
2/3 cup celery diced
2/3 cup bell peppers diced
2 tsp garlic minced
1 1/2 L (quarts) of chicken broth
500g smoked sausage, sliced 1/4 inch thick, browned and drained
1 1/2 cups chopped okra fresh or frozen
2 bay leaves
2 tsp worcestershire sauce
dash hot sauce
1 tsp salt
1/2 tsp black pepper
1/8 tsp cayenne pepper
500g peeled raw shrimp
300g chicken breast, sliced
1 tsp Emeril Essence seasoning
1/4 cup onion greens
2 tbsp dried parsley
1 tsp thyme
 You will want to dice all your vegetables, brown the sausage, peel the shrimp, and slice the chicken before you start.  I cut the chicken breast in pieces the size of your thumb so they would cook in roughly the same time as the shrimp.  Season the peeled shrimp and sliced chicken breast with the 1 tsp of Emeril Essence and set aside in the fridge until you need it.
Start  making a roux with the flour and oil.  Do this in a large heavy bottom pan. Stir the flour and oil constantly over medium heat with a whisk to make sure the flour does not burn.  You must continue to stir the whole time you are making the roux...this might take a while. You want to slowly develop the colour of the roux until it is a medium brown colour.  Like a dark peanut butter colour.  This took me about 45 minutes.
Once the roux is the right colour, add the diced vegetables and continue to stir scraping the bottom of the pot so the roux does not burn.  Cook this way for another 5-10 minutes.  The roux will darken a bit.  Add minced garlic and stir another minute.  Slowly add the chicken broth while stirring with a whisk to ensure not to leave any lumps behind.  Add browned sausages, okra, bay leaves, worcester sauce, hot sauce salt and pepper and cayenne pepper.  Let simmer for 50 minutes. 
Add chicken then 2 minutes later add the shrimp.  Cook about 5 minutes or until the chicken pieces and shrimp are opaque when sliced through.  Season with parsley, thyme and onion greens.  Serve over steamed rice.

Emeril Essence Spice Mix
2 1/2 parts paprika
2 parts salt
2 parts garlic powder
1 part black pepper
1 part onion powder
1 part cayenne
1 part oregano
1 part thyme
Mix all and store remainder in a sealed container.

Thursday, April 14, 2011

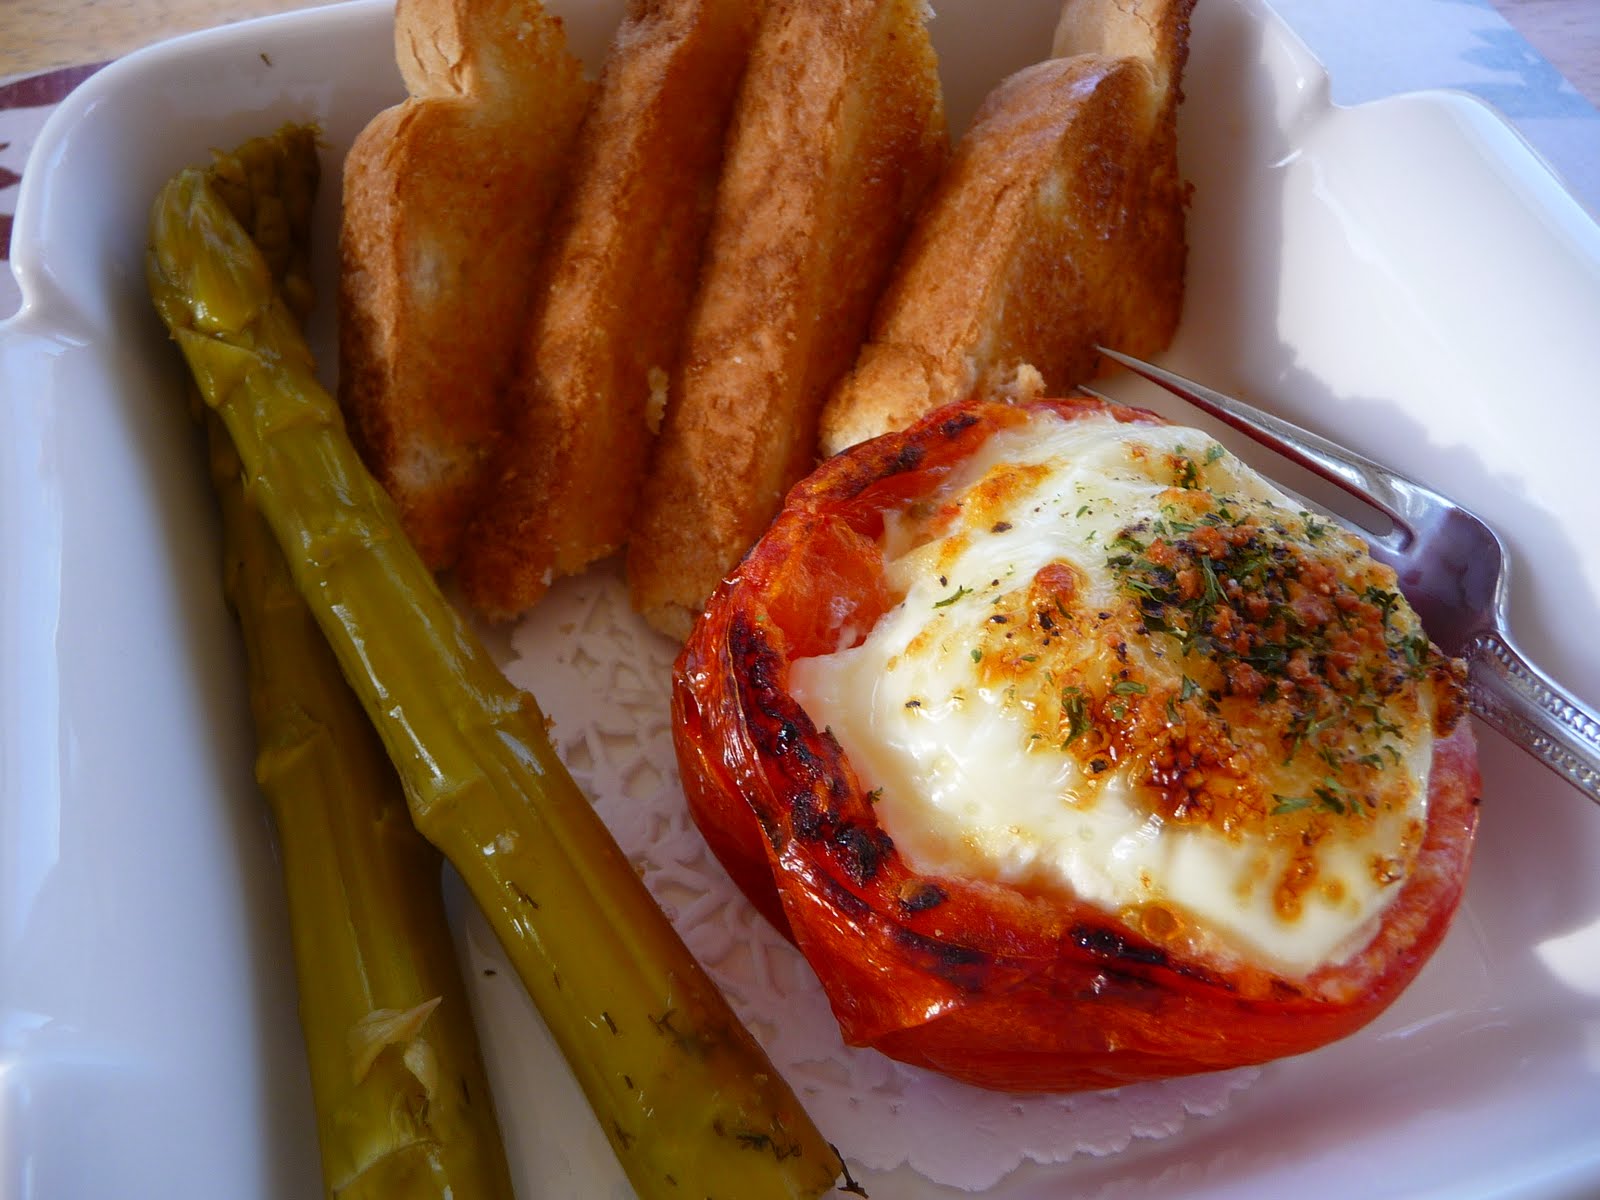
Baked Eggs in Tomato

After a lot of thought about this month's challenge.......I settled on this recipe for baked eggs in tomato shells.  It is easy, straight forward, a little bit fun and kid friendly too.
Renata of Testado, Provado & Aprovado! was our Daring Cooks’ April 2011 hostess. Renata challenged us to think “outside the plate” and create our own edible containers! Prizes are being awarded to the most creative edible container and filling, so vote on your favorite from April 17th to May 16th at http://thedaringkitchen.com!

Baked Eggs in Tomatoes
4 large eggs
4 medium tomatoes
1/4 cup grated cheese
2 Tbsp crumbled bacon
pinch of parsley
pinch of salt and pepper

Slice the tops off of the tomatoes and scoop out and discard the insides.  Divide the grated cheese and bacon between each tomato and sprinkle inside.  Crack an egg into each tomato and top with parsley and salt and pepper.  Set in a shallow pan and bake at 425F for 20-35 minutes depending on how set you want the yolk to be.

Tuesday, December 14, 2010

A Daring Eggs Benedict

This month when the Daring Cook's proposed making Eggs Benedict.....I was pretty excited.  It was an opportunity to try poaching eggs directly in water which is something I've never before bothered to do.....and to make Hollandaise Sauce from scratch....something else I had never before bothered to do.  I can tell you that I was even more pleased with the results than ever I thought possible.  It was delicious.  And the most difficult part of the whole process was not licking the Hollandaise bowl clean when it was all done.  I did decrease the Hollandaise recipe a bit using two instead of three egg yolks and it was the perfect amount to make 5 eggs.  The recommended water temperature for poaching was 190F and again my handy Thermapen saved the day......I highly recommend them.  While this may have been one of the simplest challenges....it may well be my most favourite as it had me try something I never had.....it was easier than I'd thought.....and it was far more delicious than I ever imagined.  So....I'll be trying this one again and again.
Jenn and Jill have challenged The Daring Cooks to learn to perfect the technique of poaching an egg. They chose Eggs Benedict recipe from Alton Brown, Oeufs en Meurette from Cooking with Wine by Anne Willan, and Homemade Sundried Tomato & Pine Nut Seitan Sausages (poached) courtesy of Trudy of Veggie num num.

Eggs Benedict
Ingredients
4 eggs (size is your choice)
2 English muffins*
4 slices of Canadian bacon/back bacon (or plain bacon if you prefer)
Chives, for garnish
Splash of vinegar (for poaching)
For the hollandaise (makes 1.5 cups):
3 large egg yolks
1 tsp. (5 ml) water
¼ tsp. (1 ¼ ml/1½ g) sugar
12 Tbl. (170 g/6 oz.) unsalted butter, chilled and cut in small pieces º
½ tsp. (2 ½ ml/3 g) kosher salt
2 tsp. (10 ml) freshly squeezed lemon juice
Pinch cayenne pepper (optional)
* for gluten free, use gluten free English muffins or bread of your choice
º for dairy free, use a dairy free margarine
Directions:
1. Fill a medium saucepan halfway with water and bring to a simmer.
2. Cut the chilled butter into small pieces and set aside.
3. Whisk egg yolks and 1 tsp. (5 ml) water in a mixing bowl large enough to sit on the saucepan without touching the water (or in top portion of a double boiler). Whisk for 1–2 minutes, until egg yolks lighten. Add the sugar and whisk 30 seconds more.
4. Place bowl on saucepan over simmering water and whisk steadily 3–5 minutes (it only took about 3 for me) until the yolks thicken to coat the back of a spoon.
5. Remove from heat (but let the water continue to simmer) and whisk in the butter, 1 piece at a time. Move the bowl to the pan again as needed to melt the butter, making sure to whisk constantly.
6. Once all the butter is incorporated, remove from heat and whisk in the salt, lemon juice, and cayenne pepper (if using).
7. Keep the hollandaise warm while you poach your eggs in a thermos, carafe, or bowl that you’ve preheated with warm water.
8. If the water simmering in your pan has gotten too low, add enough so that you have 2–3 inches of water and bring back to a simmer.
9. Add salt and a splash of vinegar (any kind will do). I added about a tablespoon of vinegar to my small saucepan (about 3 cups of water/720 ml of water), but you may need more if you’re using a larger pan with more water.
10. Crack eggs directly into the very gently simmering water (or crack first into a bowl and gently drop into the water), making sure they’re separated. Cook for 3 minutes for a viscous but still runny yolk.
11. While waiting for the eggs, quickly fry the Canadian/back bacon and toast your English muffin.
12. Top each half of English muffin with a piece of bacon. Remove the eggs with a slotted spoon, draining well, and place on top of the bacon. Top with hollandaise and chopped chives, and enjoy!

Sunday, November 14, 2010

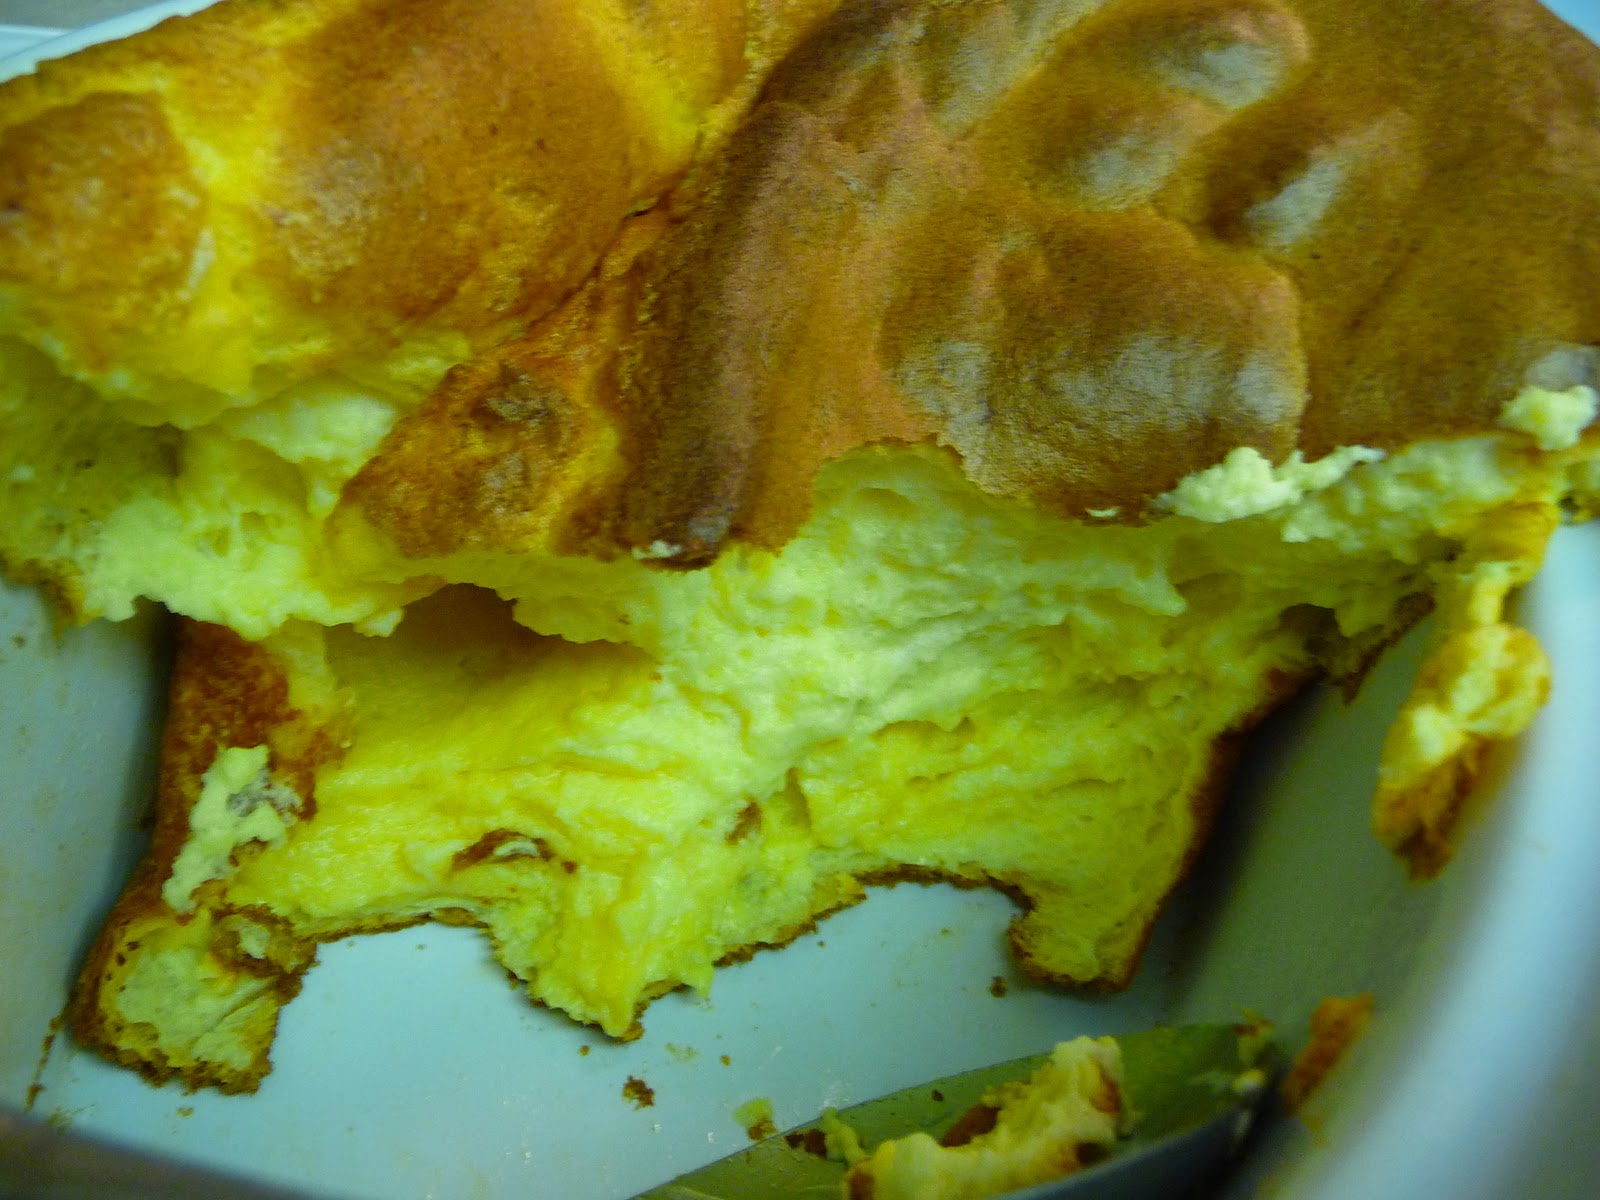
Back with a Daring Cheese Souffle

I was a little sad to miss out on last months Daring Cook's and Baker's challenge...but things were really just too hectic to do them.  But I am back at it with this month's daring cooks Challenge.  There is lots on the go here as always seems to be the case....it's actually a very busy day of baking here as I will post about later.  But for now...here is the November Cook's Challenge.
Dave and Linda from Monkeyshines in the Kitchen chose Soufflés as our November 2010 Daring Cooks’ Challenge! Dave and Linda provided two of their own delicious recipes plus a sinfully decadent chocolate soufflé recipe adapted from Gordon Ramsay’s recipe found at the BBC Good Food website.

Now I was pretty excited to learn that the November Challenge was to make a souffle.  This is my first and hopefully not my last attempt at a souffle.  It was the perfect accompaniment for a lunch with the early winter weather we have been having. I  wavered back and forth on what kind of souffle to make....and in the end decided to make a basic cheese souffle to start out with.  There seems to be no end of sweet baking going on here so a savoury concoction was most definitely in order.  We had the souffle for lunch this afternoon with a nice bowl of tomato soup.  I chose to try a recipe off the internet from Alton Brown.
Cheese Souffle
2 Tbsp parmesan cheese
1 1/2 oz or 3 Tbsp butter
3 Tbsp flour
1 tsp dry mustard
1/2 tsp garlic powder
1/2 tsp salt
pinch of cayenne pepper
1 1/3 cup hot milk
4 egg yolks
6 oz sharp cheddar cheese
5 egg whites (room temperature)
1/2 tsp cream of tartar
Grease an 8 inch souffle pan with softened butter and coat with grated parmesan cheese, by dumping the cheese in to the greased pan and turning the pan.  Preheat oven to 375F (you will be using only the very lowest rack in the oven).Heat butter and add flour, dry mustard, garlic powder, salt and cayenne pepper to make a roux.  Cook 2 minutes.  Whisk in hot milk and bring to bubble for two minutes.  Remove from heat.  In a small bowl, lightly beat the egg yolks and temper them by beating in a few tbsp of hot roux into them.  Pour egg yolk mixture into the roux and whisk constantly.  Add grated cheddar and whisk to incorporate.  In a large bowl whip egg whites and cream of tartar to firm peaks.  Add 1/4 of the egg whites to the roux base and fold in well.  Add the remaining egg whites in thirds, folding gently.  Fill pan to within 1/2 inch of top making sure edges are clean and buttered.  bake 35 minutes until cake tester poked into the center comes out clean.


Tuesday, September 14, 2010

A Tomatoey Challenge

Things are crazy here at the moment, so this will be a quick one. The September 2010 Daring Cooks’ challenge was hosted by John of Eat4Fun. John chose to challenge The Daring Cooks to learn about food preservation, mainly in the form of canning and freezing. He challenged everyone to make a recipe and preserve it. John’s source for food preservation information was from The National Center for Home Food Preservation.
I do try to do some canning every fall, so this challenge fit perfectly into my plans.  Apples are not quite ready here yet.....but I did end up with a large amount of green tomatoes......so I tried a recipe for Green Tomato Mincemeat.  Mincemeat is something I have never made before and only tasted a few times in my life.  I was very pleasantly surprised with this recipe though and will be making it again next year when I find I have an abundance of green tomatoes.  A friend of mine happily inherited a liter of mincemeat and has already baked up some mincemeat tarts.  They were delicious, and I cannot wait for Christmas to get here so I can try to make some this year for the first time:)  I will have to make some as having made 1/2 of the recipe below......it still made 15 pints of mincemeat.......YUM!  If you've got a whole lot of green tomatoes laying around, and you like mincemeat......give this recipe a try.....I highly recommend it!   After all those green tomatoes were used up I still had plenty of red ones.....so then we tried a salsa recipe which I did not like too much so no point in sharing that one!
Green Tomato Mincemeat
(adapted from Allrecipes)
8 quarts of mince green tomatoes
8 quarts of minced cored and peeled apples
1/2 pound of suet
6 lbs brown sugar
1 cup cider vinegar
2 tbsp salt
2 tbsp cinnamon
2 tbsp cloves
2 tbsp allspice
2 lbs raisins and currants combined
32 oz mixed citrus peel
7 oranges, peeled, sectioned and chopped
2 lemons, peeled and finely chopped

Combine all in a large pot and heat over low heat for 3 hours.  Sterilize jars (30 pints) and process with boiling water bath for 25 minutes with 1/2 inch head space.

Saturday, August 14, 2010

Pyrohy or Varenyky....the Worlds most Perfect Food

The August 2010 Daring Cooks’ Challenge was hosted by LizG of Bits n’ Bites and Anula of Anula’s Kitchen. They chose to challenge Daring Cooks to make pierogi from scratch and an optional challenge to provide one filling that best represents their locale.
I sincerely hope that everyone had a positive experience with this months challenge because it represents my very favourite food....ever!  Where I grew up (in Thunder Bay)....it is so commonly available that is is hard to avoid.  In fact I would bet that you would have to look very long and hard to find a person living there who did not at least know what they were.  (So it is very strange for me to hear that there are people who have never even heard of them....very strange indeed)  Its popularity is no doubt due to the very large Ukrainian and Polish communities living there.  You can find fresh pyrohy for sale nearly any day of the week.  The best places to buy them tend to be from the Ukrainian Churches or from the Ukrainian or Polish Halls (of which there are many to choose).  And the fund raising dollars raised by the sale of these delicious little parcels would boggle your mind. (It's in the millions)  One dozen fresh (and I mean fresh, hot and ready to eat) sell for $4.50 per dozen.  It is such big business there, that some of the kitchens preparing them have machines to help roll the dough, and an army of volunteers to do the filling. You can of course find 'Perogies' (the double plural) in the freezer section in all the grocery stores as well.......but they are really bad in comparison. 
Without question the most popular filling for Ukrainian Canadians would be potato and cheese, (served with melted butter, fried onion and sour cream) while back in the Ukraine, it would be cottage cheese with dill.  My personal favourites are potato and cheese, (as in the top photo) cottage cheese with dill, sauerkraut, and blueberry. 
Just in case you don't know what pyrohy are..........Pyrohy (at least in North America) are something very similar to ravioli in that they are a rolled dough with a filling that is boiled to cook.  Now, in the Ukraine, and Russia pyrohy are something a little different.....they are a baked yeast bun with the same filling.  My parents found this out while visiting relatives in the Ukraine.........when they asked for pyrohy they were given small baked yeast buns with a filling.  When they discussed what they wanted in more detail they were told..' What you want are not pyrohy....what you want are called Varenyky.'  So the only real difference is the dough (yeast or not) and the cooking method (baked or boiled).  And if you are Ukrainian this would be obvious to as the word varenyky means 'boiled'.   How these names got confused with Ukrainian Canadians is something I don't know, but my dad corrected me quite a few times....so now it's Varenyky.  I am guessing that in Polish there is only  the boiled variety which they call pierogi ....but I really don't know for sure.  The word pyrohy is already plural with a the singular pyroh......but you would never hear that word.....because honestly.....NO ONE EVER asks for just one:) 
Since I had just made potato and cheese varenyky I decided that I really wanted to try something different.  I remembered that mom had a recipe for a rhubarb sauce and a white sauce to serve on cottage cheese varenyky that I had not had in years.  This is a variation served by Mennonite families and for me is a little bit different than what I'm accustomed to.  Plus I was going to be in Thunder Bay prior to the reveal date........and my mom  has been making cottage cheese from scratch.  Well it seemed the obvious choice to me:)  We even tried a new dough recipe using evaporated milk which I liked.  It made a nice soft dough that was easy to work with.  In the end we made some potato and cheese, some cottage cheese, and a few blueberry.  It is common to boil up the scrap dough to serve as a type of noodle should you run out of filling. (Ukrainians never waste anything)
We used our scrap dough cut out with maple leaf cutters (because Canadians really love maple leaves) ......and served them tossed in melted butter and fresh blueberries we had just picked and a sprinkling of sugar.  We called them inside out blue berry veranyky.....and they were delicious.  Dessert or sweet Varenyky are not as well known....I think.......and when I was little it was such a marvelous treat when gramma would make them:)
Making varenyky is a bit time consuming so it is a nice activity to do with a friend (thanks mom).  So if you are going to do it, it's best to make a lot and freeze some for later.  Always freeze them before cooking them....because frozen cooked varenyky are gross.  And like freezing berries, make sure to freeze them on a cookie sheet (not touching) before bagging them.    When you are ready to cook them, just throw them in the boiling water while still frozen and wait until they rise to the top.  Let them continue to boil for only one minute more and immediately remove them from the water.  Having frozen ones on hand always makes for a quick supper.  Oh, and don't bother buying a mold to make them, all you need is a cookie cutter or even a thin edged drinking glass will do.  A mold will just slow you down and is a waste of money, and they won't look right either.  Mom and I had some of the Mennonite Style cottage cheese varenyky with rhubarb and white sauce for a night time snack with tea.  They were perfect, soft and warm, and not too sweet!  You could use any other fruit sauce that appeals to you.
Varenyky Dough
(makes about 150)
5 cups flour
1 tsp salt
100g butter, melted
1 cup evaporated milk
1/2 cup water (as much is needed)

Mix the flour and salt in a large bowl.  Add the butter and milk and mix together.  Add water as needed to form a soft dough.    Remove dough to a board and knead until soft, about 10 minutes(mom likes to knead a tbsp of melted butter into the dough by pouring it onto the kneading board before she starts kneading the dough).  Oil a bowl and roll dough in it to coat the dough.  Set aside to rest for at least 30 minutes. Take 1/4 of the dough to roll out on a floured board until 1/8 inch thick.  Cut with 3" round cutter dipped in flour to prevent sticking.  Fill each circle with 1 tsp of filling, and fold dough in half around the filling.  Pinch closed around the half circle to seal in the filling.  You must be careful not to get any wet filling touching the edges to be sealed or they will not seal and may break open during boiling.  Remaining scraps can be kept and rerolled at the end or may be cut up and boiled to serve as a noodle served with butter and seasonings.  Drop 12 varenyky into salted boiling water and give the pot a gentle stir to prevent sticking to the bottom.  Let boil one minutes more after they rise to the top of the pot.  Strain and rinse briefly and toss with melted butter to prevent sticking.  Keep these cooked varenyky in the oven at low heat until ready to serve.
Cottage Cheese Filling
2 cups cottage cheese, (dry cottage cheese, not wet)
1 beaten egg
salt to taste, if needed
1 tsp chopped fresh dill
Mix all ingredients, and chill until needed.  The filling must be stiff enough to not flow.  If it is runny it will be difficult to work with, so be careful in the amount of egg you add.  If you wet the edges of your circle with the filling, it will not seal.  You might want to add half just to make sure the filling is stiff enough.  Chilling helps to keep it firm.
Rhubarb Sauce
2 cups chopped fresh or frozen rhubarb
1/2 cup sugar, (or to taste)
4 tbsp water
Put rhubarb and water into a sauce pan and heat to a gentle simmer.  Add 1/2 of the sugar and let simmer another 15 minutes.  Check for sweetness and add remaining sugar if necessary.  Once sugar is dissolved set aside to cool.

White Sauce
3 tbsp butter
3 tbsp flour
1 cup half n half cream (10%)
In a small pan heat butter and flour to make a roux.  Let bubble a few minutes, but do not burn the flour.  Whisk in the cream and bubble gently for a few minutes cook away the starchy flavour. Your sauce should be smooth and pourable.  Add additional cream to thin it out if necessary.

Serve cottage cheese Varenyky with warms white sauce and  warm rhubarb sauce.  Something a little different......at least for a Ukrainian French Canadian girl:)

Wednesday, July 14, 2010

Daring Chicken with Pecan Cream Sauce

What an interesting choice for this months Daring Cooks Challenge!  The July 2010 Daring Cooks’ Challenge was hosted by Margie of More Please and Natashya of Living in the Kitchen with Puppies. They chose to challenge Daring Cooks to make their own nut butter from scratch, and use the nut butter in a recipe. Their sources include Better with Nut Butter by Cooking Light Magazine, Asian Noodles by Nina Simonds, and Food Network online.
Since I have pecans most mornings with my oatmeal.......I have a large bag of of pecans in my fridge.  I decided to try and make this challenge without purchasing any odd ingredients that I might never use up.  I opted to make chicken with pecan cream sauce.  I must admit that I got confused a bit about the directions and started looking to find a recipe using nut butter on my own and ended up with combination of the recipe provided and one that I found on the internet that had quite similar ingredients.......so this is my take on the challenge.  This recipe worked out perfectly for me as I had 3 egg yolks sitting in the fridge from the previous pavlova challenge:)  Waste not want not....and all that!
I was surprised at how quickly the toasted pecans were processed into butter!  I used my Bamix food grinder attachment and it was perfect for the small 3/4 cup volume of nuts that I was dealing with.  I was also surprised at how runny the nut butter was.  You can tell from the photo above that it is runny even with no liquids added....that is just processed nuts.  The sauce recipe that I chose to make called for what I thought was too much sugar and so I cut back from the 1/3 cup called for to 1/4 cup and would in future reduce that to 2 tbsp.  The sauce ended up being somewhere between nutella and peanut sate in flavour.  DH quite liked the recipe while my son liked it without the sauce.
To see the results of other Daring Cooks....look here.
Apple Filled Chicken with Pecan Cream Sauce.
3 skinless, boneless chicken breast halves
1/4 cup mild cheese, I used Yorkshire Wensleydale with cranberry because that's what I had
1 Granny Smith apple - peeled, cored and thinly sliced
1/4 cup finely diced onion, sauted
2 tablespoons melted butter
1/2 cup Italian seasoned bread crumbs
3 egg yolks
2 Tbsp white sugar
1/3 cup white wine
1/2 teaspoon vanilla extract
1/4 cup Pecan Butter
Directions
1. Preheat oven to 375 degrees F (190 degrees C). Lightly oil a baking pan.
2. Using a sharp knife, carefully cut a large pocket in each chicken breast. (Hint: Cutting close to the smooth side of the breast ensures no holes in the chicken.) Place 1/3 of the cheese inside each chicken, followed by 1/3 of the apple slices, and a small amount  onion, to suit your tastes. Pull the chicken back together, brush with a small amount of melted butter, and coat with breadcrumbs. Place stuffed breasts on baking pan.
3. Bake in preheated oven for 30 to 35 minutes, or until no longer pink, and juices run clear.(about 165F)
4. While the chicken bakes, you may start your sauce. In a double boiler over lightly simmering water, combine the egg yolks and sugar. Beat until the yolk lightens and froth forms. Slowly add the wine, stirring constantly, until the sauce thickens. Remove from the heat and stir in the pecans and vanilla. The sauce looks nice served under the chicken with a small amount drizzled over it.

Monday, June 14, 2010

Seafood Pate with Baguettes....an After School Snack

 Our hostesses this month, Evelyne of Cheap Ethnic Eatz, and Valerie of a The Chocolate Bunny, chose delicious pate with freshly baked bread as their June Daring Cook’s challenge! They’ve provided us with 4 different pate recipes to choose from and are allowing us to go wild with our homemade bread choice.
This month's Daring Cook's Challenge posed a lot of interest for me.  Ever since I had read a Fine Cooking Magazine feature on pate a few years back......it has been on my to do list.  My only problem with making pate is that I am likely the only person in the house who would eat it......and maybe Kitty too....depending on the flavour....she's very picky:)  So for my needs.....a very small serving size would be in order and I would have to stick to the seafood variety for increasing the probability that DH would even give it a try......and if it wasn't well received by the humans......at least that's a flavour that Kitty favours.
While researching all the aspects of what I could do.....I came upon this site and really liked the idea of pate prepared in small jars using a pressure canner.  If you own a pressure canner....you really should give this a look!  I'm going to have to try it and see what the texture of product ends up being like in the end.   I just loved the method as it would allow me to prepare pate in small (I would use salmon canning jars in the 1 cup size) containers that would be ready for company with no notice at all, and I could make a batch size that would not make me feel like I'd been wasting my time.  I have yet to try this, but it is now on my to do list for Christmas time.  They do advise in their video that the pate will take on flavours from the spices as it sits in the jars and recommends a few weeks shelf time for best flavour development.  Had I found that site a few weeks ago.....more than likely that is the route I would have chosen.  However, for this challenge I have chosen to make a salmon and shrimp (that's just what I had in the freezer) pate served with fresh baguettes.  Again I spent a lot of time considering what bread to try....I'm not very adept at bread making....so this was a useful challenge for me.  In the end I decided to give the baguette recipe a try having never made them before and having a baguette pan sitting in my basement with packaging still attached.  I am pleased to be able to tell you that I have now tried out the pan and was more that satisfied with the end result.  I worried about the dough recipe as my starter was more of a dough and not very loose at all, and the completed dough was fairly stiff even after I added the maximum suggested amount of water.  When all was finished.......I could not complain about the bread.  It had a beautiful firm crust and a deliciously moist interior.  We ate a whole baguette just sliced with butter before the pate was even ready.  I think it turned out beautifully and would not hesitate to make it again. 
I was so 'challenged' by this challenge that it has definitely been one of my favourites and I do intend to revisit it and the canning link above during the holidays.  I also loved that this was done with no trips to the grocery store as it was made with common ingredients producing a very practical dish.
I bet you want to make some now too...don't you....and you should!  My only changes to the recipe below was to scale it down in size, I used salmon rather than trout and Cointreau rather than Gran Marnier.  I also roughly chopped 1/2 of the shrimp before sauteing and mixed them into the pate rather than layering it.  I wanted it to be easier to spread.  Ike decided in the end that his after school snack was 'delectable' although he did find the crust on the baguette a bit of a challenge:)

Trout and Shrimp Pâté
Yields one 6x3 inch (15x7,5 cm) terrine or loaf pan
1 tbsp / 15 ml butter
1/4 lb / 4 oz / 120g medium raw shrimp, deveined, shelled and tailed (about 12 medium shrimp)
1/8 cup / 30ml Grand Marnier (or cognac, or another strong liqueur of your choice) (optional)
1/2 lb / 8 oz / 240g trout filet, skinned and cut into thick chunks
1/4 lb / 4 oz / 110g raw shrimp, deveined, shelled and tailed (any size)
3/4 cup / 180ml heavy cream
Salt, to taste
Green peppercorn, coarsely ground, to taste
Chives, for garnish
Preheat oven to 375ºF (190ºC).
In a heavy, flameproof frying pan, melt the butter over medium-high heat. Sauté the 1/4 pound of medium shrimp, stirring often, until pink and cooked through. Remove the pan from heat. (NOTE: These shrimp will be used to form layers within your pâté. If you feel they are too thick – like the ones in the photograph, you might want to slice them in half lengthwise.)
Pour the Grand Marnier over the cooked shrimp. Light a match and carefully ignite the alcohol, to flambé the shrimp. Wait for the flames to go out on their own, carefully tilting the pan to ensure even flavoring. Set aside.
Put the trout and the remaining raw shrimp in a food processor and pulse. Gradually pour in the cream and keep pulsing until you obtain a smooth mixture that is easy to spread, but not too liquid (you may not need to use all the cream). Season with salt and green pepper.
Butter a 6x3 inch (15x7,5 cm) loaf pan or terrine, then line it with parchment paper. Spoon in half the trout mixture, and spread it evenly. Place the flambéed shrimp on top, in an even layer, reserving 3 or 4 shrimp for decorating. Top with the remaining trout mixture.
Prepare a water bath: place the loaf pan in a larger, deep ovenproof dish (such as a brownie pan or a baking dish). Bring some water to a simmer and carefully pour it in the larger dish. The water should reach approximately halfway up the loaf pan.
Put the water bath and terrine in the oven, and bake for 35 minutes. The pâté should be cooked through and firm in the center.
Remove the pan from the water bath and let cool. Carefully unmold onto a serving platter. Decorate with the reserved shrimp, and sprinkle with chopped chives. Cut into thick slices and serve at room temperature, with crusty bread.
French Baguette
yield: Three 16" baguettes
Starter
1/2 cup / 120 ml cool water
1/16 teaspoon active dry yeast
1 cup / 240 ml flour
Dough
1 tsp / 5 ml active dry yeast
1 cup to 1 1/4 cups / 240 ml to 300 ml lukewarm water*
all of the starter
3 1/2 cups / 840 ml flour
1 1/2 tsp / 7 ml salt
*Use the lesser amount in summer (or in a humid environment), the greater amount in winter (or in a dry climate), and somewhere in between the rest of the year, or if your house is climate controlled.
Make the starter by mixing the yeast with the water, then mixing in the flour to make a soft dough. Cover and let rest at room temperature for about 14 hours; overnight works well. The starter should have risen and become bubbly.
Mix active dry yeast with the water and then combine with the starter, flour, and salt. Mix and knead everything together—by hand, mixer or bread machine set on the dough cycle—till you've made a soft, somewhat smooth dough; it should be cohesive, but the surface may still be a bit rough. Knead for about 5 minutes on speed 2 of a stand mixer.
Place the dough in a lightly greased medium-size bowl, cover the bowl, and let the dough rise for 3 hours, gently deflating it and turning it over after 1 hour, and then again after 2 hours.
Turn the dough out onto a lightly greased work surface. Divide it into three equal pieces. Shape each piece into a rough, slightly flattened oval, cover with greased plastic wrap, and let them rest for 15 minutes.
Working with one piece of dough at a time, fold the dough in half lengthwise, and seal the edges with the heel of your hand. Flatten it slightly, and fold and seal again. With the seam-side down, cup your fingers and gently roll the dough into a 15" log. Place the logs seam-side down onto a lightly greased or parchment-lined sheet pan or pans.
Cover them with a cover or lightly greased plastic wrap, and allow the loaves to rise till they've become very puffy, about 1 1/2 hours. Towards the end of the rising time, preheat your oven to 450ºF (240ºC).
Using a very sharp knife held at about a 45° angle, make three 8" vertical slashes in each baguette. Spritz the baguettes heavily with warm water; this will help them develop a crackly-crisp crust.
Bake the baguettes until they're a very deep golden brown, 25 to 30 minutes. Remove them from the oven and cool on a rack. Or, for the very crispiest baguettes, turn off the oven, crack it open about 2", and allow the baguettes to cool in the oven.

Friday, May 14, 2010

Green Chile Enchilada Stack

Our hosts this month, Barbara of Barbara Bakes and Bunnee of Anna+Food have chosen a delicious Stacked Green Chile & Grilled Chicken Enchilada recipe in celebration of Cinco de Mayo! The recipe, featuring a homemade enchilada sauce was found on www.finecooking.com and written by Robb Walsh. 
We've had such good picks for recipes these last several months on both Daring Cook's and Daring Baker's and this month was no exception.  With the weather turning warmer, a little bit of Mexican inspired cooking was a much anticipated meal.  We have never made green chile and tomatillo sauce before and it was very delicious.  Everyone here liked it and I even brought a piece over for the neighbour to try as my version contained no corn products which she has issue with and avoids Mexican foods because of it.  I had a little left over grilled chicken from souvlaki the night before and I also made a batch of ground beef taco filling which we really liked as well.  When it came to making the sauce, I roasted the tomatillos and the onions and used my trusty Bamix to puree them before assembling the sauce ingredients.  I had a bit of time finding Anaheim peppers, but did find them eventually......although I ended up using a combination of 1/2 Anaheim and 1/2 Poblano peppers.  I added no hot sauce to the recipe as it ended up being just spicy enough as it was for my 8 year old.  I also just happened to have a small amount of Monteray Jack in the fridge and made up the balance with cheddar....very nice!  What a great recipe and something fun to serve for guests as well, especially if you had enough individual sized serving dishes.

Ingredients
1½ pounds Fresh Anaheim chiles (about eight 6 to 8 inch chiles) 24 ounces 678 grams - roast, peel, remove seeds, chop coarsely. Other green chiles (NOT bell peppers) could probably be substituted but be conscious of heat and size!)
7-8 ounces Tomatillos (about 4-5 medium)212 grams - peel, remove stems
4 cups Chicken broth (32 ounces/920 grams)
1 clove Garlic, minced
2 teaspoons yellow onion, minced
1 teaspoon dried oregano
½ tsp Kosher salt (add more to taste)
¼ tsp Black Pepper (add more to taste)
2 tablespoons Cornstarch (dissolve in 2 tablespoons water, for thickening)
Hot sauce, your favorite, optional
2 Boneless chicken breasts (you can also use bone-in chicken breasts or thighs)
3 tablespoons Olive oil or other neutral vegetable oil (use more as needed)
Kosher salt and pepper
12 Small Corn tortillas (5-6 inch/13-15 cm). (you can also use wheat tortillas or other wraps)
6 ounces grated Monterey Jack, 170 grams (other cheeses (cheddar, pepper jack, Mexican cheeses) can be used. Just be sure they melt well and complement the filling)
Cilantro for garnish, chopped and sprinkled optional
Directions:
Roasting Fresh Chiles
1. Coat each chile with a little vegetable oil. If you are doing only a couple chiles, using the gas stove works. For larger batches (as in this recipe), grilling or broiling is faster.
2. Lay the oiled chiles on the grill or baking sheet (line pan with foil for simpler clean-up). Place the grill or broil close to the element, turning the chiles so they char evenly. They should be black and blistered.
3. As they are completely charred (they will probably not all be done at once), remove them to a bowl and cover with plastic, or close up in a paper bag. Let them rest until they are cool.
4. Pull on the stem and the seed core MAY pop out (it rarely does for me). Open the chile and remove the seeds. Turn the chile skin side up and with a paring knife, scrape away the skin. Sometimes it just pulls right off, sometimes you really have to scrape it.
5. DO NOT RINSE!
Green Chile Sauce
1. Put a medium saucepan of water on to boil and remove the papery outer skin from the tomatillos. Boil the tomatillos until soft, 5 to 10 minutes. You can also grill the tomatillos until soft.
2. Drain and puree in a blender or food processor.
3. Return the tomatillos to the saucepan along with the chicken broth, chopped green chiles, minced onion, oregano, garlic, salt and pepper.
4. Bring to a boil over medium-high heat and then reduce the heat and simmer for 10 minutes.
5. Add the cornstarch/water mixture and stir well. Simmer, stirring occasionally, until the sauce is thickened and reduced to 4-5 cups, another 10-15 minutes.
6. Adjust seasonings and add hot sauce if you want a little more heat.
Stacked Green Chile and Grilled Chicken Enchiladas
1. Heat a gas grill to medium high or build a medium-hot charcoal Coat the chicken with olive oil and season well with salt and pepper. Preheat oven to 450 degrees.
2. Grill the chicken until just cooked through, 4-5 minutes a side for boneless chicken breasts.
3. Cool and then slice into thin strips or shred.
4. In a small skillet, heat 3 tablespoons oil over medium-high heat until very hot. Dip the edge of a tortilla into the oil to check – it should sizzle immediately.
5. Using tongs, put a tortilla into the pan and cook until soft and lightly brown on each side, about 15-20 seconds per side (at the most).
6. Drain on paper towels.
7. Add oil as needed and continue until all 12 tortillas are done.
8. In a baking dish large enough to hold four separate stacks of tortillas, ladle a thin layer of sauce.
9. Lay four tortillas in the dish and ladle another ½ cup (4 ounces/112 grams) of sauce over the tortillas.
10. Divide half the chicken among the first layer of tortillas, top with another ½ cup of sauce and 1/3 of the grated cheese.
11. Stack another four tortillas, top with the rest of the chicken, more sauce and another third of the cheese.
12. Finish with the third tortilla, topped with the remaining sauce and cheese.
13. Bake until the sauce has thickened and the cheese melted, about 20 minutes. Let rest for 5-10 minutes.
14. To serve, transfer each stack to a plate. Spoon any leftover sauce over the stacks and sprinkle with cilantro, if you wish. The stacks may also be cooked in individual gratin dishes.

 Beef Filling
1 lb ground beef (extra lean)
2 T flour
1 1/2 tsp dried minced onion
1 1/4 tsp salt
1 tsp paprika
3/4 tsp beef soup base powder
1/4 tsp cayenne
1/4 tsp sugar
1/4 tsp garlic powder
dash onion powder

Mix all of the above in frying pan with 3/4 cup water. Stir to mix water and spices into beef and continue to stir while cooking at a simmer for 10 minutes until all pink is gone.

Wednesday, April 14, 2010

A Daring Brunswick Stew

The 2010 April Daring Cooks challenge was hosted by Wolf of Wolf’s Den. She chose to challenge Daring Cooks to make Brunswick Stew. Wolf chose recipes for her challenge from The Lee Bros. Southern Cookbook by Matt Lee and Ted Lee, and from the Callaway, Virginia Ruritan Club.
Brunswick Stew was an interesting challenge for me since it is something that I have never even heard of.  I chose to make the quick recipe since I had left over cooked ham and turkey meat from some very large dinners earlier in the month and some chicken stock from a previous challenge.    It was thick and hearty , and along with garlic toast or fresh rolls is a well rounded meal.  It was well received here by everyone (including my 8 yr old son) and following the suggestion of others I thickened the leftovers with a roux, and baked it up as a pot pie with a puff pastry crust......even better, I'd say. I will most likely be making this again as it is the perfect way to use up a combination of left over ham and turkey for me.  So if you are looking to try a nice 'comfort food' recipe to warm your insides.....give this a try.
Brunswick Stew
The Short Way-
This version goes on the assumption that you already have cooked your meats and have broth on hand. This was also my first experience with eating Brunswick stew. It’s got more of a tomato base, has larger, chunkier vegetables, but is just as wonderful as recipe one. However, it is a lot quicker to make than the first recipe.

Brunswick Stew recipe from the Callaway, Va Ruritan Club, served yearly at the Blue Ridge Folklife Festival in Ferrum, Va.

Serves about 10
2 ½ lb TOTAL diced stewed chicken, turkey, and ham, with broth - yes, all three meats
3 medium diced potatoes
2 medium ripe crushed tomatoes
2 medium diced onions
3 cups/ 689.76 grams / 24.228oz frozen corn
1 ½ cups / 344.88 grams / 12.114oz frozen lima beans
4-5 strips crumbled bacon
½ stick / 4 tablespoons / ¼ cup / 56.94 grams / 2oz of butter
1 Tablespoon / 14.235 grams / .5 oz sugar
1 Tablespoon / 14.235 grams / .5 oz ‘Poultry Seasoning’
Dash of red pepper
2 diced carrots (optional)
Tomato juice
Directions-
In large stock pot or Dutch Oven, mix all ingredients, heat until bubbly and hot. Add salt and pepper to taste. Add tomato juice as desired. Cook until all vegetables are tender. Serve hot. 

Sunday, March 14, 2010

Quick Daring Cooks Challenge

Ike and I are still on the road and this post is scheduled to post itself....so we'll hope for the best and post it manually if need be on our return.  Thankfully his months Daring Cooks Challenge turned out to be a fairly quick one as I had already prepared and frozen chicken stock which was one of the necessary components.  And also to our great fortune turned out to be something everyone here likes....what's not to like I guess?  I tracked down some Arborio rice for the risotto which I had not had good luck with in the past....but this time all turned out well and the meal was well received.  I most definitely make it again. This time I made 1/2 of the recipe indicated below, and I used shrimp, red peppers, asparagus, red onions, white wine and Parmesan cheese to flavour my risotto.  Next time on Ike's request....we'll leave out the red peppers:)
The 2010 March Daring Cooks challenge was hosted by Eleanor of MelbournefoodGeek and Jess of Jessthebaker. They chose to challenge Daring Cooks to make risotto. The various components of their challenge recipe are based on input from the Australian Masterchef cookbook and the cookbook Moorish by Greg Malouf.
It's really super easy and you don't really need to make your our chicken stock, a good store bought one will be just as good, at least according to the tasting panel at America's Test Kitchens!  While a little attention is required, it is dead easy to prepare perfectly:)

Risotto Base
Ingredients:
olive oil 2 fluid oz 60 ml
1 small onion, quatered
rice 14 oz 400g
Any type of risotto rice will do. I use Arborio but the recipe itself says Vialone Nano. Another to look for is Carnaroli.
white wine 2 fl oz 60 ml
chicken or vegetable stock , simmering 2 pints 1 L
Directions:
  1. Heat oil in a pan and add onion. Fry for a few minutes to flavour the oil then discard. (We diced ours and left it in as we like onion).
  2. Add the rice and stir for a few minutes to coat each grain of rice with oil and toast slightly.
  3. Add the wine and let it bubble away until evaporated.
  4. Add enough stock to cover the rice by a finger’s width (about an inch or two). Don't actually stick your finger in, it will be hot. Just eye it off.
  5. Cook on medium heat, stirring with a wooden spoon from time to time, until most of the stock has been absorbed.
  6. Repeat Step 5 making sure to leave aside approximately 100 ml. of stock for the final step. .
  7. Repeat, save 100ml for the final stage.
  8. Once you are at this point, the base is made. You now get to add your own variation.

Sunday, February 14, 2010

A Daring Mezze Plate

The 2010 February Daring COOKs challenge was hosted by Michele of Veggie Num Nums. Michele chose to challenge everyone to make mezze based on various recipes from Claudia Roden, Jeffrey Alford and Naomi Dugid.
For this month's Challenge I decided to serve the compulsory homemade pita and hummus with Pastitsio, dolmathes, black olives, and boiled shrimp. I made a smaller batch of Pastitisio than the recipe shown and it all worked out perfectly fine. The Pastitsio recipe is a dish that my boyfriend's mom used to make many years ago, and is good served warm or at room temperature. I almost forgot how much I liked this recipe as I had not made it in many years. The pita recipe and hummus recipe provided were very similar as ones I have made before (only my usual pita recipe has the addition of honey and my hummus recipe has about 1/3rd the amount of lemon juice). I must confess on the hummus, I only added 1/2 the amount of lemon juice called for and stopped adding right there as think it needed no more. This time I did use part whole wheat flour since I usually do not. They were good although I think I prefer all white flour, and we always reheat the pitas in a pan of hot olive oil before serving. It all ended up being a nice and easy preparation for a relaxing Valentine's Day meal with my two favourite boys:)
To make your own Mezze spread feel free to try these recipes....and make sure to see some other Daring Cooks for some other ideas.

Hummus – Recipe adapted from The New Book of Middle Eastern Food by Claudia Roden
Prep Time: Hummus can be made in about 15 minutes once the beans are cooked. If you’re using dried beans you need to soak them overnight and then cook them the next day which takes about 90 minutes.

1.5 cups dried chickpeas, soaked in cold water overnight (or substitute well drained canned chickpeas and omit the cooking) (10 ounces/301 grams)
2-2.5 lemons, juiced (3 ounces/89ml)
2-3 garlic cloves, peeled and crushed
a big pinch of salt
4 tablespoons tahini (sesame paste) OR use peanut butter or any other nut butter—feel free to experiment) (1.5 ounces/45 grams)
additional flavorings (optional) I would use about 1/3 cup or a few ounces to start, and add more to taste

Directions:
1. Drain and boil the soaked chickpeas in fresh water for about 1 ½ hours, or until tender. Drain, but reserve the cooking liquid.
2. Puree the beans in a food processor (or you can use a potato masher) adding the cooking water as needed until you have a smooth paste.
3. Add the rest of the ingredients and mix well. Adjust the seasonings to taste.


Pita Bread – Recipe adapted from Flatbreads & Flavors by Jeffrey Alford and Naomi Duguid
Prep time: 20 minutes to make, 90 minutes to rise and about 45 minutes to cook

2 teaspoons regular dry yeast (.43 ounces/12.1 grams)
2.5 cups lukewarm water (21 ounces/591 grams)
5-6 cups all-purpose flour (may use a combination of 50% whole wheat and 50% all-purpose, or a combination of alternative flours for gluten free pita) (17.5 -21 ounces/497-596 grams)
1 tablespoon table salt (.50 ounces/15 grams)
2 tablespoons olive oil (.95 ounces/29 ml)

Directions:

1. In a large bread bowl, sprinkle the yeast over the warm water. Stir to dissolve. Stir in 3 cups flour, a cup at a time, and then stir 100 times, about 1 minute, in the same direction to activate the gluten. Let this sponge rest for at least 10 minutes, or as long as 2 hours.
2. Sprinkle the salt over the sponge and stir in the olive oil. Mix well. Add more flour, a cup at a time, until the dough is too stiff to stir. Turn it out onto a lightly floured surface and knead for 8 to 10 minutes, until smooth and elastic. Rinse out the bowl, dry, and lightly oil. Return the dough to the bowl and cover with plastic wrap. Let rise until at least doubled in size, approximately 1 1/2 hours.
3. Place a pizza stone, or two small baking sheets, on the bottom rack of your oven, leaving a 1-inch gap all around between the stone or sheets and the oven walls to allow heat to circulate. Preheat the oven to 450F (230C).
4. Gently punch down the dough. Divide the dough in half, and then set half aside, covered, while you work with the rest. Divide the other half into 8 equal pieces and flatten each piece with lightly floured hands. Roll out each piece to a circle 8 to 9 inches in diameter and less than 1/4 inch thick. Keep the rolled-out breads covered until ready to bake, but do not stack.
5. Place 2 breads, or more if your oven is large enough, on the stone or baking sheets, and bake for 2 to 3 minutes, or until each bread has gone into a full balloon. If for some reason your bread doesn't puff up, don't worry it should still taste delicious. Wrap the baked breads together in a large kitchen towel to keep them warm and soft while you bake the remaining rolled-out breads. Then repeat with the rest of the dough.

Pastitsio Macaronia Me Feta

1 lb macaroni or spaghetti boiled in salted water and drained

7-9 tbsp butter

3 eggs lightly beaten

1/2 cup grated cheese, parmesan or asiago

1 1/2 cup crumbled feta

salt and white pepper to taste

1 tsp nutmeg, ground

12 sheets of filo

In a pot used to boil the pasta, combine the pasta, butter eggs, grated cheese, and feta. Season with salt and pepper and nutmeg and mix with a wooden spoon. In a buttered 9X12X3 inch pan, spread 6 sheets of filo, brushing butter between each layer with a pastry brush. Spread pasta mixture over the filo layers and press lightly down. Cover with remaining sheets of filo also brushing each layer with melted butter. Brush last sheet with butter and score the top with a sharp knife though 3-4 sheets of filo to indicate 9 to 12 servings as preferred. bake in moderate oven (350F) for 30 minutes, or until the surface is crisp. Remove to a rack to cool for 10 minutes, then cut and serve on a warm plate.


Thursday, January 14, 2010

Sate Beef with Peanut Sauce...a DB Challenge

The January 2010 DC challenge was hosted by Cuppy of Cuppylicious and she chose a delicious Thai-inspired recipe for Pork Satay from the book 1000 Recipes by Martha Day.
It is far more common in my family to make Sate Chicken rather than Sate Beef, but in the interest of using up the large quantities of beef in the freezer and trying something different.....this time I opted to try Sate Beef. I pulled out a large sirloin steak from the freezer, let it half thaw.......then cut it into 1 1/4 inch wide chunks. I then turned each of these long chunks onto it's newly cut side and sliced down the length of each piece (across the grain) to cut the strip into 3 new thinner pieces. After mixing the marinade ingredients, I tossed them and the meat strips into a large ziploc bag and let them sit for the day.As sirloin is not a very tender piece of meat, I added a pinch of baking soda dissolved in a tbsp of water into the bag for the last 15 minutes and massaged the bag to get the baking soda evenly dispersed. If you are going to add baking soda (and leave it in the marinade) to tenderize meat you must use it sparingly and only for a short amount of time. You could also treat the meat with a baking soda solution, (use 1/2 tsp dissolved in 2 tbsp water per lb of meat) let sit 15-20 minutes then rinse and dry the meat before continuing with the marinade process....but it was just more convenient for me to add the last bit in at the end and leave it in. Again, when leaving baking soda in and not rinsing it out, you must be careful not to use too much or you may taste it........and also not to leave it too long as it only needs 15 minutes to do the job. Normally I would have treated the meat with the baking soda and rinsed it before continuing with the marinade....but this day I was pressed for time. This method also works well for treating tougher cuts for stir fry or kebabs.
This ended up being the perfect little something to bring along to the neighbours for New Years Eve. Want to take a minute to see some other Daring Cooks?.....If you'd like to try this recipe, here is what you need to do.

Sate Marinade
1/2 small onion, chopped
2 garlic cloves, crushed
1 T ginger root, chopped (optional) (2 cm cubed)
2 T lemon juice (1 oz or 30 mls)
1 T soy sauce (0.5 oz or 15 mls)
1 tsp ground coriander (5 mls)
1 tsp ground cumin (5 mls)
1/2 tsp ground turmeric (2-2.5 mls)
2 T vegetable oil (or peanut or olive oil) (30 mls)
1 pound of pork (loin or shoulder cuts) (16 oz or 450g)

Feeling the need to make it more Thai? Try adding a dragon chili, an extra tablespoon of ginger root, and 1 tablespoon (0.5 oz or 15 mls) of fish sauce. (I keep some premature (still green) dragon chili peppers in the freezer for just such an occasion.)

Directions:
1a. Cheater alert: If you have a food processor or blender, dump in everything except the pork and blend until smooth. Lacking a food processor, I prefer to chop my onions, garlic and ginger really fine then mix it all together in a medium to large bowl.
2a. Cut pork into 1 inch strips.
3a. Cover pork with marinade. You can place the pork into a bowl, cover/seal and chill, or place the whole lot of it into a ziplock bag, seal and chill.

4. If using wooden or bamboo skewers, soak your skewers in warm water for at least 20 minutes before preparing skewers.
5. Gently and slowly slide meat strips onto skewers. Discard leftover marinade.*
6. Broil or grill at 290°C/550° F (or pan fry on medium-high) for 8-10 minutes or until the edges just start to char. Flip and cook another 8-10 minutes.

* If you’re grilling or broiling, you could definitely brush once with extra marinade when you flip the skewers.

Peanut Sauce
1 tsp Masaman Curry paste
2 tbsp fish sauce
2 tbsp peanut butter
3 tbsp tamarind juice
3 tbsp sugar
1 tsp paprika
1tsp garlic powder
2 c coconut milk
4 tbsp crushed peanuts

Bring all to boil, stir 15 minutes on medium heat until liquid had reduced to 1 1/2 cups. Serve with sate chicken, pork or beef.

Monday, December 14, 2009

A Wellington Challenge

The 2009 Daring Cooks challenge was hosted by Simone of Junglefrog Cooking. Simone chose Salmon en Croute (or alternative recipes for Beef Wellington or Vegetable en Croute) from Good Food Online.


It should be no surprise at all that this month I chose to make the alternate Beef Wellington. Although I do have a whole salmon sitting in my freezer right now.....I also have several hundred pounds of beef and just last month I had noticed one small brown package labeled 'tenderloin'. When I noticed that package....I decided immediately that it would be set aside to make the Wellington. The tenderloin package contained three pieces of tenderloin weighing in at just over 500g in total......so I made three small packets. With left over puff pastry, and a freezer full of beef this Challenge turned out to be not that intimidating at all. And I must mention that making a Beef Wellington has also been on my to do list for many years. I'm pleased to say that now it can be crossed off my list........and even more please to tell you that it was OMG delicious. That was a remarkably tender piece of 4H beef.

I followed the recipe as outlined below using herbs de Provence in the crepe, adding some minced onion and garlic to the pan fried mushroom filling as well as some thyme. I also did not have any English mustard...so I used some Dijon which is always a nice pairing with thyme. It was ridiculously delicious. So much so that I will most definitely be making it again. Again I used my meat probe to measure the temperature of the meat while it cooked....LOVE that tool! It would be a wonderfully dependable recipe to serve for company, and I would have no reservations trying to make it for company. The recipe lends itself well to preparing ahead. If you think you'd like to try it yourself.........wait no longer.......it was dead easy! I hope you'll try it. It would make a beautiful holiday meal.
Instructions for Beef Wellington (serves 4)


Button mushrooms - 17.6 ounces/500gr (stalks removed and finely chopped)
Olive oil - 2-3 tbsp
thyme - 1 sprig
Beef fillet, center cut piece - 21.16 ounce/600 gr
English mustard - 1 tbsp
puff pastry (all butter pastry pack) - 17.6 ounce/500 gr
parma ham (prosciutto) - 3 slices
egg yolk - 1 pcs, beaten

For the herb crepes:
plain (all purpose) flour - 0.3 cup/1.76 ounce/50 gr
milk - 0.5 cup/125 ml
mixed herbs - 1 tbsp (chopped, use herbs such as cervil, chives and tarragon
butter - 0.5 tbsp

Instructions:
1. To make the crepes, whizz the flour, egg and milk with a pinch of salt in a blender or processor until smooth. Pour into a jug and stir in the herbs and some seasoning. Leave to rest.
2. Fry the mushrooms in a little oil until they give up all their moisture and it has evaporated, leaving you with a thick paste. Add the thyme leaves and some seasoning and keep cooking for a few minutes. Cool.
3. Stir the melted butter into the crepe batter, heat a 15 cm crepe pan and oil it lightly. Pour in enough batter to make a thin layer on the base of the pan, cook until the top surface sets and then turn over and cook briefly. Remove and repeat with the rest of the batter. This will make a couple more than you need so choose the thinnest ones for the recipe.
4. Sear the beef all over in a little oil in a very hot pan. Brush with the mustard, season and allow to cool.
5. Lay a large sheet of cling-film on a kitchen surface and put two crepes down on it, overlapping a little. Lay over the parmaham (prosciutto). Spread the mushroom mixture over the ham and put the beef in the centre. Roll the cling-film up, taking the crepe with it, to wrap the beef completely into a nice neat log. Chill for 1 hour.
6. Heat the oven to 200°C/390F. Roll out the pastry, remove the clingfilm and wrap the beef in the pastry like a parcel, with the ends tucked under. Trim to keep it nice and neat. Brush with egg, score with shallow lines across the top and chill for 20 minutes.
7. Cook for 20 minutes. The best way to test if the meat is done to your liking is to neatly and carefully stick a skewer into the beef, count to three and then test it against your inner wrist. If it is cold, the beef will be raw, if it is warm then the beef will be rare and if it’s hot, it’ll be cooked through. Leave to rest for 20 minutes before carving.

For a look at some more Daring Wellingtons look here. Thanks for stopping by:)

Saturday, November 14, 2009

A Sushi Roll Party

Another Cooks Challenge is out of the way! The November 2009 Daring Cooks challenge was brought to you by Audax of Audax Artifex and Rose of The Bite Me Kitchen. They chose sushi as the challenge.
This month I enlisted the participation of one of my neighbourhood friends to help me with the challenge. When I mentioned to her that I would be making some sushi rolls this past week she asked if she could take part.....and since cooking is always more fun with friends...I did not say no. I have made California type rolls before, but had never tried to make any inside out rolls or nigiri sushi either....so I was interested to try this challenge. I am a big fan of bento box meals and do like the ones with some rolls included, but am not a big fan of sashimi. I have found that I most appreciate the flavour of raw tuna.....but never raw salmon. With that in mind I decided that my inside out 'dragon roll' would be based on a spicy tuna roll, my nori covered roll would be essentially a California roll using shrimp rather than pollack, and that my nigiri would be topped with shrimp.
We ended up making the 'sushi' on Remembrance Day and to my surprise, my local grocery store carried sashimi grade tuna....complete with instructions on how to slice it. Christine made rolls with California type fillings, and some with smoked salmon mixed with a bit of mayonnaise. The rolls all turned out well, but I found that forming the nigiri is a skill that I need a little practice with. Never the less, the rolls and nigiri were consumed without complaint. If you would like to see some other Daring Cooks and their creations check them out here.

Wednesday, October 14, 2009

Chicken Pho Challenge


The October 2009 Daring Cooks’ challenge was brought to us by Jaden of the blog Steamy Kitchen. The recipes are from her new cookbook, The Steamy Kitchen Cookbook. I ended up running late on this month's challenge mostly because of an terrible sinus infection that is now considerably better, and then might have just squeaked the challenge through on time were it not for the fact that I could not find star anise seed here in any of the grocery stores. It took a trip to the Chinese Store to accomplish that task....so here we a little late....but better late than never. Please take a moment to check out some other Daring Cooks.

I was interested by this month's challenge as I really like Vietnamese food. I liked the idea of the 'noodle bowl' assembly of the soup, and liked all of the ingredients. In the end I will say that it was OK...but not my favourite soup. I found it to be not as flavourful as I had hoped....and this may be due to the fact that I did not start from scratch to make my own chicken stock. I also could not find the wider rice noodle that was called for in the recipe, which would have given the soup more bite, and I may have added too much cilantro. Although I love cilantro, I even found the flavour too overpowering. Now I am curious to try this soup in the Vietnamese restaurant so I can figure out what went wrong for me so I can try it again.

Ingredients:

For the Chicken Pho Broth:
2 tbsp. whole coriander seeds
4 whole cloves
2 whole star anise
2 quarts (2 liters/8 cups/64 fluid ounces) store-bought or homemade chicken stock
1 whole chicken breast (bone in or boneless)
½ onion
1 3-inch (7.5 cm) chunk of ginger, sliced and smashed with side of knife
1 to 2 tbsps. sugar
1 to 2 tbsps. fish sauce

1 lb. (500 grams/16 ounces) dried rice noodles (about ¼ inch/6 mm wide)

Accompaniments:

2 cups (200 grams/7 ounces) bean sprouts, washed and tails pinched off
Fresh cilantro (coriander) tops (leaves and tender stems)
½ cup (50 grams/approx. 2 ounces) shaved red onions
½ lime, cut into 4 wedges
Sriracha chili sauce
Hoisin sauce
Sliced fresh chili peppers of your choice

Directions:

  1. To make the Chicken Pho Broth: heat a frying pan over medium heat. Add the coriander seeds, cloves and star anise and toast until fragrant, about 3-4 minutes. Immediately spoon out the spices to avoid burning.
  2. In a large pot, add all the ingredients (including the toasted spices) and bring to a boil.
  3. Reduce the heat to medium-low and let simmer for 20 minutes, skimming the surface frequently.
  4. Use tongs to remove the chicken breasts and shred the meat with your fingers, discarding the bone if you have used bone-in breasts.
  5. Taste the broth and add more fish sauce or sugar, if needed. Strain the broth and discard the solids.
  6. Prepare the noodles as per directions on the package.
  7. Ladle the broth into bowls. Then divide the shredded chicken breast and the soft noodles evenly into each bowl.
  8. Have the accompaniments spread out on the table. Each person can customize their own bowl with these ingredients.

Monday, September 14, 2009

A Tastey Vegan Meal.....

For someone who currently has over 300 lbs of beautiful Canadian 4H beef in her freezer you might find this menu choice to be a little unexpected. This vegan meal idea for Dosas was complements of the September Cooks Challenge and I thoroughly enjoyed it. Thanks Debyi from healthy vegan kitchen it was a super idea to make Dosas....and once again I am reminded of why I joined the Daring Bakers and Daring Cooks to begin with. For a look at some other great Dosas from other Daring Cooks click here.
This recipe challenge created some controversy within the Daring Cooks forum as well, due to the fact that the challenge was to create this dish entirely vegan. The point had been made by one member that making the challenge vegan was hypocritical. Since the atmosphere of all previous challenges has been quite tollerant of dietary needs, and beliefs, I too did take note of the not quite so even playing field. To my mind, it was most definitley a double standard and I could believe that there would be those who could be offended at being forced to prepare a vegan meal in order to meet the challenge requirements. After all, this challenge was meant to be a meal, not a side dish. Each month when the challenges are announced, there are always substitutions allowed within the recipe to accommodate members who have diet restrictions due to religious, ethical or health reasons. The same courtesy should have been extended in this challenge.....but was not. Fortunately my family had no issue with the preparation of a vegan meal so we were off to the races.
When I first saw the recipe announced last month, I was excited. We love Indian food! I was then perplexed by the odd recipe provided for the making of the dosa themselves. After some investigation I determined that the recipe provided was not a traditional method. I think, but I'm not certain, that the recipe provided is supposed to be more convenient than making traditional dosas. After comparing the recipe provided with more traditional ones I decided to go with the traditional preparation. I mean....if I'm going to the bother of trying something new.....I think I'd like to know what it is supposed to taste like before I go and alter it so significantly. I was a little worrried as there had been some comments concerning the difficulty is preparing them the traditional way. It turned out to be nothing to worry about as they turned out absolutely beautifully and easily, not sure what all the fuss was about there?? They had a bit of a crunchy texture to them which was due to the amount you chose to blend the rice and dal while making the batter. We were also allowed to vary the filling and I chose to make an Aloo Matar filling of potato and peas rather than the chick pea filling which sounded texturally not as appealing to me. The Coconut Curry Sauce sounded tasty and I did make that and we liked it very much.
If you'd care to try it yourself...here are the two recipes that I tried. The challenge recipes for the chick pea filling and other dosa recipe will follow at the end of this post as well as the yummy sauce recipe.

Dosa

Ingredients
  • 3 cups rice
  • 1 cup skinless split urad daal (skinless black gram)
  • 3/4 tsp fenugreek seeds
  • Salt to taste
  • Vegetable/ canola/ sunflower cooking oil
Method
  • Wash the rice and urad daal well. Add the fenugreek seeds to the mix and fill enough water in the rice-daal bowl to cover them about 2" deep. Soak overnight.
  • The next morning, drain all the water from the rice and urad daal. Now put some in a food processor and grind - adding very little water if necessary - to a smooth yet slightly grainy paste.
  • When all the rice-daal mix is ground like this, put it into a large mixing bowl and add enough water to make a batter. The consistency of the batter should be such that it thickly coats a spoon dipped in it.
  • Now add salt to taste and keep the Dosa batter aside in a warm, dark spot, covered, for 6-8 hours. After this fermentation, stir the batter well. It is now ready to make Dosas.
  • Put some cooking oil in a small bowl and keep ready. You will also need a bowl of ice cold water, a large, flat nonstick pan, 2 sheets of paper towel, a ladle, a spatula and a basting brush.
  • Fold one sheet of paper towel into a wad and dip lightly into the bowl of cooking oil. Squeeze out any excess and then rub the paper towel all over the surface of the pan to grease. The correct amount of oil is such that it is barely visible on the pan. Now turn on the heat/ flame at medium high.
  • Fill the ladle upto the 3/4 level with Dosa batter. Gently pour this batter onto the center of the pan - just as you would for a pancake - till the ladle is empty.
  • Now begin to spread the batter in sweeping circular motions to form a pancake of roughly 8" diameter. Do not be alarmed if the Dosa develops tiny holes as you spread the batter. This is normal.
  • As soon as you have finished spreading the batter out on the pan, dip the basting brush in cooking oil and drizzle the oil all over the surface of the dosa and also around its edges. Now hold the pan by its handle, lift up and swirl it so as to make the drizzled oil spread all over the Dosa.
  • When the upper surface begins to look cooked (it will no longer look soft or runny), flip the Dosa. By this time, ideally, the surface that was underneath should be light golden in color. Allow to cook for 1 minute after flipping.
  • The Dosa is almost done. Fold it in half and allow to cook for 30 seconds more.
  • Before you start making the next Dosa, fold another sheet of paper towel into a wad and dip it in ice cold water. Squeeze the wad to remove excess water and then rub it all over the surface of the pan to cool it slightly. This ensures your next Dosa will spread evenly and not break because the pan is too hot. Now proceed as you did for the last Dosa.
Aloo Matar Filling (Potato and Peas)

Ingredients:
1/4 cup vegetable oil
2 medium onions chopped finely
1 T ginger and garlic paste
1 bay leaf
4 large potatoes, peeled, cooked and chopped
1 cup frozen peas
1/2 cup tomato puree
1 1/2 tsp garam masala
1 1/2 tsp paprika
1 tsp white sugar
1 tsp salt
2 T cilantro, chopped

Method:
Heat oil in wok over medium heat. Stir in onions, ginger garlic paste and bay leaf and cook until onion is tender. Add in potatoes and peas. Cook 5 minutes on medium heat. Stir in tomato, garam masala, sugar , salt and paprika. Cook 10 minutes and garnish with cilantro.

Recipes Supplied by the Challenge Host are....

Dosa Pancakes
1 cup (120gm/8oz) spelt flour (or all-purpose, gluten free flour)
½ tsp (2½ gm) salt
½ tsp (2½ gm) baking powder
½ tsp (2½ gm) curry powder
½ cup (125ml/4oz) almond milk (or soy, or rice, etc.)
¾ cup (175ml/6oz) water
cooking spray, if needed

1.Combine the dry ingredients in a bowl, slowly adding the almond milk and water, whisking until smooth.
2.Heat a nonstick skillet over medium heat. Spray your pan with a thin layer of cooking spray, if needed.
3.Ladle 2 tablespoons of batter into the center of your pan in a circular motion until it is a thin, round pancake. When bubbles appear on the surface and it no longer looks wet, flip it over and cook for a few seconds. Remove from heat and repeat with remaining batter. Makes 8 pancakes.

Curried Garbanzo Filling
This filling works great as a rice bowl topping or as a wrap too, so don't be afraid to make a full batch.
5 cloves garlic
1 onion, peeled and finely diced
1 carrot, peeled and finely diced
1 green pepper, finely diced (red, yellow or orange are fine too)
2 medium hot banana chilies, minced
2 TBSP (16gm) cumin, ground
1 TBSP (8gm) oregano
1 TBSP (8gm) sea salt (coarse)
1 TBSP (8gm) turmeric
4 cups (850gm/30oz) cooked or canned chick peas (about 2 cans)
½ cup (125gm/4oz) tomato paste
1.Heat a large saucepan over medium to low heat. Add the garlic, veggies, and spices, cooking until soft, stirring occasionally.
2.Mash the chickpeas by hand, or in a food processor. Add the chickpeas and tomato paste to the saucepan, stirring until heated through.


Coconut Curry Sauce
This makes a great sauce to just pour over rice as well. This does freeze well, but the texture will be a little different. The flavor is still the same though. My picture of this sauce is one that I had made, had to freeze, then thaw to use. It tastes great, but the texture is a little runnier, not quite as thick as it was before freezing.
1 onion, peeled and chopped
2 cloves garlic
½ (2½ gm) tsp cumin, ground
¾ (3¾ gm) tsp sea salt (coarse)
3 TBSP (30gm) curry powder
3 TBSP (30gm) spelt flour (or all-purpose GF flour)
3 cups (750ml/24oz) vegetable broth
2 cups (500ml/24oz) coconut milk
3 large tomatoes, diced
1.Heat a saucepan over medium heat, add the onion and garlic, cooking for 5 minutes, or until soft.
2.Add the spices, cooking for 1 minutes more. Add the flour and cook for 1 additional minute.
3.Gradually stir in the vegetable broth to prevent lumps. Once the flour has been incorporated, add the coconut milk and tomatoes, stirring occasionally.
4.Let it simmer for half an hour.