Showing posts with label Edmonds Cookery Challenge. Show all posts

Tuesday, November 29, 2011

The Mouse Trap

Making the fruit chutney in my previous post was all so I could try the Edmonds Mousetrap recipe.  For those of you not familiar with them....as I was not.  A mousetrap is a snack composed of some type of spread on bread covered with cheese which may or may not be toasted.  In the case of the Edmonds recipe....the spread was of course chutney, and the snack was in fact toasted....twice.  As per the Edmonds directions....you should:
  1. toast one side of your bread
  2. spread the untoasted side of the bread with chutney
  3. top with shredded cheese and minced onion
  4. pop it all back in the toaster oven to melt the cheese
  5. garnish with chopped parsley
  6. salt and pepper to taste
Now, after trying this....I would recommend using chopped onion greens rather than minced onion as you would get a bit of colour for garnish and a milder onion flavour as well.  All and all, a nice little snack....This is based on the fact that I alone have almost finished my first jar of chutney filling myself with these tasty little snacks.  Ike however does not share my fondness for these.......he's not quite sure of what he thinks of the chutney I think.....perhaps a different spread for him then....

Saturday, November 26, 2011

Making a Better Mousetrap


I was sitting and flipping through my Edmonds Cookery Book wondering what might next be of interest for me to try......when the recipe for mousetraps caught my eye.  I have heard of these......but had no real  clue what they were about.  The recipe called for chutney, of which I had none.......Hmmm....but I did still have 10 pounds of  apples left to do something with....A few more pages flipped and there was the recipe I was looking for.  So......I actually made a chutney recipe just so I'd have a jar to try the recipe for mouse traps.  The chutney recipe was nice though, and made quite a few jars.  Maybe enough to share with the neighbours or for Christmas giving.  More on the mouse traps later......
Edmonds Fruit Chutney
2 kg apples peeled, cored and chopped
500g onion diced
2 cloves garlic, minced
2 cups raisins
4 cups brown sugar
1 tsp mixed spice or cloves
2 tsp salt
1/2 tsp cayenne pepper
4 cups (or there abouts) Malt vinegar

Put apples, onions,  garlic,raisins, sugar, salt, and spices into a large pot.  Add enough vinegar to not cover but leave some fruit above the vinegar.  Cook at a simmer for about two hours, frequently stirring to achieve the consistency of a jam. Bottle and seal.

Monday, July 25, 2011

That's what it's all about!....Hokey Pokey Biscuits

This biscuit recipe from the Edmonds Cookery Book has been on my mind for sometime now and I finally gave it a go.  The method of melting the butter rather than creaming softened butter with sugar is a little unusual for me.  I did have to let the mixture cool down quite a bit before adding my chocolate chips so they would not instantly melt into the dough.  I was quite happy with the end result and sent them off to daycare with Ike to share with his friends there.  The tin returned empty.......so they are kid approved.  The only modification to the original recipe was in allowing the dough to cool completely, and the addition of the chocolate chips of course.  The traditional recipe contains no chocolate chips.  I will most definitely be making them again.......and perhaps again so I can try them without the chocolate chips.  Try them.....you just might like them too!
Chocolate Chip Hokey Pokey Biscuits
1/2 cup butter
1/2 cup sugar
1 Tbsp golden syrup (cane syrup rather than corn syrup if you can find it)
1 Tbsp milk
1 1/2 cups flour
1 tsp baking soda
1/2 cup chocolate chips (optional)

Combine butter, sugar, syrup and milk in a saucepan.  Heat until butter is melted and mixture is nearly boiling, stirring constantly.  Remove from heat and allow to cool to lukewarm.  Sift flour and baking soda together.  Add to the cooled mixture.  Stir well.  Cool dough completely before adding in chocolate chips if adding them.  Roll tablespoonsful of dough into balls and place on ungreased cookie sheets.  Flatten the balls of dough slightly with a floured fork.  Bake 350F until golden, 8-10 minutes.

Tuesday, March 1, 2011

Ginger Crunch......Easy and Delicious

So.......it's been snowing here.....a lot!  It may even be the highest amount of snowfall for this area since we've lived here????  If not, it's got to be pretty close.  I've been pretty easy going about it.....after all, I do not mind shoveling snow..........Now, I think I need to concede that the snow banks have surpassed my abilities to throw it high enough.  Spring is coming....just around the corner......but the snowbanks are so high, it's difficult to see around that corner.......I guess I can wait a little longer.  But in the mean time......I will occupy myself with some of my favourite winter activities.........knitting.......and baking:)
With another PAC meeting coming up tomorrow night......I thought I'd get the jump on some baking to bring.  I pulled out several cook books and decided on Ginger Crunch from the Edmonds Cookery Book.  The name sounded familiar in the 'you should try this one day' department.   I think my friend Alison must have mentioned it.  I love ginger, and the recipe appeared to be quite simple.  The base is cookie like and the icing......well..... fudge like.....both seasoned with ginger.  I'd have to say I'll definitely make it again.  It was easy and I enjoyed both the ginger and the chewy texture.  I'll have to wait until it cools to taste it again to see if the texture changes.........but the 'few' pieces I did have, practically straight from the oven, were pretty yummy!
 I highly recommend it.  Update: the next morning it definitely had some crunch!  Still yummy!
Ginger Crunch
125g butter, softened (a little more than 1/2 cup)
1/2 cup sugar
1 1/2 cups flour
1 tsp baking powder
1 tsp ground ginger

Icing
75 g butter (a little more than 1/4 cup)
3/4 cup icing sugar
2 tbsp golden syrup (I used corn syrup)
3 tsp ground ginger

Cream the butter and sugar until light and fluffy.  Sift flour, baking powder and ginger together.  Mix into creamed mixture.  Turn dough out onto a lightly floured board.  Knead well. (I found the dough a little too dry to knead.....so I added a few tbsp soft butter and worked it in by hand still in the bowl until it was moist enough to hold together easily with squeezed. Press dough into a greased 20X30 cm pan.  I lined the pan with tin foil and sprayed the foil with baking spray to make it easier to remove the bars for slicing.  Bake at 190C (375F) for 20-25 minutes or until light brown.  Pour hot ginger icing over the base while hot and cut into squares before it gets cold.
Ginger Icing
In a small saucepan combine butter, icing sugar, syrup and ginger.  Heat until butter is melted, stirring constantly.

Monday, February 22, 2010

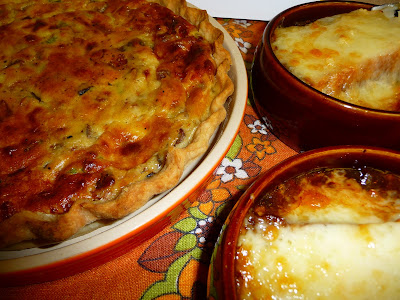
French Onion Soup and Quiche Anyone?

I have made quick versions of French Onion Soup before without even knowing that they were short cuts.  I have not made any in some time, so when I was flipping through the America's Test Kitchen Cookbook  (love this book....can't say enough good things about it) that the DH got for me for Christmas and saw the lengthy preparation for French Onion Soup.......I started to wonder what exactly I might be missing.  So......yesterday I set about to try this simple but time consuming recipe.  I will say that I did enjoy the end result.  It had a very rich flavour and was highly populated with beautifully caramelized onions so much so that the soup was almost thick from them. I ended up making 3/4 of the recipe indicated as I didn't think my son would be liking the whole 'onion' thing and I didn't want to be left with a lot of left overs.  I never thought that I could have frozen some.......maybe next time.  It's actually comical that I would like French Onion Soup as an adult.....as I can vividly recall being forced to eat a whole bowl as a child which I promptly threw up.  Feeling that French Onion Soup on it's own would not be quite enough for dinner......I pondered a bit to come up with a suitable accompaniment.  I settled on a basic bacon and smokey cheddar Quiche.  Perfect....all ingredients that I had laying about....no need to run to the store:)  I used the basic quiche recipe from the Edmonds Cookery Book given me by my good friend since I've been making my way through that book too......I could kill two birds with one stone.  End of story......perfect meal....I used two strips more bacon than called for in the quiche recipe and used smoked cheddar because that's what I had on hand.  I'd make it again for sure.  I have made quiche few times before and do not recall the roux that this recipe has in it.  I think it must help with the setting of the quiche.  In any event it rose quite high then settled upon cooling. I probably should have even removed it from the oven a minute or two earlier as the center seemed set when I took it out......convection always seem to cook quite a bit faster.  Will most definitely make it again as I was very happy with the result.
If you have an afternoon to kill......why not give this French Onion Soup recipe a try?  It isn't difficult, so you can get house work done while it's in the oven for the first few hours, and during the last simmer time too.
French Onion Soup
3 tbsp butter
4 pounds yellow or cooking onions sliced 1/4 inch thick
salt to taste
2 cups water, plus extra for deglazing
1/2 cup dry sherry
4 cups chicken broth
2 cups beef broth
6 sprigs thyme, tied together
1 bay leaf
ground black pepper

French bread, cut 1/2 inch thick to fit in soup bowls
2 cups shredded greyere cheese

Place sliced onions, butter and pinch of salt into a greased (sprayed) large dutch oven.  Cook covered for 1 hour in a preheated 400 F oven on the rack on lower middle position.  Remove from oven and stir onions scraping and onion stuck on sides or bottom.  Return to oven with lid ajar for up to 1 3/4 hours stirring after 1 more hour.  Remove pot and place over medium high heat for about 15 minutes.  This is to allow a brown crust to form on the bottom of the pot.  Turn heat down if the browning is occurring too quickly. Deglaze pan with 1/4 cup of water and repeat this process 3 more times. (each time takes about 15 minutes you don't want it to burn!) Now do an additional deglazing with the sherry, after which you will leave on the heat for 5 minutes or until the sherry has evaporated.  Now add the water, chicken broth, beef broth, thyme and bay leaf.  Increase heat to bring to a simmer then reduce it to low and simmer covered for 30 minutes.   You may add additional beef stock if you find the soup is too thick with onions...as my husband did.  Discard spices and season with salt and pepper as needed.
Put bread slices in a 400 F oven to toast on a baking sheet for about 10 minutes or until golden, then remove.
Raise oven rack to 6 inches below broiler and turn on broiler.  Fill broiler safe bowls with soup and top with toasted bread slices and shredded cheese. Broil on a baking sheet until cheese if melted and bubbling, about 3 minutes.  What them carefully and make sure that the bread is covered by cheese as the exposed bread might burn from the high heat.  Cool 5 minutes, then serve.


Thursday, February 4, 2010

Yoyo Biscuits

Poor Ike was the only kid to show up for the Parent Advisory Council meeting at the school last night:( He always wants to go since the kids get to use the computer room during the meeting .......and there are usually lots of kids there= lots of fun. Not so, last night....poor kid. In need of a new bake up for the meeting....I decided to try a recipe suggested by a previous blog visitor. I tried the Yoyo recipe from the Edmonds Cookery Book. After glancing at the recipe....I saw that they are very much looking like a short bread cookie, prettied up a bit by joining two cookies with a bit of butter cream. Both the cookie and the frosting were flavoured with custard powder. The custard powder (1/4 cup of it) also provided the cornstarch to the cookie that made me think of short bread. The cookie is a nice shortbread, and the frosting added a bit of extra interest. I found the single recipe made only 14 completed cookies for me instead of the 20 suggested in the recipe, so I made a double batch. I would definitely make these much smaller next time with about 1 level tsp of dough each, to make them easier to eat. We ended up pulling them apart to eat them like an Oreo. I flavoured half of the frosting with raspberry jam and a pinch of red colouring to pink them up. If you like short bread, you will most likely like these, and they are a nice shortbread.

If you'd like to give them a go, here is the recipe. New teapot set and cup and saucer set from ebay........... and a new pot holder from the thrift shops.........I know.....I need to stop:) So far the consensus from the short bread likers is two thumbs up!

Yoyos
175 g butter
1/4 cup icing sugar
1/8 tsp vanilla extract
1 1/2 cups four
1/4 cup custard powder

Butter Filling
50g butter , softened
1/2 cup icing sugar
2 tbsp custard powder

Cream butter and icing sugar until light and fluffy. Add vanilla. Sift flour and custard powder together. Mix sifted ingredients into creamed mixture. Roll teaspoonful of mixture into balls. Place on a cookie sheet and flatten each ball with a fork. Bake 180C for 15-20 minutes. When cold, sandwich together in twos with Butter Filling.

Butter Filling
Beat all ingredients together until well blended.

note: I baked at 350F for about 10 minutes, removing once there was a slight goldening on some of the cookies. Bake too long and they will become sandy and dry, so do remove them at the first signs of browning.

Thursday, March 26, 2009

Disappearing Afghan Biscuits

I finally got some corn flakes and was able to try the Afghan Biscuit recipe from the Edmonds Cookery Book last night. It would appear that they are a New Zealand and Australia staple cookie....kind of like chocolate chip over in North America. I had heard of them many years ago, but had never seen a picture of them so I had no idea what they looked like or what they contained for ingredients. The name had never appealed to me as something appetizing....so I never looked any further into it. Well lucky me that my good friend got me this cook book because Afghans are YUMMY! They are an easy, quick bake up too! After making the dough and reading the next direction to fold in the corn flakes.....I was a little bewildered as to how one would fold delicate and breakable corn flakes into a fairly stiff cookie dough. I was extremely careful not to break any more flakes than I absolutely needed to to distribute them into the dough. Perhaps my dough was too stiff?? No idea.....but I will definitely be making these again.....maybe for the next PAC meeting? The little bit of frosting dressed them up just enough to be a presentable baked good too! End of the story is ....loved them....will make them again ....and probably again..... and maybe even again. The batch made 30 cookies as promised by the recipe when using a rounded teaspoonful of dough and when made without the nut topping is suitable for my kid's nut free school:)

Afghans

200 g butter (about 1 cup), softened
1/2 cup sugar
1 1/4 cups all purpose flour
1/4 cup cocoa
2 cups corn flakes
walnuts, optional for topping
Chocolate Icing (See Below)

Cream the butter and the sugar until light and fluffy. Sift the flour and cocoa. Stir into creamed mixture. Fold in cornflakes. Spoon mounds of mixture onto a greased cookie sheet, gently pressing together. Bake 180 C (325 F) or until set. When cool, ice with chocolate icing and top with walnuts if desired.

Afghan Slice

In a hurry??? Press the afghan mixture into a 20X30 cm baking tin. Bake at 180C for 25 minutes or until set. When cool, ice with Chocolate icing.

Chocolate Icing
2 cups icing sugar
1/4 tsp butter, softened
2 tbsp water, (approximately)
1/4 tsp vanilla
1 tbsp cocoa

Sift icing sugar and cocoa into a bowl. Add butter. Add sufficient water to mix to a spreadable consistency. Flavour with vanilla essence.

Update! These cookies disappeared so fast that another batch has been requested...and I've just set out the butter to soften now!
Tried the recipe adding a little more butter. It did make the corn flakes easier to fold into the batter, but I did not like how it made the cookie more crumbly like a short bread. I will stick with 1 cup of butter which made a more brownie like texture. Can't stop eating these:(

Monday, March 23, 2009

Delicious Belgium Biscuits

Another Edmonds Cookery Book Challenge completed! I sat down to find the recipe for Afghans, found that I did not have one of the main ingredients on hand, and switched my plan to making Belgium Biscuits instead. I do want to try the Afghans, but I will need to make a run to the grocery store to pick up some corn flakes first. Until then......here's how the Belgium Biscuits turned out.
They were a rolled mild spice cookie sandwiched together with a bit of raspberry jam and topped with a bit of plain icing....the kind that will firm up and get glassy and hard....yum! The recipe called for mixed spice or pudding spice which I did not have on hand....but I looked up a recipe for that and made some of my own. I found the dough a little too crumbly going by the recipe and ended up adding about 2 tsp of milk to get the dough to hold together well. After that, it handled quite easily. I didn't have any raspberry essence....I'm going to have to look for some now because I do really like the flavour....so instead, I added a generous spoon of Heather and Andrew's raspberry jam (made with love with my neighbours own raspberries) to the frosting. So far, I am happy with this recipe and I am curious to see what sitting over night does to their texture...that is assuming there will be any left to make it through the night......Well, I know what I'll be having with tea tonight:)
Update: After typing out the recipe I notice that when I made the recipe I glanced up to the recipe above and added the amount and type of sugar called for in the 'basic biscuit' recipe. Oops, this meant I added 3/4 cup of white sugar to the recipe rather than the 1/4 cup brown sugar called for. I will have to try them again now to see what difference it will make. I would expect the brown sugar to make a difference in texture. But.....I will say that after a night in the cookie tin all filled and frosted, I thought these cookies were just perfect. They softened up just enough to not be crumbley when eating them. They were a bit of work, but I will definitely make them again.
Belgium Biscuits

125 g (about 1/2 cup plus 2 Tbsp) butter, softened
1/4 cup brown sugar
1 egg
2 cups flour
1 tsp baking powder
1 tsp cinnamon
1 tsp ground ginger
1 tsp mixed spice
1 tsp cocoa

Icing
3/4 to 1 cup icing sugar
1/4 tsp raspberry or vanilla essence
a few drops of red food colouring
water

Filling

1/2 cup raspberry jam, approximately

Cream butter and sugar until light and fluffy. Add egg and beat well. Sift flour, baking powder, cinnamon, ginger, mixed spice, and cocoa together. Mix into creamed mixture to make a firm dough. On a lightly floured board roll the dough out to 3 mm thick. Cut out rounds using a 6.5cm cuter. Bake at 180 C (350F) for 15 minutes or until golden. When cold, ice half of the biscuits. Spread the remaining biscuits with raspberry jam and place iced biscuits on top.

Icing
Mix icing sugar with flavouring and colouring. Add sufficient water to make a pink icing of spreading consistency.

If you do not have Mixed Spice, but would like to make your own...try this recipe...

Mixed Spice
1 tbsp cinnamon
1 tbsp nutmeg
1 tbsp allspice
2 tsp mace
1 tsp ground cloves

Mix all together and store in a sealed container.

Tuesday, February 24, 2009

Edmonds Anzac Biscuits


I have never tried to make Anzac Biscuits before so this was a new one for me. I had noticed the recipe for Anzac Biscuits many years ago in my Australian Women's Weekly Beautiful Biscuits cookbook, and never been tempted by them because I am not really a big fan of oatmeal.......well in cookies anyway. Often oatmeal cookies are too muffiny in texture for my liking so this recipe never made the starting gate for me. As part of my Kiwianna challenge, I decided that this would have to be one of the 'must make' recipes as it seems to be a traditional Australian and New Zealand cookie. Biscuit....I mean. So with friends coming to play after school, this provided the perfect opportunity to test them out.

I found the recipe unusual in it's lack of eggs, and low flour requirement and needed to add a touch more wet ingredients to make the dough stay together....but all in all a pretty easy make. I did find the estimated cooking time to be way too long for my oven, but I baked them using convection and thought I had taken enough time off the bake time already.....but I see I should have taken a little more off. A little more 'golden', but not yet burned. The batch size was small making exactly 20 cookies not counting the dough I ate....which was good BTW!

The feedback from the kids was positive as the batch is now gone........We'll definitely try these again:) They were quite chewy almost like a macaroon, due to the coconut I expect, and I may try a batch again tomorrow to improve upon the cooking time.


Anzac Biscuits

1/2 cup all purpose flour
1/3 cup sugar
2/3 coconut
3/4 cup rolled oats
50 g butter
1 tbsp golden syrup
1/2 tsp baking soda
2 tbsp boiling water

Mix together flour, sugar, coconut and rolled oats. Melt butter and golden syrup. Dissolve baking soda in the boiling water and add to butter and golden syrup. Stir butter mixture into the dry ingredients. Place level tablespoonsful of mixture onto cold greased trays. Bake at 180C for about 15 minutes or until golden. Next time I'll focus more on the 'until golden' and less on the recommended baking time.

Makes 20

Saturday, January 31, 2009

Kiwianna Challenge- Pikelets


For Christmas I received many nice things.......I am very fortunate. My good friend, (that abandoned me and moved to NZ) sent me this lovely compilation on Kiwianna Cooking. Thank you Alison, you know I love cookbooks. I had thought I should make an effort to actually try some of the recipes on a regular schedule. I am an avid collector of cookbooks and magazines........and I read through them like a kid reads comic books......and now and again I'll try an new recipe. In the interest of breaking that habit.....I'm going to try to make at least one recipe per month from this book.....so here is my start.

This morning I've decided to try the Pikelets. I've heard of these for years.......always known that they were some type of small pancake......and now (I think) I understand what they are. According to Wikipedia they are a member of the pancake..also called a drop scone. They are (according to my attempt) quite a stiff pancake batter making for a thick moist pancake gem. My batter dropped by the tablespoon (actually pushed off the spoon) made 2 1/2 inch pancakes that were 1/2 to 3/4 inch thick. The batter was slightly thinner than dumpling batter and I left it a little bit lumpy as you would a muffin batter since the recipe cautions not to over mix and make them tough. I know I probably made them a little on the smallish side since my recipe made more than that suggested by the recipe......but I cannot tell you exactly how many due to the repeated taste tests taking place in the kitchen at the time. They are really nice warm! I have no idea about how they taste cold:( I am told they are to be served with a bit of jam or butter but Ike chose this morning to have them dipped in a bit of Saskatoon berry syrup.

Well.....I really like them! And will definitely make them again. Maybe next time I'll get to try them when they are cold. As I was making them my mom called and I told her what I was making and she went off to have a try at them too.

From the Edmonds 100 Year Anniversary Cookery Book.....

Pikelets Makes 8-10

1 cup flour
1 tsp baking powder
1/4 tsp salt
1 egg
1/4 cup sugar
3/4 cup milk, approximately

Sift flour, baking powder and salt into a bowl. In another bowl beat egg and sugar until thick. Add with milk to the sifted ingredients. Mix until just combined. Drop tablespoonsful of the mixture from the point of spoon onto a hot, lightly greased griddle (actually the book says girdle....but I'm pretty sure they mean griddle.....but what do I know?) Turn Pikelets over when bubbles start to burst on the top surface. Cook second side until golden. I think my batter was a tiny bit too thick as I did not see bubbles breaking the surface on every one as you would on a pancake.

Extra foot note: Overmixing pikelet batter produces tough pikelets. If pikelets brown unevenly, wipe the cooking surface with a paper towel to remove excess butter.

All in all a very successful recipe! I will make them again....maybe even smaller to put into Ikes bento box for lunch one day. If you'd like to try the recipe and forward me a photo to add to this entry just leave a comment below and we'll set it up.

Hmmm learn something new every day! Ok ,I did a google search on Girdle vs. Griddle it appears they are the same....girdle being the Scottish terminology. Well I'm going to stick with griddle because cooking up a batch of pancakes on my grandmothers hot girdle doesn't sound very appetizing to me. So...girdle or griddle...use what you'd like.
Hope your having a great weekend:)

Feb 2/09 Note: I've already made the recipe two more times and have found that the thickness of the batter is a matter of personal preference. However, the thicker batter makes something more like crumpet and less like a pancake.......so for me I am liking them thicker and turning them when they are golden rather than waiting to see bubbles rising through the batter. Ike has taken them to school now with a little container of jam in his bento box. Yeah! a new bento snack....and he liked them too:)