Showing posts with label Daring Bakers Challenge. Show all posts

Tuesday, May 27, 2014

Pao de Queijo

This is only the second time I've ever made Pao de Queijo.  The first time was a few years ago when a friend from Brazil told my family that we simply had to try to make them...because they are so very good.  I honestly cannot remember the recipe I used on my first attempt....but I did remember that they were a cross between cream puff pastry and crusty bread rolls.  This time I followed the recipe from Dulce Delight.  She has a very entertaining video where she goes through the process and I love to use the Kitchen Aid stand mixer whenever I  can....and this seemed like a very good option to save my arms so serious work.  As it happens....these little gems are gluten free and really quite delicious.  They are savoury and addictive with a crisp exterior and a chewy inside.  Properly made, these little cheese breads, are made with a blend of two types of tapioca starch.  Unfortunately I was only able to find (sweet) tapioca starch locally and even an internet search for the (sour) tapioca starch did not prove to be fruitful.  There is no telling how much more wonderful these might be if only I had access to all the proper ingredients.  Regardless.....even with my substitutions of convenience, they were quite good.  

As we are carb limited in the house at the moment.....I froze the bulk of the dough in small balls...ready to bake up for our neighbourhood potluck in another week from now....and I only baked 5 to taste tonight.

This month's Daring Bakers' Challenge took us on a trip to beautiful Brazil! Renata of "Testado, Provado & Aprovado!" taught us how to make Pao De Queijo, tasty cheese buns that make the perfect snack or treat, and that will make your taste buds samba!

Pao de Queijo
(adapted from Dulce Delight)
400 g tapioca starch
1/4 tsp salt
20g butter
55 mL vegetable oil
300 mL whole milk
2 large eggs
200 g Dubliner Cheese (That's what I used but Monterey Jack is suggested)
100 g parmesan

Heat milk, oil, butter and salt in a heavy bottomed pot until just boiling.  While the milk mixture is heating, sift your starch and salt into the bowl of you kitchen aid stand mixer.  Once the milk is heated, pour all into the starch in the mixer and stir slowly with a spoon to wet the starch.  Turn on mixer and mix until the mixture resembles a smooth paste and it has cooled down enough to just feel warm. Add one egg and beat in on medium speed until it is smooth and creamy looking.  Add the second egg and mix until fully incorporated.  Continue mixing and add the grated cheeses until all mixed in. 
Heat oven to 350F and line a cookie sheet with parchment.  Roll balls of dough with oiled hands to the desired size and bake until golden on the bottom....15-25 min depending on size.


Friday, July 29, 2011

A Frasier- Too much cake for Two

This month, the baker's challenge took me longer than I'd anticipated.....it's always such a chore to begin....with so much going on around the house.  We finally...here it is.......It's a good one I think!
Jana of Cherry Tea Cakes was our July Daring Bakers’ host and she challenges us to make Fresh Frasiers inspired by recipes written by Elisabeth M. Prueitt and Chad Robertson in the beautiful cookbook Tartine.
I chose to keep it simple and stick with the classic vanilla cake and strawberry fruit filling.  They are in season here and easy to come by.....and cheap right now.....let's not forget cheap.  Sadly for me I could not find marzipan in any of the grocery stores here......seems to be a seasonal item...as I have seen it before......so I found a recipe off the internet and gave it a go.  I decorated minimally to cover my less than perfect cake.....Did the chocolate squiggles avert your attention from the less than perfect details??
With DH away and 3 of our nearest neighbours all gone on holiday.........the remainder found a new home with some friends of Ike.
Basic Chiffon Cake:

Ingredients:
1 cup + 2 tablespoons (270 ml) (5½ oz/155 gm) all-purpose flour
1 teaspoon (5 ml) (4 gm) baking powder
3/4 cups (180 ml) (6 oz /170 gm) sugar
1/2 teaspoon (2½ ml) (1½ gm) salt, preferably kosher
1/4 cup (2 fl oz/60 ml) vegetable oil
3 large egg yolks
⅓ cup + 1 tablespoon (3.17 fl oz/95 ml) water
1 teaspoon (5 ml) pure vanilla extract
3/4 teaspoon (3¾ ml) (3 gm) lemon zest, grated
5 large egg whites
¼ teaspoon (1¼ ml) (1 gm) cream of tartar
Directions:
  1. Preheat the oven to moderate 325°F (160°C/gas mark 3).
  2. Line the bottom of an 8-inch (20 cm) spring form pan with parchment paper. Do not grease the sides of the pan.
  3. In a large mixing bowl, stir together the flour and baking powder. Add in all but 3 tablespoons (45 ml.) of sugar, and all of the salt. Stir to combine.
  4. In a small bowl combine the oil, egg yolks, water, vanilla and lemon zest. Whisk thoroughly.
  5. Combine with the dry ingredients and mix thoroughly for about one minute, or until very smooth.
  6. Put the egg whites into a stand mixer, and beat on medium speed using a whisk attachment on a medium speed, until frothy. Add cream of tartar and beat on a medium speed until the whites hold soft peaks. Slowly add the remaining sugar and beat on a medium-high speed until the whites hold firm and form shiny peaks.
  7. Using a grease free rubber spatula, scoop about ⅓ of the whites into the yolk mixture and fold in gently. Gently fold in the remaining whites just until combined.
  8. Pour the batter into the prepared pan. Bake for 45 to 55 minutes or until toothpick inserted into the center comes out clean.
  9. Removed the cake from the oven and allow to cool in the pan on a wire rack.
  10. To unmold, run a knife around the sides to loosen the cake from the pan and remove the spring form sides. Invert the cake and peel off the parchment paper. Refrigerate for up to four days.

Pastry Cream Filling:

Gluten Free! Vegans see the links at the end!
Ingredients:
1 cup (8 fl oz/250 ml) whole milk
1/2 teaspoon (2½ ml) pure vanilla extract
1/8 teaspoon (1/2 ml) (¼ gm) salt, preferably kosher
2 tablespoons (30 ml) (10 gm)cornstarch
1/4 cup (60 ml) (2 oz/55 gm) sugar
1 large egg
2 tablespoons (30 ml) (1 oz/30 gm) unsalted butter
3/4 teaspoon (3¾ ml) (4 gm) gelatin
1/2 tablespoon (7½ ml) water
1 cup (8 fl oz/250 ml) heavy cream
Directions:
  1. Pour the milk, vanilla, and salt into a heavy sauce pan. Place over medium-high heat and scald, bringing it to a near boiling point. Stir occasionally.
  2. Meanwhile, in a stand mixer add the cornstarch and sugar. Whisk to combine
  3. Add the eggs to the sugar and cornstarch and whisk until smooth.
  4. When the milk is ready, gently and slowly while the stand mixer is whisking, pour the heated milk down the side of the bowl into the egg mixture.
  5. Pour the mixture back into the warm pot and continue to cook over a medium heat until the custard is thick, just about to boil and coats the back of a spoon.
  6. Remove from heat and pass through a fine mesh sieve into a large mixing bowl. Allow to cool for ten minutes stirring occasionally.
  7. Cut the butter into four pieces and whisk into the pastry cream a piece at a time until smooth.
  8. Cover the cream with plastic wrap, pressing the plastic wrap onto the top of the cream to prevent a skin from forming. Chill in the refrigerator for up to five days.
  9. In a small dish, sprinkle the gelatin over the water and let stand for a few minutes to soften.
  10. Put two inches (55 mm) of water into a small sauce pan and bring to a simmer over a medium heat.
  11. Measure 1/4 cup (2 oz/60 ml) of the chilled pastry cream into a small stainless steel bowl that will sit across the sauce pan with the simmering water, without touching the water.
  12. Heat the cream until it is 120 F (48.8 C). Add the gelatin and whisk until smooth. Remove from the water bath, and whisk the remaining cold pastry cream in to incorporate in two batches.
  13. In a stand mixer, fitted with the whisk attachment, whip the cream until it holds medium-stiff peaks. Immediately fold the whipped cream into the pastry cream with a rubber spatula.

Simple Syrup:

gluten free and vegan!
You may choose to flavor the syrup. One way is to use flavored sugar (for example: apple cider sugar, orange sugar, or vanilla sugar) or to stir in 1-2 teaspoons of flavored extract. You may also infuse with herbs or spices, if desired or add four tablespoons (60 ml) of fruit juice or liqueur while the syrup is cooling.
Ingredients:
1/3 cup (2⅔ fl oz/80 ml) (2⅔ oz/75 gm) of sugar, flavored or white
1/3 cup (2⅔ fl oz/80 ml) of water
Directions:
  1. Combine the water and sugar in a medium saucepan.
  2. Bring the mixture to a boil and let the sugar dissolve. Stirring is not necessary, but will not harm the syrup.
  3. Remove the syrup from the heat and cool slightly.
  4. Transfer syrup to a lidded container or jar that can be stored in the refrigerator. Simple syrup can be stored for up to one month.

Fraisier Assembly:

Components:
1 baked 8 inch (20 cm) chiffon cake
1 recipe pastry cream filling
⅓ cup (80 ml) simple syrup or flavored syrup
2 lbs (900 g) strawberries
confectioners’ sugar for dusting
½ cup (120 ml) (5 oz/140 gm) almond paste
Directions:
  1. Line the sides of a 8-inch (20 cm) spring form pan with plastic wrap. Do not line the bottom of the pan.
  2. Cut the cake in half horizontally to form two layers.
  3. Fit the bottom layer into the prepared spring form pan. Moisten the layer evenly with the simple syrup. When the cake has absorbed enough syrup to resemble a squishy sponge, you have enough.
  4. Hull and slice in half enough strawberries to arrange around the sides of the cake pan. Place the cut side of the strawberry against the sides of the pan, point side up forming a ring.
  5. Pipe cream in-between strawberries and a thin layer across the top of the cake.
  6. Hull and quarter your remaining strawberries and place them in the middle of the cake. Cover the strawberries and entirely with the all but 1 tbsp. (15 ml) of the pastry cream.
  7. Place the second cake layer on top and moisten with the simple syrup.
  8. Lightly dust a work surface with confectioners' sugar and roll out the almond paste to a 10-inch (25 cm) round 1/16 inch (1.5 mm) thick. Spread the remaining 1 tablespoon (15 ml) of pastry cream on the top of the cake and cover with the round of almond paste.
  9. Cover with plastic wrap and refrigerate for at least 4 hours.
  10. To serve release the sides of the spring form pan and peel away the plastic wrap.
  11. Serve immediately or store in the refrigerator for up to 3 days.

Sunday, March 27, 2011

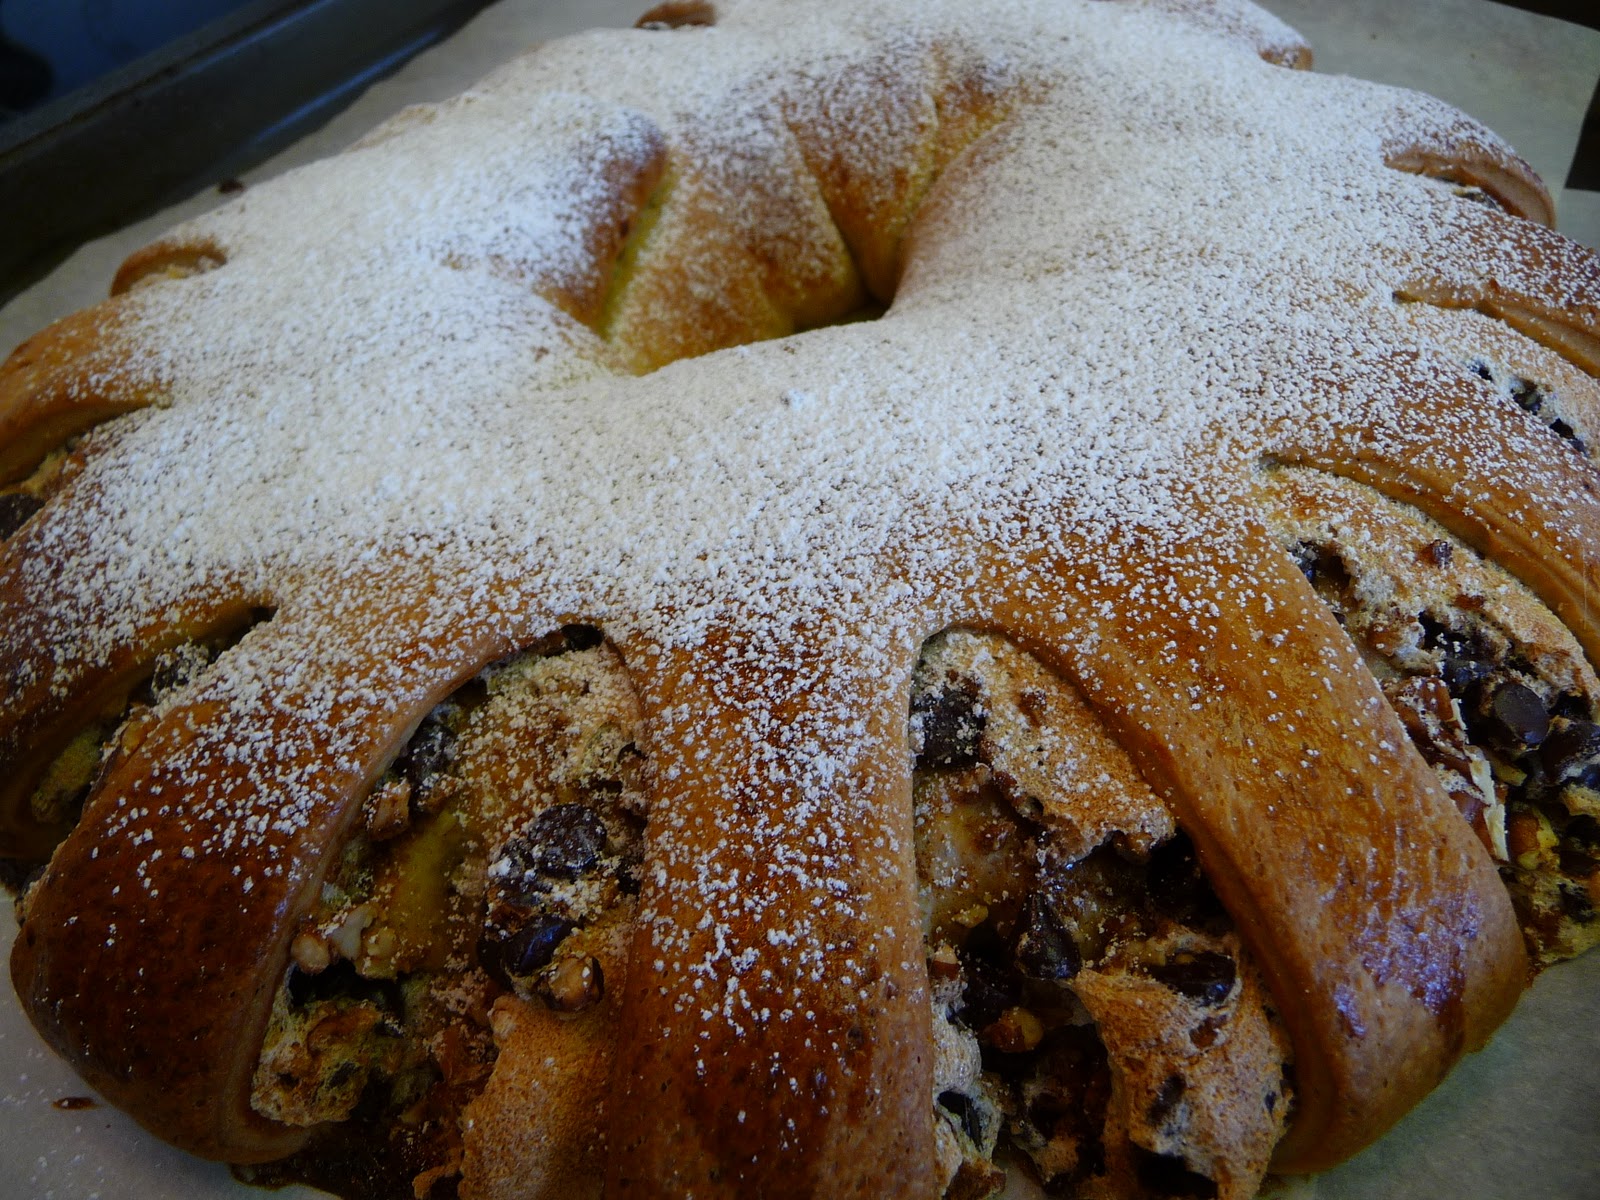
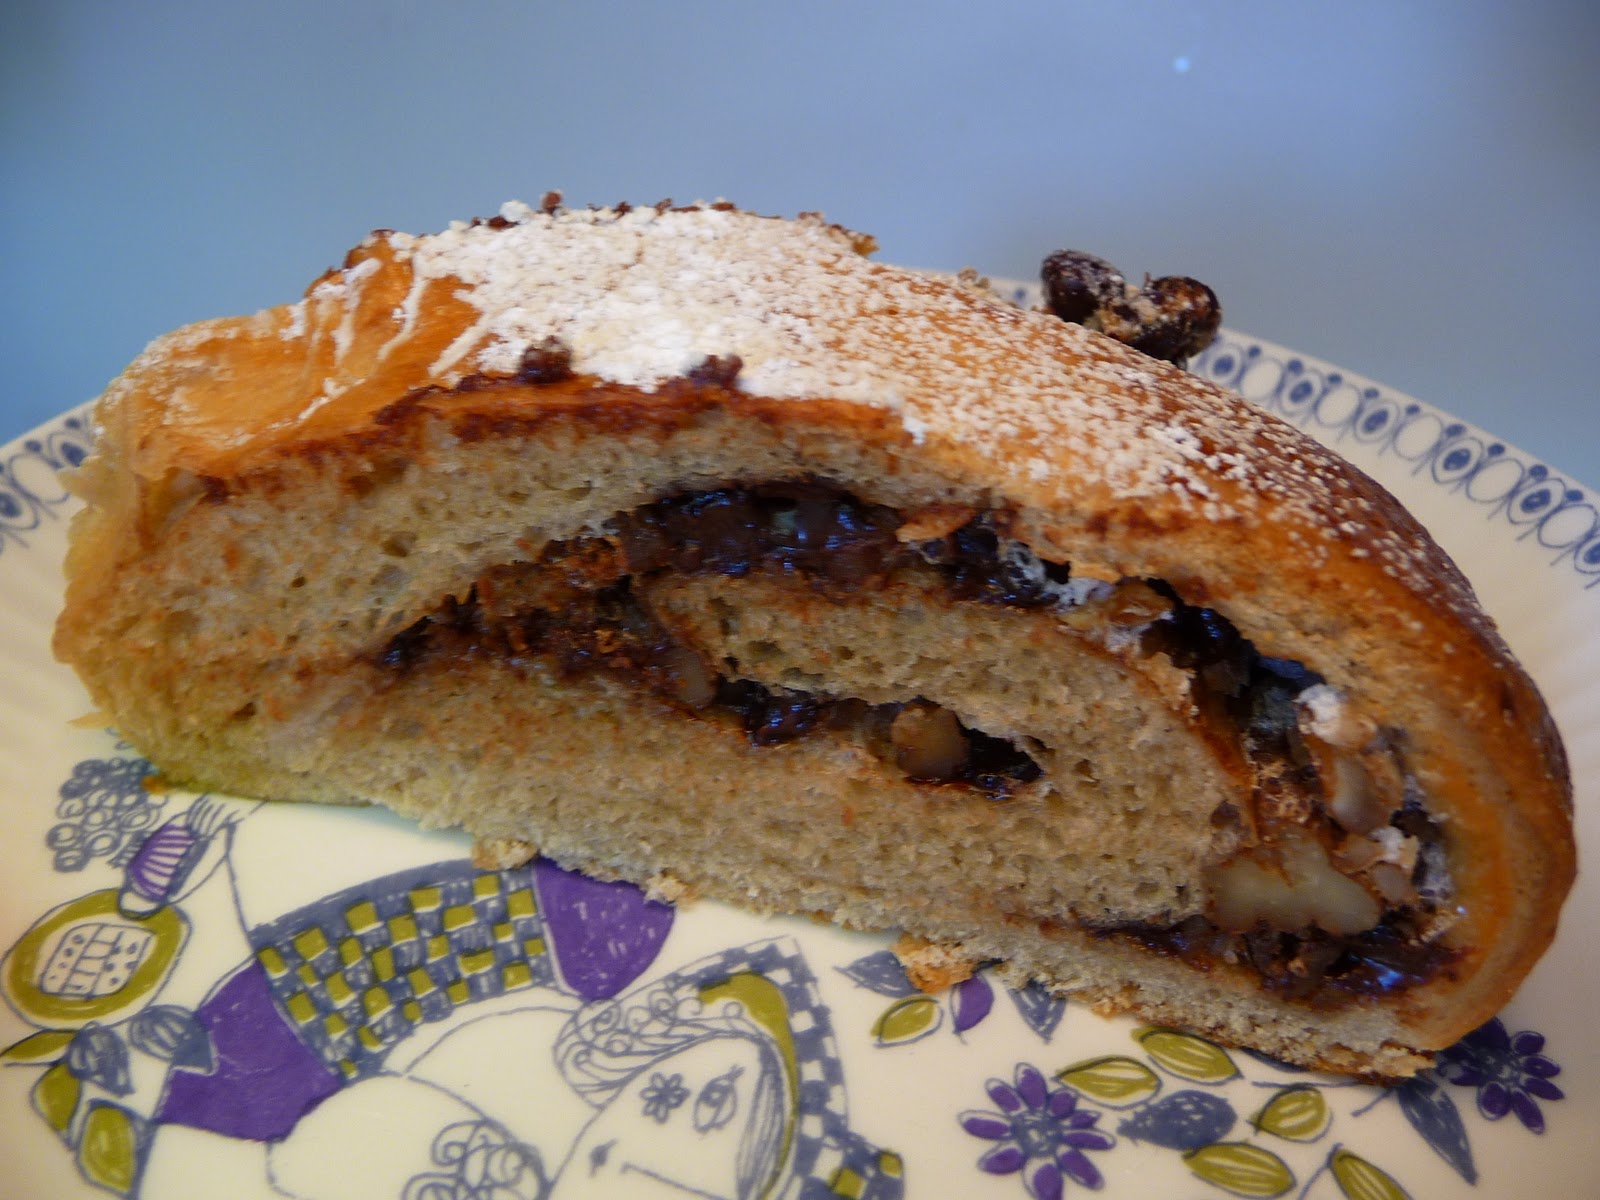
Meringue Filled Tea Masala Coffee Cake

I should warn you......this one is delicious!  At first.....I halved the recipe with the expectation of sharing the one ring I made with the neighbours.  After our small family tasting, I am embarrassed to say.......I doubt that there will be enough left over to share.  Read on at your own risk..................... 
The March 2011 Daring Baker’s Challenge was hosted by Ria of Ria’s Collection and Jamie of Life’s a Feast. Ria and Jamie challenged The Daring Bakers to bake a yeasted Meringue Coffee Cake.  I was quite interested in this challenge as I do like yeast breads and am always happy for the opportunity to try a new recipe.  The meringue filling made this one pretty intriguing and I have this packet of Masala Tea Spice sitting in my cupboard that I thought might make a nice addition to the recipe.  The only substitution I made was to use Tea Masala Spice in place of the cinnamon called for in the filling recipe and to add 1 tsp of Tea Masala spice to he warmed milk as well.  This addition to the milk did make the dough take on a more brown colour from the start.  Thanks to Ria and Jamie for hosting a delicious challenge that I will surely make again and again......it was delicious!  I highly recommend it for tea with a special guest.......as it is easy, impressive, and really delicious:) ......and the flavouring possibilities are nearly endless.  I hope you try it and discover a new flavour possibility!
MERINGUE FILLED COFFEE CAKE
Makes 2 round coffee cakes, each approximately 10 inches in diameter
The recipe can easily be halved to make one round coffee cake
Ingredients
For the yeast coffee cake dough:
4 cups (600 g / 1.5 lbs.) flour
¼ cup (55 g / 2 oz.) sugar
¾ teaspoon (5 g / ¼ oz.) salt
1 package (2 ¼ teaspoons / 7 g / less than an ounce) active dried yeast
¾ cup (180 ml / 6 fl. oz.) whole milk
¼ cup (60 ml / 2 fl. oz. water (doesn’t matter what temperature)
½ cup (135 g / 4.75 oz.) unsalted butter at room temperature
2 large eggs at room temperature
10 strands saffron for Ria’s version (Saffron might be hard to find and it’s expensive, so you can substitute with ½ - 1 teaspoon of ground cardamom or ground nutmeg. Or simply leave it plain like Jamie’s version)
For the meringue:
3 large egg whites at room temperature
¼ teaspoon salt
½ teaspoon vanilla
½ cup (110 g / 4 oz.) sugar
For the filling:
Jamie’s version:
1 cup (110 g / 4 oz.) chopped pecans or walnuts
2 Tablespoons (30 g / 1 oz.) granulated sugar
¼ teaspoon ground cinnamon
1 cup (170 g / 6 oz.) semisweet chocolate chips or coarsely chopped chocolate

Egg wash: 1 beaten egg
Cocoa powder (optional) and confectioner’s sugar (powdered/icing sugar) for dusting cakes

Directions:
Prepare the dough:
In a large mixing bowl, combine 1 ½ cups (230 g) of the flour, the sugar, salt and yeast.
In a saucepan, combine the milk, water and butter and heat over medium heat until warm and the butter is just melted. Ria’s version: add the 10 saffron threads to the warmed liquid and allow to steep off of the heat for 10 minutes. This will give the mixture a distinct aroma and flavor and a yellowish-orange hue.
With an electric mixer on low speed, gradually add the warm liquid to the flour/yeast mixture, beating until well blended. Increase mixer speed to medium and beat 2 minutes. Add the eggs and 1 cup (150 g) flour and beat for 2 more minutes.
Using a wooden spoon, stir in enough of the remaining flour to make a dough that holds together. Turn out onto a floured surface (use any of the 1 ½ cups of flour remaining) and knead the dough for 8 to 10 minutes until the dough is soft, smooth, sexy and elastic, keeping the work surface floured and adding extra flour as needed.

Place the dough in a lightly greased (I use vegetable oil) bowl, turning to coat all sides. Cover the bowl with plastic wrap and a kitchen towel and let rise until double in bulk, 45 – 60 minutes. The rising time will depend on the type of yeast you use.
Prepare your filling:In a small bowl, combine the cinnamon and sugar for the filling if using. You can add the chopped nuts to this if you like, but I find it easier to sprinkle on both the nuts and the chocolate separately.
Once the dough has doubled, make the meringue:
In a clean mixing bowl – ideally a plastic or metal bowl so the egg whites adhere to the side (they slip on glass) and you don’t end up with liquid remaining in the bottom – beat the egg whites with the salt, first on low speed for 30 seconds, then increase to high and continue beating until foamy and opaque. Add the vanilla then start adding the ½ cup sugar, a tablespoon at a time as you beat, until very stiff, glossy peaks form.
Assemble the Coffee Cakes:
Line 2 baking/cookie sheets with parchment paper.
Punch down the dough and divide in half. On a lightly floured surface, working one piece of the dough at a time (keep the other half of the dough wrapped in plastic), roll out the dough into a 20 x 10-inch (about 51 x 25 ½ cm) rectangle. Spread half of the meringue evenly over the rectangle up to about 1/2-inch (3/4 cm) from the edges. Sprinkle half of your filling of choice evenly over the meringue (ex: half of the cinnamon-sugar followed by half the chopped nuts and half of the chocolate chips/chopped chocolate).
Now, roll up the dough jellyroll style, from the long side. Pinch the seam closed to seal. Very carefully transfer the filled log to one of the lined cookie sheets, seam side down. Bring the ends of the log around and seal the ends together, forming a ring, tucking one end into the other and pinching to seal.
Using kitchen scissors or a sharp knife (although scissors are easier), make cuts along the outside edge at 1-inch (2 ½ cm) intervals. Make them as shallow or as deep as desired but don’t be afraid to cut deep into the ring.
Repeat with the remaining dough, meringue and fillings.
Cover the 2 coffee cakes with plastic wrap and allow them to rise again for 45 to 60 minutes.
Preheat the oven to 350°F (180°C).
Brush the tops of the coffee cakes with the egg wash. Bake in the preheated oven for 25 to 30 minutes until risen and golden brown. The dough should sound hollow when tapped.
Remove from the oven and slide the parchment paper off the cookie sheets onto the table. Very gently loosen the coffee cakes from the paper with a large spatula and carefully slide the cakes off onto cooling racks. Allow to cool.
Just before serving, dust the tops of the coffee cakes with confectioner’s sugar as well as cocoa powder if using chocolate in the filling. These are best eaten fresh, the same day or the next day.

Sunday, February 27, 2011

A Daring Panna Cotta with Florentines

I was pretty happy with the choice of making Panna Cotta for this months Baker's Challenge.  I absolutely love creme caramel and other custard type desserts and was thinking that I would probably like this as well.  One of these days I will have to try this recipe again with a fruit flavouring as it seems to be more traditional....but to start with.....this version using buttermilk seemed to grab my attention.  Plus I like buttermilk recipes since you can substitute milk kefir which I often have on hand anyway.  In addition to the Panna Cotta we also were required to make florentine cookies.  The recipe provided was intriguing to me as it contained no nuts which could be handy for some people.  I have never noticed,  nor ordered Panna Cotta on a menu before, but I am assuming it customarily comes with some type of cookie accompaniment and thus the need for this seemingly unrelated recipe??  
So, the end result of the challenge.......Everyone Loved it........and  asked for seconds.  Using the buttermilk gave it a flavour edging towards yogurt.....a bit of a tang.  The caramel sauce was super easy, and would be great for ice cream......or apparently just by itself:)  The amount of gelatin was just enough to make it thicken.....but not make it like wobbly jelly.......just right in fact.  And the boys enjoyed dunking their florentine cookies in through the caramel before eating them up.  I will certainly be trying this one again!  I like that it makes pretty individual servings....perfect to make ahead for when company is coming.  And....I loved that it was super quick and easy!  I poured them into vintage ruby coloured sherry glasses....let the Panna Cotta chill.....and then topped them with warm Cinnamon Caramel Sauce.  YUM!  It you are are looking for something to make for dessert that looks impressive.......you really should try it....
The February 2011 Daring Bakers’ challenge was hosted by Mallory from A Sofa in the Kitchen. She chose to challenge everyone to make Panna Cotta from a Giada De Laurentiis recipe and Nestle Florentine Cookies.


Buttermilk Panna Cotta with Cinnamon Carmel Sauce
1 1/2 tsp gelatin
1 cup whip cream, divided
1/3 cup sugar
1 1/2 cup buttermilk
2 1/2 tsp vanilla, divided
1/2 cup brown sugar
1/8 tsp cinnamon


Pour 1 1/2 tablespoons of water into a small bowl and sprinkle gelatin over evenly.  Let sit for 10 minutes.  Combine 3/4 cup cream, 1/3 cup sugar in a small saucepan and stir over medium high heat until the sugar dissolved and the mixture begins to simmer.  Remove from the heat , and add softened gelatin and stir until fully dissolved.  Cool to warm stirring occasionally.  Stir in buttermilk and 1 1/2 tsp vanilla.  Divide into 6 ramekins, cover and refrigerate for at least 4 hours.  
Prepare Sauce:
Combine brown sugar and 1/4 cup cream in a small saucepan.  Stir over medium heat until sugar dissolves and caramel sauce is smooth.  Remove from heat and stir in cinnamon and 1 tsp vanilla.


Nut Free Florentine Cookies
Ingredients:
2/3 cup (160 ml) (150 gm) (5.3 oz) unsalted butter
2 cups (480 ml) (160 gm) (5 2/3 oz) quick oats
1 cup (240 ml) (230 gm) (8 oz) granulated sugar
2/3 cup (160 ml) (95 gm) (3⅓ oz) plain (all purpose) flour
1/4 cup (60 ml) dark corn syrup
1/4 cup (60 ml) whole milk
1 tsp (5 ml) vanilla extract
pinch of salt
1½ cups (360 ml) (250 gm) (9 oz) dark or milk chocolate
Directions:
Preheat oven to moderately hot 375°F (190°C) (gas mark 5). Prepare your baking sheet with silpat or parchment paper.
  1. Melt butter in a medium saucepan, then remove from the heat.
  2. To the melted butter add oats, sugar, flour, corn syrup, milk, vanilla, and salt. Mix well. Drop a tablespoon full, three inches (75 mm) apart, onto your prepared baking sheet. Flatten slightly with the back of your tablespoon, or use a spatula.  
  3. Bake in preheated oven for 6-8 minutes, until cookies are golden brown. Cool completely on the baking sheets.
  4. While the cookies are cooling melt your chocolate until smooth either in the microwave (1 1/2 minutes), or stovetop (in a double boiler, or a bowl that fits atop a saucepan filled with a bit of water, being sure the water doesn't touch the bottom of the bowl)
  5. Peel the cookies from the silpat or parchment and place face down on a wire rack set over a sheet of wax/parchment paper (to keep counters clean). 
  6. Spread a tablespoon of chocolate on the bottom/flat side of your cookie, sandwiching another (flat end) cookie atop the chocolate.
This recipe will make about 2 1/2 - 3 dozen sandwiched Florentine cookies. You can also choose not to sandwich yours, in which case, drizzle the tops with chocolate (over your wax paper).

Tuesday, February 15, 2011

Valentine's Soba and Tempura

It just so happened that the Daring  Cook's Challenge coincided with Valentine's Day this year.......and I have been very delinquent on my Daring attempts these past few months.  So......I was pretty happy to see that this month was not going to be extremely time consuming, and not likely to cause me undue stress for a quick Valentine's meal.  It was after all a very full day yesterday!
The February 2011 Daring Cooks’ challenge was hosted by Lisa of Blueberry Girl. She challenged Daring Cooks to make Hiyashi Soba and Tempura. She has various sources for her challenge including japanesefood.about.com, pinkbites.com, and itsybitsyfoodies.com
It went together quickly, was appealing to kids and adults, and turned out well. The soba noodles were new for us and were a nice addition to the tempura meal.

Soba Noodles:
Ingredients
2 quarts (2 Liters) water + 1 cup cold water, separate
12 oz (340 g) dried soba (buckwheat) noodles (or any Asian thin noodle)
Directions:
Cooking the noodles:
  1. Heat 2 quarts of water to a boil in a large pot over high heat. Add the noodles a small bundle at a time, stirring gently to separate. When the water returns to a full boil, add 1 cup of cold water. Repeat this twice. When the water returns to a full boil, check the noodles for doneness. You want to cook them until they are firm-tender. Do not overcook them.
  2. Drain the noodles in a colander and rinse well under cold running water until the noodles are cool. This not only stops the cooking process, but also removes the starch from the noodles. This is an essential part of soba noodle making. Once the noodles are cool, drain them and cover them with a damp kitchen towel and set them aside allowing them to cool completely.
  3. Mentsuyu - Traditional dipping sauce:
    Ingredients
    2 cups (480ml) Kombu and Katsuobushi dashi (This can be bought in many forms from most Asian stores and you can make your own. Recipe is HERE.) Or a basic vegetable stock.
    1/3 cup (80 ml) soy sauce or a low sodium soy sauce
    1/3 cup (80 ml) mirin (sweet rice wine)
    *Note: If you can’t find Mirin, a substitute recipe can be found HERE
    Directions:
  4. Put mirin in a sauce pan and heat gently. Add soy sauce and dashi soup stock in the pan and bring to a boil. Take off the heat and cool. Refrigerate until ready to use.
  5. Common Hiyashi Soba Toppings:
  6. Thin omelet strips
  7. Ham
  8. Boiled chicken breasts
  9. Cucumber
  10. Boiled bean sprouts
  11. Tomatoes
  12. Toasted nori (Dried Seaweed)
  13. Green onions
  14. Wasabi powder
  15. Finely grated daikon (Japanese radish)
  16. Beni Shoga (Pickled Ginger)
All toppings should be julienne, finely diced or grated. Prepare and refrigerate covered until needed.
Serving:
Traditionally soba is served on a bamboo basket tray, but if you don’t have these, you can simply serve them on a plate or in a bowl. Divide up the noodles, laying them on your serving dishes. Sprinkle each one with nori. In small side bowl or cup, place 1/2 cup (120 ml) of dipping sauce into each. In separate small side dishes, serve each person a small amount of wasabi, grated daikon, and green onions.
The noodles are eaten by sprinkling the desired garnishes into the dipping sauce and eating the noodles by first dipping them into the sauce. Feel free to slurp away! Oishii!
Tempura
Ingredients
1 egg yolk from a large egg
1 cup (240 ml) iced water
½ cup (120 ml) (70 gm) (2½ oz) plain (all purpose) flour, plus extra for dredging
½ cup (120 ml) (70 gm) (2½ oz) cornflour (also called cornstarch)
½ teaspoon (2½ ml) (2½ gm) (0.09 oz) baking powder
oil, for deep frying preferably vegetable
ice water bath, for the tempura batter (a larger bowl than what will be used for the tempura should be used. Fill the large bowl with ice and some water, set aside)
Very cold vegetables and seafood of your choice ie:
  • Sweet potato, peeled, thinly sliced, blanched
  • Carrot, peeled, thinly sliced diagonally
  • Pumpkin, peeled, seeds removed, thinly sliced blanched
  • Green beans, trimmed
  • Green bell pepper/capsicum, seeds removed, cut into 2cm (¾ inch)-wide strips
  • Assorted fresh mushrooms
  • Eggplant cut into strips (traditionally it’s fanned)
  • Onions sliced
Directions:
  1. Place the iced water into a mixing bowl. Lightly beat the egg yolk and gradually pour into the iced water, stirring (preferably with chopsticks) and blending well. Add flours and baking powder all at once, stroke a few times with chopsticks until the ingredients are loosely combined. The batter should be runny and lumpy. Place the bowl of batter in an ice water bath to keep it cold while you are frying the tempura. The batter as well as the vegetables and seafood have to be very cold. The temperature shock between the hot oil and the cold veggies help create a crispy tempura.
  2. Heat the oil in a large pan or a wok. For vegetables, the oil should be 320°F/160°C; for seafood it should be 340°F/170°C. It is more difficult to maintain a steady temperature and produce consistent tempura if you don’t have a thermometer, but it can be done. You can test the oil by dropping a piece of batter into the hot oil. If it sinks a little bit and then immediately rises to the top, the oil is ready.
  3. Start with the vegetables, such as sweet potatoes, that won’t leave a strong odor in the oil. Dip them in a shallow bowl of flour to lightly coat them and then dip them into the batter. Slide them into the hot oil, deep frying only a couple of pieces at a time so that the temperature of the oil does not drop.
  4. Place finished tempura pieces on a wire rack so that excess oil can drip off. Continue frying the other items, frequently scooping out any bits of batter to keep the oil clean and prevent the oil (and the remaining tempura) from getting a burned flavor.
  5. Serve immediately for the best flavor, but they can also be eaten cold.
  6.  

Monday, September 27, 2010

September's Daring Bears

When you talk about September in my neighbourhood....chances are good bears will enter the conversation.  Just last week while I was away there was a mother and cub (black bears) wandering from yard to yard looking for tasty apples and berries to see them through the long winter.  As the bears become so  'Daring' that noisy neighbourhood activity no longer frightens them away......this can become a problem with sad consequences for the bears.  With all the bear activity around here, it seemed appropriate as I pawed through my cookie cutter collection that I should choose the bear shaped one of this month's challenge with the Daring Bakers.
The September 2010 Daring Bakers’ challenge was hosted by Mandy of “What the Fruitcake?!” Mandy challenged everyone to make Decorated Sugar Cookies based on recipes from Peggy Porschen and The Joy of Baking.
Since I am out of town for a good chunk of the coming week again....I decided to bake up just a few of the batch and to store the remaining dough for rolling when I return home.  As a modification I used rum flavouring and added 1/4 tsp ground fresh nutmeg to the recipe below.  I am leaving these little bear cookies for Ike to have for lunch while I am away so I will have to update with his thoughts on their flavour.  The dough was very easy to work with and I can comment that the dough was quite tasty too:)
Basic Sugar Cookies:
Makes Approximately 36x 10cm / 4" Cookies
200g / 7oz / ½ cup + 6 Tbsp Unsalted Butter, at room temperature
400g / 14oz / 3 cups + 3 Tbsp All Purpose / Plain Flour
200g / 7oz / 1 cup Caster Sugar / Superfine Sugar
1 Large Egg, lightly beaten
5ml / 1 tsp Vanilla Extract / Or seeds from 1 vanilla bean
Directions
• Cream together the butter, sugar and any flavourings you’re using. Beat until just becoming
creamy in texture.
Tip: Don’t over mix otherwise you’ll incorporate too much air and the cookies will spread during
baking, losing their shape.

• Beat in the egg until well combined, make sure to scrape down the sides of the bowl.
Add the sifted flour and mix on low until a non sticky dough forms.
Tip: I don’t have a stand mixer so I find it easier to switch to dough hooks at this stage to avoid
flour flying everywhere.

• Knead into a ball and divide into 2 or 3 pieces.
• Roll out each portion between parchment paper to a thickness of about 5mm/1/5 inch (0.2 inch)
• Refrigerate for a minimum of 30mins.
Tip: Recipes commonly just wrap the whole ball of dough in clingwrap and then refrigerate it for an
hour or overnight, but by rolling the dough between parchment, this shortens the chilling time and
then it’s also been rolled out while still soft making it easier and quicker.

• Once chilled, peel off parchment and place dough on a lightly floured surface.
• Cut out shapes with cookie cutters or a sharp knife.
• Arrange shapes on parchment lined baking sheets and refrigerate for another 30mins to an hour.
Tip: It’s very important you chill them again otherwise they’ll spread while baking.
• Re-roll scraps and follow the above process until all scraps are used up.
• Preheat oven to 180°C (160°C Fan Assisted) / 350°F / Gas Mark 4.
• Bake until golden around the edges, about 8-15mins depending on the size of the cookies.
Tip: Bake same sized cookies together otherwise mixing smaller with larger cookies could result in
some cookies being baked before others are done.

Tip: Rotate baking sheets half way through baking if your oven bakes unevenly.
• Leave to cool on cooling racks.
• Once completely cooled, decorate as desired.
Tip: If wrapped in tinfoil/cling wrap or kept in airtight containers in a cool place, un-decorated
cookies can last up to a month.

Friday, August 27, 2010

Ice Cream Petite Fours

The August 2010 Daring Bakers’ challenge was hosted by Elissa of 17 and Baking. For the first time, The Daring Bakers partnered with Sugar High Fridays for a co-event and Elissa was the gracious hostess of both. Using the theme of beurre noisette, or browned butter, Elissa chose to challenge Daring Bakers to make a pound cake to be used in either a Baked Alaska or in Ice Cream Petit Fours. The sources for Elissa’s challenge were Gourmet magazine and David Lebovitz’s “The Perfect Scoop”.
This month's challenge caught me running a little behind, but I did manage just barely to get done what I needed just in time.  Fortunately, I had lots of mocha  ice cream left over from last months challenge, and this was a good way to use it up.  I did absolutely the love the brown butter pound cake.....you should really give it a try.......and I liked the overall flavour combination in the petite fours...They are fabulous.  Another excellent challenge!
The Brown butter recipe can be found below and the mocha ice cream recipe is in last month's challenge.   Feel free to enter the current giveaways posted below as well if you are interested, and take a minute to check out what other Daring Bakers put together for this month's challenge.  I'm going to go that myself.....right now!  Thanks for stopping by:)
 
 Brown Butter Pound Cake
19 tablespoons (9.5 oz) (275g) unsalted (sweet) butter
2 cups (200g) sifted cake flour (not self-rising; sift before measuring) (See “Note” section for cake flour substitution)
1 teaspoon (5g) baking powder
1/2 teaspoon (3g) salt
1/2 cup (110g) packed light brown sugar
1/3 (75g) cup granulated sugar
4 large eggs
1/2 teaspoon pure vanilla extract
1. Preheat the oven to 325°F/160°C and put a rack in the center. Butter and flour a 9”x9” (23cmx23cm) square pan.
2. Place the butter in a 10” (25cm) skillet over medium heat. Brown the butter until the milk solids are a dark chocolate brown and the butter smells nutty. (Don’t take your eyes off the butter in case it burns.) Pour into a shallow bowl and chill in the freezer until just congealed, 15-30 minutes.
3. Whisk together cake flour, baking powder, and salt.
4. Beat the brown butter, light brown sugar, and granulated sugar in an electric mixer until light and fluffy, about 2 minutes. Beat in the eggs one at a time, mixing well, and then the vanilla extract.
5. Stir in the flour mixture at low speed until just combined.
6. Scrape the batter into the greased and floured 9”x9” (23cmx23cm) square pan. Smooth the top with a rubber spatula and rap the pan on the counter. Bake until golden brown on top and when a toothpick inserted into the center comes out clean, about 25 minutes.
7. Cool in the pan 10 minutes. Run a knife along the edge and invert right-side-up onto a cooling rack to cool completely.
Chocolate Glaze (For the Ice Cream Petit Fours)
9 ounces (250g) dark chocolate, finely chopped
1 cup (250 ml) heavy (approx 35% butterfat) cream
1 1/2 tablespoons (32g) light corn syrup, Golden syrup, or agave nectar
2 teaspoons (10ml) vanilla extract (I substituted coffee liqueur)
Stir the heavy cream and light corn syrup in a small saucepan over medium heat until it comes to a boil. Remove from heat and add the dark chocolate. Let sit 30 seconds, then stir to completely melt the chocolate. Stir in the vanilla and let cool until tepid before glazing the petit fours.

Once cooled, the cake was leveled and split into two layer. I put one layer back into the pan which I  had covered in a layer of plastic wrap. Then I spread the softened ice cream over top and popped the second  cake layer on top of that.  After cooling over night in the freezer, I removed the cake, cut away the rough edges and cut the cake up into 1 inch squares.  The 1 inch squares with covered with glaze and sprinkled with mocha powder and left in the freezer until serving time.

Tuesday, July 27, 2010

A Billy Miner Bomb

The July 2010 Daring Bakers’ challenge was hosted by Sunita of Sunita’s world – life and food. Sunita challenged everyone to make an ice-cream filled Swiss roll that’s then used to make a bombe with hot fudge. Her recipe is based on an ice cream cake recipe from Taste of Home.-
I was pretty interested to get going on the Daring Bakers Challenge this month as our summer traveling schedule was going to be making things a little difficult to get everything done.  This one had quite a few steps that required a lot of cooling times in between, so it was not a challenge that you could easily knock off in one day.  After a lot of thought, I decided that the flavour I wanted to theme this months challenge was going to be Billy Miner Pie.  Billy Miner Pie is a 'to die for' dessert served at the Keg Steak house chain here in Canada.  It is a mocha ice cream cake with a chocolate cookie crumb crust dressed in hot fudge sauce and carmel.......and I think with some sliced almonds (if I recall correctly).  In order to keep this flavour theme I found a recipe for mocha ice cream from Allrecipes that I felt would work well for me and altered it only very slightly.  I have never thought to make or even purchased a swiss roll before, so I was quite interested to see how this part of the challenge would play out for me.  I could not bring myself to make two separate batches of ice cream as my ice cream maker makes a gallon of ice cream at a time and we would never eat it quickly enough.  I did not feel confident in my abilities to make the ice cream by hand.  As it turns out....with a 2 L bowl as a mold, I will still have tons of ice cream left over which we can make our way through I'm sure.  I wanted very much to make this dessert to serve for friends visiting from NZ but figured out quite quickly that it would be too much of a rush to accomplish this and dinner with the time constraints involved.  Since I am away...I just had time to snatch a quick photo of the unmolded dessert.   DH will be enjoying the completed challenge with caramel sauce and extra hot fudge sauce.......with the neighbours (I hope).
Over all I loved that this challenge gave me the opportunity to make a swiss roll.  It turned out absolutely light and beautiful and seems like something nice to serve for dessert with a light lunch.  I will have to investigate other flavour options and make some dates for tea now:)  I came very close to making an ice cream cake for Ike's birthday party back in June....and I feel happy now that I didn't since this challenge has given me that opportunity.  If you'd like to give one of these a go.....here is what I did....  When you have time, do have a look over here to see the beautiful results of some other Daring Bakers as well!
The Swiss rolls-
Preparation time- 10 minutes
Baking time- 10-12 minutes
Rolling and cooling time- at least 30 minutes
Filling-5-8 minutes
Filling and rolling- 5-10 minutes
Ingredients-
6 medium sized eggs (or 5 large)
1 C / 225 gms caster sugar /8 oz+ extra for rolling
6 tblsp / 45gms/ a pinch over 1.5 oz of all purpose (plain) flour + 5 tblsp/40gm /a pinch under 1.5 oz of natural unsweetened cocoa powder, sifted together
2 tblsp /30ml / 1 fl oz of boiling water
a little oil for brushing the pans
For the filling-
2C / 500 mls/ 16 fl oz of whipping cream
1 vanilla pod, cut into small pieces of about ½ cm (or 1 tsp vanilla extract)
5 tblsp / 70gms/2.5oz of caster sugar
Method-
  1. Pre heat the oven at 200 deg C /400 deg F approximately. Brush the baking pans ( 11 inches by 9 inches ) with a little oil and line with greaseproof baking paper. If you have just one pan, bake one cake and then let the pan cool completely before using it for the next cake.
  2. In a large mixing bowl, add the eggs and sugar and beat till very thick; when the beaters are lifted, it should leave a trail on the surface for at least 10 seconds.
  3. Add the flour mixture, in three batches and fold in gently with a spatula. Fold in the water.
  4. Divide the mixture among the two baking pans and spread it out evenly, into the corners of the pans.
  5. Place a pan in the centre of the pre heated oven and bake for about 10-12 minutes or till the centre is springy to the touch.
  6. Spread a kitchen towel on the counter and sprinkle a little caster sugar over it.
  7. Turn the cake on to the towel and peel away the baking paper. Trim any crisp edges.
  8. Starting from one of the shorter sides, start to make a roll with the towel going inside. Cool the wrapped roll on a rack, seam side down.
  9. Repeat the same for the next cake as well.
  10. Grind together the vanilla pieces and sugar in a food processer till nicely mixed together. If you are using vanilla extract, just grind the sugar on its own and then add the sugar and extract to the cream.
The Filling
  1. In a large bowl, add the cream and vanilla-sugar mixture and beat till very thick.
  2. Divide the cream mixture between the completely cooled cakes.
  3. Open the rolls and spread the cream mixture, making sure it does not go right to the edges (a border of ½ an inch should be fine).
  4. Roll the cakes up again, this time without the towel. Wrap in plastic wrap and chill in the fridge till needed, seam side down.
The Hot fudge sauce- I made this just after adding the layer of vanilla ice cream to the cake.
Preparation time-2 minutes
Cooking time-2 minutes
Ingredients-
1 C / 230gms/ 8 oz of caster sugar
3 tblsp / 24gms/1.5 oz of natural unsweetened cocoa powder
2 tblsp /15gms/ 1 oz of cornflour/cornstarch
1 and ½ C /355ml /12 fl oz of water
1 tblsp /14gms/ 1 oz butter
1 tsp/5 ml / .15 fl oz vanilla extract
Method-
  1. In a small saucepan, whisk together the sugar, cocoa powder, cornflour and water.
  2. Place the pan over heat, and stir constantly, till it begins to thicken and is smooth (for about 2 minutes).
  3. Remove from heat and mix in the butter and vanilla. Keep aside to cool .
Mocha Ice Cream Recipe
2 1/4 cups sugar
3/4 cup cocoa powder
1/3 cup flour
3 Tbsp instant coffee granules
dash of salt
3 cups milk
4 eggs beaten
4 cups whipping cream
2 cups milk
3 Tbsp vanilla extract
Combine the first 5 ingredients in a saucepan gradually adding milk and eggs while stirring until smooth.  Cook over medium heat to 160 F or until thickened. (about 15 minutes)  Set custard to cool in fridge.  Once the custard is cold add remaining ingredients and pour into your ice cream maker or freezer.

Tuesday, June 29, 2010

A Chocolate Pavlova Baker's Challenge

The June 2010 Daring Bakers’ challenge was hosted by Dawn of Doable and Delicious. Dawn challenged the Daring Bakers’ to make Chocolate Pavlovas and Chocolate Mascarpone Mousse. The challenge recipe is based on a recipe from the book Chocolate Epiphany by Francois Payard
After trying a Pavlova on my own just a short time ago, the Daring Baker's announced their June Chocolate Pavlova Challenge last month.  While I do love chocolate, I was very skeptical about this chocolate version.  While we all LOVED the traditional version we tried here......I knew that the chocolate version would be entirely a different thing.  The traditional version topped with flavoured whipped cream and fruit is light and summery.  The chocolate version is dense and rich and is a hit of extreme chocolate.  Based on the amounts of filling required for the traditional Pavlova I reduced the size of the chocolate mousse filling recipe by 1/2 as the recipe as stated would make way too much filling for a 3 egg Pavlova.  The amount of Creme Anglaise drizzle required is also way more than is required for the recipe so I scaled it back to 1/5 of the original making just over 1/2 cup of glaze.  Not being able to find any mascarpone cheese meant that I did have to make my own again as we did back in the Tiramisu challenge over here.....and it turned out beautifully again.....this time I used just regular grocery store whipping cream without any problems.
Over all, I found the dessert so completely changed by the addition of the chocolate and the heaviness of the mascarpone mousse filling (compared to a whipped cream filling) that I would not describe it as a Pavlova......it's not the same kind of dessert experience at all.  If you like super intense chocolate flavour you may well like this dessert.  If you love traditional Pavlova this will be different.  Since I love traditional Pavlova....I think I would just leave well enough alone and continue to make it in the traditional manner as it is really not to be improved upon for me.  I would be tempted to make the chocolate Pavlova base again.....but not the mascarpone mousse nor the Creme Anglaise drizzle.  I much prefer the lightness of the traditional whipped cream filling with fresh fruit and could do without all the added steps required for the fillings as presented here.  The challenge has pointed out some options to try as far as making some alterations from the traditional recipe that I never really thought about before.....so for that I really enjoyed this challenge.  Plus there's nothing wrong with a good hit of chocolate now and again:)

Recipe 1: Chocolate Meringue (for the chocolate Pavlova):
3 large egg whites
½ cup plus 1 tbsp (110 grams) white granulated sugar
¼ cup (30 grams) confectioner’s (icing) sugar
1/3 cup (30 grams) cocoa powder
Directions:
  1. Place a rack in the center of the oven and preheat to 200º F (95º C) degrees. Line two baking sheets with silpat or parchment and set aside.
  2. Put the egg whites in a bowl and whip until soft peaks form. Increase speed to high and gradually add granulated sugar about 1 tbsp at a time until stiff peaks form. (The whites should be firm but moist.)
  3. Sift the confectioner’s sugar and cocoa powder over the egg whites and fold the dry ingredients into the white. (This looks like it will not happen. Fold gently and it will eventually come together.)
  4. Fill a pastry bag with the meringue. Pipe the meringue into whatever shapes you desire. Alternatively, you could just free form your shapes and level them a bit with the back of a spoon. (Class made rounds, hearts, diamonds and an attempt at a clover was made!)
  5. Bake for 2-3 hours until the meringues become dry and crisp. Cool and store in an airtight container for up to 3 days.
Recipe 2: Chocolate Mascarpone Mousse (for the top of the Pavlova base):
1 ½ cups (355 mls) heavy cream (cream with a milk fat content of between 36 and 40 percent)
grated zest of 1 average sized lemon
9 ounces (255 grams) 72% chocolate, chopped
1 2/3 cups (390 mls) mascarpone (don't forget we made this a few months ago - get the printable .pdf HERE)
pinch of nutmeg
2 tbsp (30 mls) Grand Marnier (or orange juice)
Directions:
  1. Put ½ cup (120 mls) of the heavy cream and the lemon zest in a saucepan over medium high heat. Once warm, add the chocolate and whisk until melted and smooth. Transfer the mixture to a bowl and let sit at room temperature until cool.
  2. Place the mascarpone, the remaining cup of cream and nutmeg in a bowl. Whip on low for a minute until the mascarpone is loose. Add the Grand Marnier and whip on medium speed until it holds soft peaks. (DO NOT OVERBEAT AS THE MASCARPONE WILL BREAK.)
  3. Mix about ¼ of the mascarpone mixture into the chocolate to lighten. Fold in the remaining mascarpone until well incorporated. Fill a pastry bag with the mousse. Again, you could just free form mousse on top of the pavlova.

    Recipe 3: Mascarpone Cream (for drizzling):
    1 recipe crème anglaise
    ½ cup (120 mls) mascarpone
    2 tbsp (30 mls) Sambucca (optional)
    ½ cup (120 mls) heavy cream
    Directions

    1. Prepare the crème anglaise. Slowly whisk in the mascarpone and the Sambucca and let the mixture cool. Put the cream in a bowl and beat with electric mixer until very soft peaks are formed. Fold the cream into the mascarpone mixture.
       

      Recipe 4: Crème Anglaise (a component of the Mascarpone Cream above):
      1 cup (235 mls) whole milk
      1 cup (235 mls) heavy cream
      1 vanilla bean, split or 1 tsp pure vanilla extract
      6 large egg yolks
      6 tbsp (75 grams) sugar
      Directions:
    1. In a bowl, whisk together the egg yolks and sugar until the mixture turns pale yellow.
    2. Combine the milk, cream and vanilla in a saucepan over medium high heat, bringing the mixture to a boil. Take off the heat. 
    3. Pour about ½ cup of the hot liquid into the yolk mixture, whisking constantly to keep from making scrambled eggs. Pour the yolk mixture into the pan with the remaining cream mixture and put the heat back on medium. Stir constantly with a wooden spoon until the mixture thickens enough to lightly coat the back of a wooden spoon. DO NOT OVERCOOK.
    4. Remove the mixture from the heat and strain it through a fine mesh sieve into a bowl. Cover and refrigerate until the mixture is thoroughly chilled, about 2 hours or overnight.
    Assembly:
    Pipe the mousse onto the pavlovas and drizzle with the mascarpone cream over the top. Dust with confectioner’s sugar and fresh fruit if desired.

    Thursday, May 27, 2010

    Lovely Cream Puffs

    The May 2010 Daring Bakers’ challenge was hosted by Cat of Little Miss Cupcake. Cat challenged everyone to make a piece montée, or croquembouche, based on recipes from Peter Kump’s Baking School in Manhattan and Nick Malgieri.
    Cream Puffs are something my mom finds a bit of nostalgia with.  Gramma had made lots of them when mom was growing up.  In fact when I was little....cream puffs were what my mom sent me to school with when we had class parties.  Always light and delicious and filled with yummy whipped cream.  It was on my mother's last visit out about a year ago that she made some for me to take to school for a PAC meeting at the school.  Well here we are again....more cream puffs....and I'm not complaining.  The recipe provided is very similar to the one used on mom's last visit and turned out quite nicely.  Just to try something different....this time I filled them with one of the filling recipes provided.....a vanilla pastry cream and drizzled the lot with a chocolate glaze recipe for glazing chocolate dipped donuts.   They were just as delicious as we had all expected, and I look forward to making them for Ike to bring to school some time:)  If you have a hankering to try them....here are the recipes. I made only a 1/2 batch of cream puffs and made them quite small...they baked up about 38 puffs about 1 1/2 inches across.  You will need a full batch (double what is written) of the filling to fill a half recipe of cream puffs, and I found a half recipe of the chocolate glaze was more than enough to drizzle over a half batch of puffs.

    Pate a Choux (Yield: About 28)
    ¾ cup (175 ml.) water
    6 Tbsp. (85 g.) unsalted butter
    ¼ Tsp. salt
    1 Tbsp. sugar
    1 cup (125 g.) all-purpose flour
    4 large eggs
    For Egg Wash: 1 egg and pinch of salt
    Pre-heat oven to 425◦F/220◦C degrees. Line two baking sheets with parchment paper.
    Preparing batter:
    Combine water, butter, salt and sugar in a saucepan over medium heat. Bring to a boil and stir occasionally. At boil, remove from heat and sift in the flour, stirring to combine completely.
    Return to heat and cook, stirring constantly until the batter dries slightly and begins to pull away from the sides of the pan.
    Transfer to a bowl and stir with a wooden spoon 1 minute to cool slightly.
    Add 1 egg. The batter will appear loose and shiny.
    As you stir, the batter will become dry-looking like lightly buttered mashed potatoes.

    It is at this point that you will add in the next egg. Repeat until you have incorporated all the eggs.
    Piping:
    Transfer batter to a pastry bag fitted with a large open tip (I piped directly from the bag opening without a tip). Pipe choux about 1 inch-part in the baking sheets. Choux should be about 1 inch high about 1 inch wide.
    Using a clean finger dipped in hot water, gently press down on any tips that have formed on the top of choux when piping. You want them to retain their ball shape, but be smoothly curved on top.
    Brush tops with egg wash (1 egg lightly beaten with pinch of salt).
    Baking:
    Bake the choux at 425◦F/220◦C degrees until well-puffed and turning lightly golden in color, about 10 minutes.
    Lower the temperature to 350◦F/180◦C degrees and continue baking until well-colored and dry, about 20 minutes more. Remove to a rack and cool.


    For the Vanilla Crème Patissiere (Half Batch)
    1 cup (225 ml.) whole milk
    2 Tbsp. cornstarch
    6 Tbsp. (100 g.) sugar
    1 large egg
    2 large egg yolks
    2 Tbsp. (30 g.) unsalted butter
    1 Tsp. Vanilla
    Dissolve cornstarch in ¼ cup of milk. Combine the remaining milk with the sugar in a saucepan; bring to boil; remove from heat.
    Beat the whole egg, then the yolks into the cornstarch mixture. Pour 1/3 of boiling milk into the egg mixture, whisking constantly so that the eggs do not begin to cook.
    Return the remaining milk to boil. Pour in the hot egg mixture in a stream, continuing whisking.
    Continue whisking (this is important – you do not want the eggs to solidify/cook) until the cream thickens and comes to a boil. Remove from heat and beat in the butter and vanilla.

    Chocolate Glaze
    3/4 cup chocolate chips
    3 tablespoons butter
    1 tablespoon light corn syrup
    1/4 teaspoon vanilla extract
    1. In a double boiler over hot, but not boiling water, combine chocolate chips, butter and corn syrup. Stir until chips are melted and mixture is smooth, then add vanilla.
    2. Spread warm glaze over top of cake, letting it drizzle down the sides.

    Tuesday, April 27, 2010

    Figgy Duff and British Bulldog Puddings

     The April 2010 Daring Bakers’ challenge was hosted by Esther of The Lilac Kitchen. She challenged everyone to make a traditional British pudding using, if possible, a very traditional British ingredient: suet.
    We've have quite a few challenges in a row now that I've been pretty excited about on Baker's and Cook's....and this one is no exception.  I love steamed puddings, sticky puddings etc.....LOVE THEM ALL!  My family was not one to make steamed puddings although I believe my great grandmother on my fathers paternal side did make them.  I think this because my dad has had steamed plum pudding somewhere and it is certainly not made by a living relative.  So I suspect it's on the French Canadian side of the family...........
     My first exposure to a steamed pudding was at Christmas time with my in-laws.  My SIL makes the most delicious carrot pudding (steam right in a canning jar) and serves it with her grandmothers recipe for hard sauce.  Absolutely delicious....nothing more I can say about that one.  So when the challenge gave us the option of making our own steamed pudding recipe that is the recipe that first came to my mind.  We were to give a try at making suet pudding though (the carrot pudding recipe does not) so I continued to research.  In the end I decided to try British Bulldog (layers of suet pastry and stewed beef) and for dessert......a Canadian twist on Spotted Dick.......called Figgy Duff.  The Figgy Duff is a steamed pudding although it doesn't contain suet........well at least I'm trying something new!  If nothing else I was excited at the prospect of using some just gorgeous pudding bowls.  If you'd like to give it a try......here is the recipes I used. for the beef steak pudding.......the Figgy Duff recipe is from this site and I made individual servings of a 1/2 recipe.
     What did I think???  I really liked the British Bulldog recipe.  The pastry has baking powder  (recipe calls for self raising flour) in it and during the steaming it puffs up like a light and flaky biscuit, and I really liked the stew recipe, so for me it was all good.  With all the suet in it....it is rich though.  The Figgy Duff had a great texture and I will try it again, but will look for a recipe with less molasses in it.  It was quite overpowering in this one.....especially when served with a custard sauce.

    British Bulldog
    Pastry
    12 oz flour
    2 1/2 tsp baking soda
    6 oz beef suet, crumbled
    1 cup cold water (as much as you need to pull together a soft dough)
    Place dry ingredients in a bowl and mix well.  Add 1/2 of the water and then gradually any extra needed to form a workable dough.  I added nearly all of it.  Do not over work the dough.  Wrap in plastic wrap and set in the fridge until ready. (I left mine in over night)

    Filling
    1 12/ lbs chuck steak or roast cut into small pieces
    1 large onion chopped
    2 tbsp flour
    1 tbsp tomato paste
    1 can mushrooms, drained
    1 cup dark beer or (1 cup light beer with 1 tbsp molasses)
    1 tsp cider vinegar
    1/2 tsp dried thyme
    1 bay leaf
    2 1/2 cups beef broth
    Chop meat into small bit sized pieces and blot very well with paper towels.  Season with salt and pepper and let sit while you assemble your ingredients.  Add 1 tbsp oil to pan and brown the meat in 3 batches slowly over medium high heat so as not to crowd the pan.  Each batch should take about  minutes to brown.  Remove browned beef to side plate and repeat until all batches are browned. Put chopped onions in the pan and over medium heat cook until translucent.  Sprinkle flour over onions and stir to coat.  Add tomato paste and cook  3-4 more minutes making sure to scrape the bottom of the pan and reduce heat if it starts to burn.  Add beer stirring to mix well.  Add beef broth and remaining ingredients including the beef back to the pot.  Cover partially with lid and reduce heat to keep a light simmer for 2 hours.  Set aside to cool before assembling with pastry.

    Saturday, March 27, 2010

    A Daring Orange Tian

    This month's challenge to make an Orange Tian perplexed me more than most challenges have so far.  We were allowed to make the Tian of any citrus flavour we wanted......and I would have easily been happy with Blood Oranges if the state of them had not been so poor in the grocery store at the moment.  Had it been last month's challenge.....it would have been perfect timing.....but here at least, they seen to be at the end of their season.  My next thought was to make a lemon one......which I think would make a lovely marmalade, but as for topping the dessert with that much fresh lemon was sounding like it was going to be too tart for me....which is saying something.  So in the end I opted to go with plain old navel oranges, and I think the flavour will be perfect if not very adventurous.  Essentially the recipe looks like a fruit topped cheese cake, however the 'cheese cake' layer is a layer of stabilized (with a bit of gelatin) flavoured whipped cream followed by a bottom of sweet pastry crust.  Because I chose to make my dessert in a 9 1/2" spring form pan, I decided to double the amount of the cream filling so it would produce a thick enough layer in the dessert.  There were quite a few little steps in the recipe....none of which were terribly difficult....just a bit time consuming.
    Should you like to give this recipe a go....instructions are below.  Just be careful when making the caramel to add the orange juice very slowly at first (like a tablespoon at a time) because the high temperature of the caramel will make it sputter.  Once the overall temperature has dropped from adding the juice you can add it at a faster rate.

    The 2010 March Daring Baker’s challenge was hosted by Jennifer of Chocolate Shavings. She chose Orange Tian as the challenge for this month, a dessert based on a recipe from Alain Ducasse’s Cooking School in Paris.
    What did I think of the Tian?? I really liked the opportunity to make Marmalade that this challenge offered.  I was happy with the marmalade, the pastry crust although I made the dough a little too crumbly as I was worrying about adding too much water, and I really liked the creamy filling.  I did not care much for the caramel  sauce as it had a very strong marmalade flavour.  Just a bit too bitter for me.   I found the instructions as to what to do with the caramel a little too unclear.  I assumed I was to pour half of the thin caramel sauce over the orange segments once they were layered in the pan.  Perhaps my interpretation has too much caramel in it??   In the end this caramel did not firm up while in the freezer and made a bit of a mess when I flopped it out on to the serving dish.  Funny enough the caramel in this dish tasted very much like one from a flan or creme caramel that I love......but I found it just a bit too brash form this recipe.  If I was to repeat this recipe, I might try it without the caramel or more likely with strawberries or kiwis with a small amount of chocolate sauce rather than the caramel.
    Orange Tian
    For the Pate Sablee:
    Ingredients U.S. Imperial Metric Instructions for Ingredients
    2 medium-sized egg yolks at room temperature
    granulated sugar 6 tablespoons + 1 teaspoon; 2.8 oz; 80 grams
    vanilla extract ½ teaspoon
    Unsalted butter ¼ cup + 3 tablespoons; 3.5 oz; 100 grams ice cold, cubed
    Salt 1/3 teaspoon; 2 grams
    All-purpose flour 1.5 cup + 2 tablespoons; 7 oz; 200 grams
    baking powder 1 teaspoon ; 4 grams
    Directions:
    Put the flour, baking powder, ice cold cubed butter and salt in a food processor fitted with a steel blade.
    In a separate bowl, add the eggs yolks, vanilla extract and sugar and beat with a whisk until the mixture is pale. Pour the egg mixture in the food processor.
    Process until the dough just comes together. If you find that the dough is still a little too crumbly to come together, add a couple drops of water and process again to form a homogenous ball of dough. Form into a disc, cover with plastic wrap and leave to rest in the fridge for 30 minutes.
    Preheat your oven to 350 degree Fahrenheit.
    Roll out the dough onto a lightly floured surface until you obtain a ¼ inch thick circle.
    Using your cookie cutter, cut out circles of dough and place on a parchment (or silicone) lined baking sheet. Bake for 20 minutes or until the circles of dough are just golden.
    For the Marmalade:
    Ingredients U.S. Imperial Metric Instructions for Ingredients
    Freshly pressed orange juice ¼ cup + 3 tablespoons; 3.5 oz; 100 grams
    1 large orange used to make orange slices
    cold water to cook the orange slices
    pectin 5 grams
    granulated sugar: use the same weight as the weight of orange slices once they are cooked
    Finely slice the orange. Place the orange slices in a medium-sized pot filled with cold water. Simmer for about 10 minutes, discard the water, re-fill with cold water and blanch the oranges for another 10 minutes.
    Blanch the orange slices 3 times. This process removes the bitterness from the orange peel, so it is essential to use a new batch of cold water every time when you blanch the slices.
    Once blanched 3 times, drain the slices and let them cool.
    Once they are cool enough to handle, finely mince them (using a knife or a food processor).
    Weigh the slices and use the same amount of granulated sugar . If you don’t have a scale, you can place the slices in a cup measurer and use the same amount of sugar.
    In a pot over medium heat, add the minced orange slices, the sugar you just weighed, the orange juice and the pectin. Cook until the mixture reaches a jam consistency (10-15 minutes).
    Transfer to a bowl, cover with plastic wrap and put in the fridge.
    For the Orange Segments:
    For this step you will need 8 oranges.
    Cut the oranges into segments over a shallow bowl and make sure to keep the juice. Add the segments to the bowl with the juice.
    [See YouTube video in the References section below for additional information on segmenting oranges.]
    For the Caramel:
    Ingredients U.S. Metric Imperial Instructions for Ingredients
    granulated sugar 1 cup; 7 oz; 200 grams
    orange juice 1.5 cups + 2 tablespoons; 14 oz; 400 grams
    Place the sugar in a pan on medium heat and begin heating it.
    Once the sugar starts to bubble and foam, slowly add the orange juice. As soon as the mixture starts boiling, remove from the heat and pour half of the mixture over the orange segments.
    Reserve the other half of the caramel mixture in a small bowl — you will use this later to spoon over the finished dessert. When the dessert is assembled and setting in the freezer, heat the kept caramel sauce in a small saucepan over low heat until it thickens and just coats the back of a spoon (about 10 minutes). You can then spoon it over the orange tians.
    [Tip: Be very careful when making the caramel — if you have never made caramel before, I would suggest making this step while you don’t have to worry about anything else. Bubbling sugar is extremely, extremely hot, so make sure you have a bowl of ice cold water in the kitchen in case anyone gets burnt!]
    For the Whipped Cream:
    Ingredients U.S. Metric Imperial Instructions for Ingredients
    heavy whipping cream 1 cup; 7 oz; 200 grams
    3 tablespoons of hot water
    1 tsp Gelatine
    1 tablespoon of confectioner's sugar
    orange marmalade (see recipe above) 1 tablespoon
    In a small bowl, add the gelatine and hot water, stirring well until the gelatine dissolves. Let the gelatine cool to room temperature while you make the whipped cream. Combine the cream in a chilled mixing bowl. Whip the cream using a hand mixer on low speed until the cream starts to thicken for about one minute. Add the confectioner sugar. Increase the speed to medium-high. Whip the cream until the beaters leave visible (but not lasting) trails in the cream, then add the cooled gelatine slowly while beating continuously. Continue whipping until the cream is light and fluffy and forms soft peaks. Transfer the whipped cream to a bowl and fold in the orange marmalade.
    [Tip: Use an ice cold bowl to make the whipped cream in. You can do this by putting your mixing bowl, cream and beater in the fridge for 20 minutes prior to whipping the cream.]
    Assembling the Dessert:
    Make sure you have some room in your freezer. Ideally, you should be able to fit a small baking sheet or tray of desserts to set in the freezer.
    Line a small tray or baking sheet with parchment paper or a silicone sheet. Lay out 6 cookie cutters onto the parchment paper/silicone.
    Drain the orange segments on a kitchen towel.
    Have the marmalade, whipped cream and baked circles of dough ready to use.
    Arrange the orange segments at the bottom of each cookie cutter. Make sure the segments all touch either and that there are no gaps. Make sure they fit snuggly and look pretty as they will end up being the top of the dessert. Arrange them as you would sliced apples when making an apple tart.
    Once you have neatly arranged one layer of orange segments at the bottom of each cookie cutter, add a couple spoonfuls of whipped cream and gently spread it so that it fills the cookie cutter in an even layer. Leave about 1/4 inch at the top so there is room for dough circle.
    Using a butter knife or small spoon, spread a small even layer of orange marmalade on each circle of dough.
    Carefully place a circle of dough over each ring (the side of dough covered in marmalade should be the side touching the whipping cream). Gently press on the circle of dough to make sure the dessert is compact.
    Place the desserts to set in the freezer to set for 10 minutes.
    Using a small knife, gently go around the edges of the cookie cutter to make sure the dessert will be easy to unmold. Gently place your serving plate on top of a dessert (on top of the circle of dough) and turn the plate over. Gently remove the cookie cutter, add a spoonful of caramel sauce and serve immediately.

    Saturday, February 27, 2010

    Tiramisu and the Lonely Trifle Bowl


    I have had this pretty trifle bowl waiting in it's box for over 15 years now, and finally it has had its inaugural use!  I was pretty impressed with myself that it only took 10 minutes for me to unearth it  from the basement still in its original packaging no less.
    The February 2010 Daring Bakers’ challenge was hosted by Aparna of My Diverse Kitchen and Deeba of Passionate About Baking. They chose Tiramisu as the challenge for the month. Their challenge recipe is based on recipes from The Washington Post, Cordon Bleu at Home and Baking Obsession.
    I was pleased as punch when I read what this month's challenge was to be.  Tiramisu is something I like, but have never made.  There is a restaurant here that makes a most excellent Tiramisu and the DH is sure to ask for it every time we go there.  It is quite popular and can be 'sold out' as has been the case for poor DH many times.  Well lucky him......he's about to enjoy his own personal serving (for 6).  The many components of the recipe proved to be a slight bit tedious, especially when you consider you were to make roughly 1/3 cup  each of marscapone cheese, and zabagloine and 1 cup of pastry cream.  I like the fact that all the components were made from scratch.....but I think I might have had more satisfaction in making it all in larger quantity..........that being said......I had no idea what to do with 3 Tiramisu.......so one would have to do for now.  I flavoured the recipe as suggested with the exception of the zabaglione in which I used a German White wine and orange zest rather than the Marsala and Lemon Zest. To finish the top, I sprinkled with powdered instant coffee and squiggled on some melted chocolate.

    I was beginning to wonder if the final recipe size was going to be miniature as well.  Not to sorry though, it all worked out ok....although I did need to make a second batch of lady fingers (which are ridiculously good) to have enough to complete the recipe.  If real 'ladies fingers' tasted this good we'd be in a lot of trouble!  

    All in all, this was a most delicious challenge that will most likely be made again.  I think my Trifle Bowl will be very popular now!  I also seriously enjoyed that the challenge prompted me to drive out to the health food store and buy some proper cream.  Wow....what a difference in the cream without all the yucky carrageenan, cellulose gum, and cellulose gel..  Nothing but the fresh clean taste of cream and the added bonus off thickened cream in the cap....OMG how good is that?

    Now if only I had company coming for dinner........Wanna come?

    TIRAMISU
    (Recipe source: Carminantonio's Tiramisu from The Washington Post, July 11 2007 )
    This recipe makes 6 servings
    Ingredients:
    For the zabaglione:
    2 large egg yolks
    3 tablespoons sugar/50gms
    1/4 cup/60ml Marsala wine (or port or coffee)
    1/4 teaspoon/ 1.25ml vanilla extract
    1/2 teaspoon finely grated lemon zest
    For the vanilla pastry cream:
    1/4 cup/55gms sugar
    1 tablespoon/8gms all purpose flour
    1/2 teaspoon finely grated lemon zest
    1/2 teaspoon/ 2.5ml vanilla extract
    1 large egg yolk
    3/4 cup/175ml whole milk
    For the whipped cream:
    1 cup/235ml chilled heavy cream (we used 25%)
    1/4 cup/55gms sugar
    1/2 teaspoon/ 2.5ml vanilla extract
    To assemble the tiramisu:
    2 cups/470ml brewed espresso, warmed
    1 teaspoon/5ml rum extract (optional)
    1/2 cup/110gms sugar
    1/3 cup/75gms mascarpone cheese
    36 savoiardi/ ladyfinger biscuits (you may use less)
    2 tablespoons/30gms unsweetened cocoa powder
    Method:
    For the zabaglione:
    Heat water in a double boiler. If you don’t have a double boiler, place a pot with about an inch of water in it on the stove. Place a heat-proof bowl in the pot making sure the bottom does not touch the water.
    In a large mixing bowl (or stainless steel mixing bowl), mix together the egg yolks, sugar, the Marsala (or espresso/ coffee), vanilla extract and lemon zest. Whisk together until the yolks are fully blended and the mixture looks smooth.
    Transfer the mixture to the top of a double boiler or place your bowl over the pan/ pot with simmering water. Cook the egg mixture over low heat, stirring constantly, for about 8 minutes or until it resembles thick custard. It may bubble a bit as it reaches that consistency.
    Let cool to room temperature and transfer the zabaglione to a bowl. Cover and refrigerate at least 4 hours or overnight, until thoroughly chilled.
    For the pastry cream:
    Mix together the sugar, flour, lemon zest and vanilla extract in a medium heavy-bottomed saucepan. To this add the egg yolk and half the milk. Whisk until smooth.
    Now place the saucepan over low heat and cook, stirring constantly to prevent the mixture from curdling.
    Add the remaining milk a little at a time, still stirring constantly. After about 12 minutes the mixture will be thick, free of lumps and beginning to bubble. (If you have a few lumps, don’t worry. You can push the cream through a fine-mesh strainer.)
    Transfer the pastry cream to a bowl and cool to room temperature. Cover with plastic film and refrigerate at least 4 hours or overnight, until thoroughly chilled.
    For the whipped cream:
    Combine the cream, sugar and vanilla extract in a mixing bowl. Beat with an electric hand mixer or immersion blender until the mixture holds stiff peaks. Set aside.
    To assemble the tiramisu:
    Have ready a rectangular serving dish (about 8" by 8" should do) or one of your choice.
    Mix together the warm espresso, rum extract and sugar in a shallow dish, whisking to mix well. Set aside to cool.
    In a large bowl, beat the mascarpone cheese with a spoon to break down the lumps and make it smooth. This will make it easier to fold. Add the prepared and chilled zabaglione and pastry cream, blending until just combined. Gently fold in the whipped cream. Set this cream mixture aside.
    Now to start assembling the tiramisu.
    Workings quickly, dip 12 of the ladyfingers in the sweetened espresso, about 1 second per side. They should be moist but not soggy. Immediately transfer each ladyfinger to the platter, placing them side by side in a single row. You may break a lady finger into two, if necessary, to ensure the base of your dish is completely covered.
    Spoon one-third of the cream mixture on top of the ladyfingers, then use a rubber spatula or spreading knife to cover the top evenly, all the way to the edges.
    Repeat to create 2 more layers, using 12 ladyfingers and the cream mixture for each layer. Clean any spilled cream mixture; cover carefully with plastic wrap and refrigerate the tiramisu overnight.
    To serve, carefully remove the plastic wrap and sprinkle the tiramisu with cocoa powder using a fine-mesh strainer or decorate as you please. Cut into individual portions and serve.
    MASCARPONE CHEESE
    (Source: Vera’s Recipe for Homemade Mascarpone Cheese)
    This recipe makes 12oz/ 340gm of mascarpone cheese
    Ingredients:
    474ml (approx. 500ml)/ 2 cups whipping (36 %) pasteurized (not ultra-pasteurized), preferably organic cream (between 25% to 36% cream will do)
    1 tablespoon fresh lemon juice
    Method:
    Bring 1 inch of water to a boil in a wide skillet. Reduce the heat to medium-low so the water is barely simmering. Pour the cream into a medium heat-resistant bowl, then place the bowl into the skillet. Heat the cream, stirring often, to 190 F. If you do not have a thermometer, wait until small bubbles keep trying to push up to the surface.
    It will take about 15 minutes of delicate heating. Add the lemon juice and continue heating the mixture, stirring gently, until the cream curdles. Do not expect the same action as you see during ricotta cheese making. All that the whipping cream will do is become thicker, like a well-done crème anglaise. It will cover a back of your wooden spoon thickly. You will see just a few clear whey streaks when you stir. Remove the bowl from the water and let cool for about 20 minutes. Meanwhile, line a sieve with four layers of dampened cheesecloth and set it over a bowl. Transfer the mixture into the lined sieve. Do not squeeze the cheese in the cheesecloth or press on its surface (be patient, it will firm up after refrigeration time). Once cooled completely, cover with plastic wrap and refrigerate (in the sieve) overnight or up to 24 hours.
    Vera’s notes: The first time I made mascarpone I had all doubts if it’d been cooked enough, because of its custard-like texture. Have no fear, it will firm up beautifully in the fridge, and will yet remain lusciously creamy.
    Keep refrigerated and use within 3 to 4 days.
    LADYFINGERS/ SAVOIARDI BISCUITS
    (Source: Recipe from Cordon Bleu At Home)
    This recipe makes approximately 24 big ladyfingers or 45 small (2 1/2" to 3" long) ladyfingers.
    Ingredients:
    3 eggs, separated
    6 tablespoons /75gms granulated sugar
    3/4 cup/95gms cake flour, sifted (or 3/4 cup all purpose flour + 2 tbsp corn starch)
    6 tablespoons /50gms confectioner's sugar,
    Method: 
    Preheat your oven to 350 F (175 C) degrees, then lightly brush 2 baking sheets with oil or softened butter and line with parchment paper.
    Beat the egg whites using a hand held electric mixer until stiff peaks form. Gradually add granulate sugar and continue beating until the egg whites become stiff again, glossy and smooth.
    In a small bowl, beat the egg yolks lightly with a fork and fold them into the meringue, using a wooden spoon. Sift the flour over this mixture and fold gently until just mixed. It is important to fold very gently and not overdo the folding. Otherwise the batter would deflate and lose volume resulting in ladyfingers which are flat and not spongy.
    Fit a pastry bag with a plain tip (or just snip the end off; you could also use a Ziploc bag) and fill with the batter. Pipe the batter into 5" long and 3/4" wide strips leaving about 1" space in between the strips.
    Sprinkle half the confectioner's sugar over the ladyfingers and wait for 5 minutes. The sugar will pearl or look wet and glisten. Now sprinkle the remaining sugar. This helps to give the ladyfingers their characteristic crispness.
    Hold the parchment paper in place with your thumb and lift one side of the baking sheet and gently tap it on the work surface to remove excess sprinkled sugar.
    Bake the ladyfingers for 10 minutes, then rotate the sheets and bake for another 5 minutes or so until the puff up, turn lightly golden brown and are still soft.
    Allow them to cool slightly on the sheets for about 5 minutes and then remove the ladyfingers from the baking sheet with a metal spatula while still hot, and cool on a rack.
    Store them in an airtight container till required. They should keep for 2 to 3 weeks.