Tuesday, August 31, 2010

Coddled Eggs and Giveaway Winners

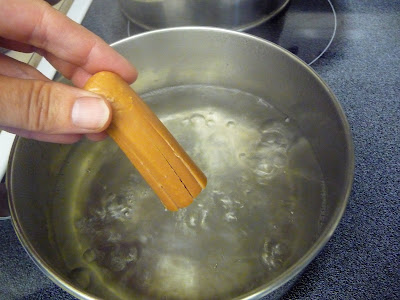
After spending a week alone, everyone is back now and we took our time getting up.  It's raining lightly here and the post man almost woke me up.  Isn't it nice to get presents from the post man first thing in the morning.  'It's a good thing I cut the grass before this rain started', I think as I bring my parcel back to the kitchen where breakfast is on the make.  My egg is coddling away in a pot of simmering water, making my morning seem a bit warmer.  I'm just going to enjoy my breakfast, and then I can see about getting my clothes dryer looked at.  So, if your morning is a bit chilly and you'd like to try a coddled egg, go here and and try out a recipe for yourself.  My perfect coddled egg simmered 1/2 submerged in an egg coddler for 9 1/2 minutes with a refrigerated egg.  A room temperature egg would take about 1 minute less.  I  added only a pinch of salt and pepper and a few drops of cream to my egg before simmering.  It was perfect for dipping with toast:)  Have a great day....OK!  Before I get going though....I wanted to say thanks to everyone who stopped by  for the Lunch Revolution party.  Hopefully you found some worthwhile information and fun at all the participating blogs.  And also a congratulations to Noreen, who made the 10th comment for the CSN Giveaway......I'll be emailing her this morning.

Random Integer Generator

Here are your random numbers:
10
Timestamp: 2010-08-31 15:55:58 UTC

And also to Shaz for entering the International Giveaway for the Bento supplies and lunch cookbook.  I'll be sending that package out this week.  Stop by and check her delicious blog if you are looking for something new to try.

Saturday, August 28, 2010

Back to School Breakfasts

Back to school in my house means that mornings are a bit rushed.  I am not at all a big fan of cold cereal for breakfast although Ike will ask for it once and a while.  I do insist that that he eats a hot cereal once per week.....even though I'm not sure if nutritionally he's better of with hot cereal......in my head it just seems more filling....you know, in its stick to your ribbyness.  So at least 3 mornings per week Ike has a hot breakfast before he sets off for school.  I save the cold cereal mornings for mornings when I feeling like I'm running out of time.  Most mornings Ike's breakfast doesn't even take 10 minutes to make......  And I was amazed to learn that you can scramble an egg in about 45 seconds in your microwave.  Isn't technology wonderful!  If we have buns to use up or bread is going stale...chances are Ike will be having french toast. ( As buns go stale we usually keep them in the freezer for french toast)  If we have a huge pile of pancakes on the weekend....leftovers are frozen in ziploc bags for a quick midweek breakfast.  If we have english muffins on the shelf.....chance are good Ike will be eating an 'Egg McMuffin'.  By the way...home made 'egg McMuffins' freeze very well, but need to be defrosted slowly so you don't end up with scorching hot spots and frozen spots in your breakfast sandwich.  With pancakes and french toast we use fruit syrups since Ike likes them better than maple syrup.  Ike's favourite breakfast item changes from time to time and right now his favourite is a 'one eye'.  (pictured above) That's a sunny side up egg on a slice of toast with the edges cut off into toast soldiers for dipping.  Breakfast never causes too much of a problem here because Ike loves breakfast foods.  

Ike's Favourite Breakfast foods:
One Eye
Scrambled egg McMuffin sandwich
Toasted Bacon, Tomato and Cheese Sandwich with Mayo
French toast (cut each slice into 3 strips or cut out with cookie cutters)
Buttermilk Pancakes with fruit syrup
German Oven Pancakes with apples
Dipping Egg N Toast (Sunny Side up Eggs)
Hot Oatmeal Cereal
Scrambled Egg in a Nest
Fruit cocktail and toast
Assorted Cold Cereal
Scrambled Eggs in the microwave with Salsa and cheese and toast

Any of the egg, pancake or french toast choices above would likely be accompanied by bacon, sausages, ham or even fried summer sausage or an octopus wiener........and some cut up fresh fruit or fried apples with cinnamon......just depends what we have on hand.

Friday, August 27, 2010

Ice Cream Petite Fours

The August 2010 Daring Bakers’ challenge was hosted by Elissa of 17 and Baking. For the first time, The Daring Bakers partnered with Sugar High Fridays for a co-event and Elissa was the gracious hostess of both. Using the theme of beurre noisette, or browned butter, Elissa chose to challenge Daring Bakers to make a pound cake to be used in either a Baked Alaska or in Ice Cream Petit Fours. The sources for Elissa’s challenge were Gourmet magazine and David Lebovitz’s “The Perfect Scoop”.
This month's challenge caught me running a little behind, but I did manage just barely to get done what I needed just in time.  Fortunately, I had lots of mocha  ice cream left over from last months challenge, and this was a good way to use it up.  I did absolutely the love the brown butter pound cake.....you should really give it a try.......and I liked the overall flavour combination in the petite fours...They are fabulous.  Another excellent challenge!
The Brown butter recipe can be found below and the mocha ice cream recipe is in last month's challenge.   Feel free to enter the current giveaways posted below as well if you are interested, and take a minute to check out what other Daring Bakers put together for this month's challenge.  I'm going to go that myself.....right now!  Thanks for stopping by:)
 
 Brown Butter Pound Cake
19 tablespoons (9.5 oz) (275g) unsalted (sweet) butter
2 cups (200g) sifted cake flour (not self-rising; sift before measuring) (See “Note” section for cake flour substitution)
1 teaspoon (5g) baking powder
1/2 teaspoon (3g) salt
1/2 cup (110g) packed light brown sugar
1/3 (75g) cup granulated sugar
4 large eggs
1/2 teaspoon pure vanilla extract
1. Preheat the oven to 325°F/160°C and put a rack in the center. Butter and flour a 9”x9” (23cmx23cm) square pan.
2. Place the butter in a 10” (25cm) skillet over medium heat. Brown the butter until the milk solids are a dark chocolate brown and the butter smells nutty. (Don’t take your eyes off the butter in case it burns.) Pour into a shallow bowl and chill in the freezer until just congealed, 15-30 minutes.
3. Whisk together cake flour, baking powder, and salt.
4. Beat the brown butter, light brown sugar, and granulated sugar in an electric mixer until light and fluffy, about 2 minutes. Beat in the eggs one at a time, mixing well, and then the vanilla extract.
5. Stir in the flour mixture at low speed until just combined.
6. Scrape the batter into the greased and floured 9”x9” (23cmx23cm) square pan. Smooth the top with a rubber spatula and rap the pan on the counter. Bake until golden brown on top and when a toothpick inserted into the center comes out clean, about 25 minutes.
7. Cool in the pan 10 minutes. Run a knife along the edge and invert right-side-up onto a cooling rack to cool completely.
Chocolate Glaze (For the Ice Cream Petit Fours)
9 ounces (250g) dark chocolate, finely chopped
1 cup (250 ml) heavy (approx 35% butterfat) cream
1 1/2 tablespoons (32g) light corn syrup, Golden syrup, or agave nectar
2 teaspoons (10ml) vanilla extract (I substituted coffee liqueur)
Stir the heavy cream and light corn syrup in a small saucepan over medium heat until it comes to a boil. Remove from heat and add the dark chocolate. Let sit 30 seconds, then stir to completely melt the chocolate. Stir in the vanilla and let cool until tepid before glazing the petit fours.

Once cooled, the cake was leveled and split into two layer. I put one layer back into the pan which I  had covered in a layer of plastic wrap. Then I spread the softened ice cream over top and popped the second  cake layer on top of that.  After cooling over night in the freezer, I removed the cake, cut away the rough edges and cut the cake up into 1 inch squares.  The 1 inch squares with covered with glaze and sprinkled with mocha powder and left in the freezer until serving time.

School Lunch Ideas...all in one place.

It's Lunch Revolution Time!  Please Take a minute to check out the rest of the Party, and thanks very much to Scattered Mom for Hosting this Blog Party.  I'm sure you'll find something useful.  There's recipes, tips and giveaways.....so go and check it all out! 
It's time to get back into packing school lunches for Ike.  Like most kids....his lunch is always better received when it is tasty, interesting, fun, and not too repetitive.  The school Ike goes to is 'Nut Aware' as well so this means that making his lunch takes just a little more time and thought.  I try to change it up enough that he doesn't get tired of any one meal and I'm always on the look out for new ideas and recipes.
Ike is not a big eater yet, and with the 15 minutes he has to eat his lunch, a large lunch would never get eaten.  I have really liked packing his lunch in a bento box as it keeps everything together, is interesting looking, and I can use silicone or paper muffin liners to separate the different foods.  I have boxes in varying sizes and use the one most appropriate for the lunch I am making.  He takes a wide mouth hot thermos on days when I've made a hot lunch and carries a freezer pack or frozen juice box for days he has a cold lunch.  We always have left overs from dinner the night before.....and if it's something suitable for the hot thermos....it's fair game. 
Even if you are making something as simple as a tuna salad sandwich.....cut them in fun shapes or even just in fingers.......much more fun that a regular sandwich.....really.  Small serving size and a bit more variety means Ike will more likely finish his lunch.  Fruits are peeled and sliced (tossed in lemon juice if needed) and ready to eat........seriously he only has 15 minutes to eat......and lunch time is crazy!
These are our common nut free lunch choices:

Sandwich on Bread, Bun, or Pita
  • chicken salad
  • ground ham and sweet pickle with miracle whip to hold it all together
  • tuna salad
  • flavoured cream cheese ribbon or pinwheel sandwiches
Not A Sandwich
A Hot Thermos Lunch
Keep the hot stuff hot by filling your hot thermos with boiling water while heating your lunch meal.  Once the meal is hot....dump out the water and dump in the hot lunch.
What About Veggies
  • Veggies & Dip
  • Cherry Tomatoes
  • Avocado tossed in dressing
  • Pickled beans, carrots, asparagus etc
  • Vegetable Cocktail or Tomato Juice
    Something Sweet
    Emergency Lunches for the Hot Thermos
    • Canned chunky soups with crackers
    • Lean Cuisine type frozen meals (when they are on sale for $1 I pick up a few)
    • Canned Pork & Beans & a Bun
    • Canned Spaghetti (I think it's gross but Ike likes it)
    As with any canned products....watch out for the salt content...some brands are better than others.

      Thursday, August 26, 2010

      It's Lunch Revolution Time

      What's a party without presents???  And if you stop by my house.....I'd even give you a piece of this yummy slice that I just tried.  I got the recipe from Carole over at Madness and Mess, and apparently it is super common over in New Zealand.  I will warn you.....it is very addictive if you like chocolate........and it's super easy too! (which I appreciate)..........and it's nut free (or can be) so it's good for a lunch box treat as well.  
      To say thanks for stopping by I am running two giveaways that I hope are in keeping with the Lunch Revolution theme.  The first giveaway can only be shipped to a US or Canadian address and the second can be sent to anywhere else (not including the US or Canada).  So click on the links below to enter the giveaway which is appropriate for you if you are interested.  And if you are around....come back tomorrow for a list of lunch ideas to get ready for those back to school lunches...................as the party continues.....that's right.......it's a sleep over party!  Check out more party fun over at the Cookie Jar.

      Take me to the Lunch Revolution Giveaway (US and Canada only)

      Take me to the Lunch Revolution Giveaway (International excludes US and Canada)

      Let's See The Lunch Recipe List from LittleRedSaid

      Now if you don't have the time to stop by for a piece of Chocolate Slice......maybe you'd like to make some for yourself.
      No Bake Chocolate Slice
      (adapted from the recipe at Madness and Mess)
      3/4 cup butter
      2/3 cup sugar
      1/4 cup cocoa powder
      1/4 cup coconut
      1 egg, beaten sightly
      3/4 cup raisins
      1/4 cup cranraisin
      1/4 cup pepitas
      250g (8oz) plain biscuits (like arrow root or marie biscuits) broken into small bits

      In a saucepan over medium heat, mix first three ingredients until the sugar in dissolved.  Add the remaining ingredients stirring to combine.  Press into a 9X13 inch lined pan and set in the fridge to firm up.  Once firm, frost with chocolate icing listed in this post.  Keep in fridge until ready to serve.

      A Super Cool or Hot Lunch:)

      Thanks again to the folks over at CSN for providing another giveaway opportunity for us.  It's a perfectly perfect Zojirushi Classic Stainless Lunch Jar.  How fabulous is that for back to school or even back to work lunches.  I love Zojirushi for it's top notch rice cookers.......and now I just might love them even more for this...which I found after after scouring the CSN site and finding their le creuset tagine for my Christmas wish list.  What a happy accident for one of you:)  This giveaway is open to anyone with a US or Canadian mailing address.  For the non US and Canda Giveaway look here.
      But more about this great prize:
      • It has Stainless steel construction with vacuum insulation
      • Comes with chop sticks, chop stick holder and carrying strap
      • Contains 3 microwavable bowls (26.7oz, 13.5 oz, and 9.5 oz)
      • All with a 5 year warranty
      In order to enter the giveaway:
      • Please leave a comment on this post telling me what your favourite lunch food  is.  
      • To say thanks to all those who follow LittleRedSaid.....followers may leave a second entry  by leaving a second comment on this post mentioning that you follow LittleRedSaid for a second chance to win.  So that's a maximum of two entries per person.   
      • Please make sure to leave a way for me to contact you should your have the winning comment or another winner will need to chosen. 
      • This Giveaway will remain open until midnight on Monday August 30th
      • On Tuesday morning the winning comment will be selected using a random number generator.
      • All spam and ineligible comments will be removed prior to selecting a winning comment.
      • Remember this giveaway is open to anyone with a US or Canadian mailing address only.
      Thanks for stopping by!.......Take a moment to see more of the Lunch Revolution Party, to see what else is going on at the blog party.....And stop back tomorrow to see lots of lunch box ideas....enjoy the party!

      Lunch Revolution-Bento Lunch Box Giveaway

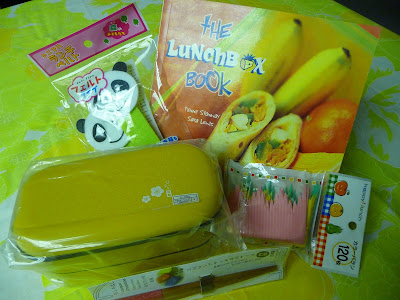
      To celebrate the Lunch Revolution Party .....there is an International (not US or Canada) giveaway as well. for Canada and the US.  If you have a mailing address that is from anywhere other than the US or Canada.....then this giveaway might be just for you.  I really love these adorable bento boxes and find they make lunch just a little more fun and hopefully you will too.  This Giveaway includes one two stage bento box, chop sticks, two closure bands, a pack of grass separators, plus the Lunch Box Book....filled with great lunch box recipes.  All giveaway items are pictured.......so you will receive those items exactly as pictured.  You can find the US and Canadian Giveaway here.

      In order to enter:
      • You must have a mailing address that is not in the US or Canada
      • Leave a comment on this post telling me your favourite school lunch
      • Followers may leave a second comment letting me know you follow LittleRedSaid for a second chance to win...that's a maximum of two entries per person
      • Make sure that there is a way for me to contact you should your comment be selected as the winning comment.....if I cannot reach you another winning comment will be selected
      • This giveaway will remain open until Monday August 30th at midnight
      • A winning comment will be selected using a random number generator on Tuesday morning
      • Spam or ineligible comments will be removed before drawing
      Thanks for stopping by the Lunch Revolution Party.....Be sure to check out more of the Lunch Revolution Party to go and see what else is going on:)  Check back in here tomorrow for lots of lunch making ideas.

      Wednesday, August 25, 2010

      Tangzhong Buns......Worth a Try

      Ever since I tasted the delicious buns from Furama Cake & Dessert Garden on Spadina in Toronto's China Town....I've been thinking about trying some similar recipes.  I had book marked a few blogs of interest to me and I finally got around to trying some.  A few of the recipes I wanted to try contained tangzhong starter which is a cooked paste of 5 parts water and 1 part flour by weight.  Flour and water are mixed together in a pot and heated just until it reaches 150 F.  Then it is cooked and whisked for 1 more minute making sure to get all the lumps out.  Then it is removed from the heat and and cooled to room temperature.  Once at room temperature it is ready to be added to the recipe.  Left over amounts can be stored for a few days in the fridge.  Making the tangzhong is so quick and easy that I like to make just a tiny bit more than called for in the recipe as I can not be sure I'll use up the left overs quickly enough.  The point of the addition of this 'starter' to the dough is to create a more moist and elastic bread.  And I can say that it produced an absolutely beautiful dough.  
      First I tried a recipe using whole wheat and white flour recipe from Dodol & Mochi to make the Ham and Cheese Buns pictured above and then I tried a recipe from Grace at Kitchen Corner for her delicious looking Cheese Sticks. 
      I really liked both recipes and will definitely be making them again as they will be perfect for Ike's lunch box.  To see the shaping instructions for the Ham and Cheese Buns have a look at the photos here and there is a very cute alternate shape as well.  For the Ham and Cheese Buns...I made a longer cut.......about 1/2 inch or less away from the ends so the buns would open up more and look more like the ones from Dodol & Mochi.  
      I found the recipe at Dodol & Mochi need a bit more liquid than as written (it was pretty dry for sealing) and the rise time I needed was a bit longer.....probably much cooler in my kitchen than hers:)  Both recipe get two thumbs up from me and both can be made in the bread machine and hand shaped before baking if that makes it easier and in my case less messy.  Do make sure that for either recipe you allow enough proofing time for the dough to double in bulk.  And keep in mind that breads containing whole wheat need to bake to a temperature of 205-210 F where as white breads are done at 190-200 F.  For the Ham & Cheese Rolls...I preferred the sweet chili sauce to the mustard and I bet pizza sauce would be great too......maybe even Ham Cheese and Pineapple Buns......hmmm Something else to try now!

      Monday, August 23, 2010

      Nifty Nordic Finds

      You might have noticed the new button at the top of my sidebar.  It's for a little blog party that I plan to take part in starting on August 26th.   As you can tell it's about lunch ideas which is good timing for here, as we are just about to send kids back to school any moment now.  There will be lots of helpful posts containing tips, stories and recipes, so do come back on the 26th to check it out and click on the button to go and see who else is taking part.  I'll be sure to poke around and see what fabulous suggestions might be there for a perfect and speedy lunch preparation since after Ike starts back into school.......I too will be going back to work.  After 1 1/2 years off work.....I was busier than ever when this opportunity sort of fell in my lap.  Now I have a few short weeks to get things in order.....but I am so easily side tracked.....I actually came to the computer to find my choke cherry syrup recipe.......
      Before I get up to my elbows in syrup and stickiness....have a look as my fab finds.  While up at my parents camp in Northern Ontario....I scavenged these dishes from their cupboards (I did ask first!).  They belonged to our neighbour who had the entire set for her everyday dishes.  Time will tell if more of these pieces surface at the cabin.......I sure hope so!  I remember them as being so unusual and now of course....I think they are kind of retro groovy. 
      After scooping those cool Norwegian dishes from the cabin.......I took a trip into town with a good friend to shop the Finnish district in Thunder Bay.   The two must see stores on Bay street are, the Finnish Bookstore and Finnport. (See first photo and the one directly above)  They both carry Finnish imports and Scandinavian gift ware and sauna supplies.  I always like to look in there and see what's new.  Last time there, I notice that Finnport was selling Marimekko fabric and I knew I had to have some.  And I also had to pick up this very cool umbrella....You can never have enough umbrellas.....especially cute ones:)
      Now....I'd better go make me some syrup!!

      Wednesday, August 18, 2010

      24 Degrees and Smoke

      Ike and I have been back at home for a few days now and still are unpacking.  I was looking forward to finally relaxing away the last two weeks of summer vacation with only a few 'must do' items on my list.  Sadly, I think I've missed out on the Saskatoon berry season here, but it has been so very dry here this summer.....I probably didn't miss too much in the way of berries.  Also for the first time in my life I've heard the weather forecast including smoke.  The forecast for today.....24 C and smoke.  Well, they were bang on......it's 24 degrees and smokey in my backyard.......it's a little unnerving as 70% of the province is in 'extreme fire danger' with 175,807 hectares of forests already burned.  (That's 434,426 acres or 679 section)
      While I does seem that I've missed out on the Saskatoon crop this year, I did manage to get in on some pickling cucumbers as a neighbour had an extra 25 lb crate of cukes sitting around.  Normally I like to choose each cucumber myself and I pick small ones that will pack better into the 1 liter canning jars I use, but this time I had no choice.  Wow these cucumbers were huge.......the size you might get along side a smoked meat sandwich in a Kosher deli.  I could only fit 4 in a jar:(  This created some pause for me as I hummed over my options.  After hearing stories on my recent visit home about how my dads' baba would keep a 45 gallon wooden barrel of pickles and one full of sauerkraut in her porch all winter......I got to thinking I might be able to do something similar if not a bit smaller scale.  So I pulled a 3 gallon crock out of the basement and gave it a good washing, filled it with scrubbed clean cucumbers and seasonings and salt water right up to the top.  This was a much better use for those jumbo sized cucumbers and was much faster for me as well. 
      I still managed to can up 7 liters of  the usual vinegar dill pickles using the smallest of the cucumbers that I could find, and they are all now sealed and waiting in my basement.  After a week of fermenting (now doesn't that sound delicious) in the crock on my kitchen counter I will move them to a cooler place and eventually into a cupboard in the garage where it will be much cooler come winter.  And just like my great grandmother........I can yell at Ike not to put his hands in the pickle jar:)
      I actually prefer salt water pickles to vinegared ones.......and since I've made almost 4 gallons of them.....I sure hope they turn out properly!  They are much less work than regular pickles (due to the fact that I did not can them), so you might want to give them a try.

      Moms' Salt Water Dill Pickles
      To each 1 liter (1 quart) canning jar add:
      1 clove of garlic (cut in half)
      2 heads of dill (substitute 2 tsp of dill seed if unavailable)
      1 small dried red chili pepper
      1/8 tsp pickling spice
      2 black pepper corns
      3"x3" piece of horse radish leaf or root the size of your baby finger
      Brine
      about 1 1/2 cups boiling water
      1 level tbsp pickling salt (coarse salt)

      Prepare cucumbers by soaking in ice water for a few hours.  Scrub clean and cut off the very ends of each cucumber.  Pack your clean canning jars with cucumber and add all spice ingredients as listed.  Pour salt into 1/2 cup of boiling water and stir to dissolve.  Pour this into filled canning jars and top up with remaining cup of boiling water ...filling to leave 1/2 inch head space.  Seal jars with clean new snap lids and leave to seal.  If you are more comfortable using a water bath to process jars, use method outlined here.
      If you are doing this on a larger scale like I am trying you will not need to seal the container.  I filled my 3 gallon crock with cucumbers and 9 times the listed ingredients...since my crock held about nine liters.   After topping up with enough water to cover the cucumbers, I placed a small dish inside the crock that I could weight down to submerge the pickles.  Then I covered the crock with a clean tea towel.  After one week I will see if they taste 'pickled' enough.....and if they do I will move them to a cooler location.  I will then remove some of them into a smaller container that will fit in my fridge for daily use.

      Saturday, August 14, 2010

      Pyrohy or Varenyky....the Worlds most Perfect Food

      The August 2010 Daring Cooks’ Challenge was hosted by LizG of Bits n’ Bites and Anula of Anula’s Kitchen. They chose to challenge Daring Cooks to make pierogi from scratch and an optional challenge to provide one filling that best represents their locale.
      I sincerely hope that everyone had a positive experience with this months challenge because it represents my very favourite food....ever!  Where I grew up (in Thunder Bay)....it is so commonly available that is is hard to avoid.  In fact I would bet that you would have to look very long and hard to find a person living there who did not at least know what they were.  (So it is very strange for me to hear that there are people who have never even heard of them....very strange indeed)  Its popularity is no doubt due to the very large Ukrainian and Polish communities living there.  You can find fresh pyrohy for sale nearly any day of the week.  The best places to buy them tend to be from the Ukrainian Churches or from the Ukrainian or Polish Halls (of which there are many to choose).  And the fund raising dollars raised by the sale of these delicious little parcels would boggle your mind. (It's in the millions)  One dozen fresh (and I mean fresh, hot and ready to eat) sell for $4.50 per dozen.  It is such big business there, that some of the kitchens preparing them have machines to help roll the dough, and an army of volunteers to do the filling. You can of course find 'Perogies' (the double plural) in the freezer section in all the grocery stores as well.......but they are really bad in comparison. 
      Without question the most popular filling for Ukrainian Canadians would be potato and cheese, (served with melted butter, fried onion and sour cream) while back in the Ukraine, it would be cottage cheese with dill.  My personal favourites are potato and cheese, (as in the top photo) cottage cheese with dill, sauerkraut, and blueberry. 
      Just in case you don't know what pyrohy are..........Pyrohy (at least in North America) are something very similar to ravioli in that they are a rolled dough with a filling that is boiled to cook.  Now, in the Ukraine, and Russia pyrohy are something a little different.....they are a baked yeast bun with the same filling.  My parents found this out while visiting relatives in the Ukraine.........when they asked for pyrohy they were given small baked yeast buns with a filling.  When they discussed what they wanted in more detail they were told..' What you want are not pyrohy....what you want are called Varenyky.'  So the only real difference is the dough (yeast or not) and the cooking method (baked or boiled).  And if you are Ukrainian this would be obvious to as the word varenyky means 'boiled'.   How these names got confused with Ukrainian Canadians is something I don't know, but my dad corrected me quite a few times....so now it's Varenyky.  I am guessing that in Polish there is only  the boiled variety which they call pierogi ....but I really don't know for sure.  The word pyrohy is already plural with a the singular pyroh......but you would never hear that word.....because honestly.....NO ONE EVER asks for just one:) 
      Since I had just made potato and cheese varenyky I decided that I really wanted to try something different.  I remembered that mom had a recipe for a rhubarb sauce and a white sauce to serve on cottage cheese varenyky that I had not had in years.  This is a variation served by Mennonite families and for me is a little bit different than what I'm accustomed to.  Plus I was going to be in Thunder Bay prior to the reveal date........and my mom  has been making cottage cheese from scratch.  Well it seemed the obvious choice to me:)  We even tried a new dough recipe using evaporated milk which I liked.  It made a nice soft dough that was easy to work with.  In the end we made some potato and cheese, some cottage cheese, and a few blueberry.  It is common to boil up the scrap dough to serve as a type of noodle should you run out of filling. (Ukrainians never waste anything)
      We used our scrap dough cut out with maple leaf cutters (because Canadians really love maple leaves) ......and served them tossed in melted butter and fresh blueberries we had just picked and a sprinkling of sugar.  We called them inside out blue berry veranyky.....and they were delicious.  Dessert or sweet Varenyky are not as well known....I think.......and when I was little it was such a marvelous treat when gramma would make them:)
      Making varenyky is a bit time consuming so it is a nice activity to do with a friend (thanks mom).  So if you are going to do it, it's best to make a lot and freeze some for later.  Always freeze them before cooking them....because frozen cooked varenyky are gross.  And like freezing berries, make sure to freeze them on a cookie sheet (not touching) before bagging them.    When you are ready to cook them, just throw them in the boiling water while still frozen and wait until they rise to the top.  Let them continue to boil for only one minute more and immediately remove them from the water.  Having frozen ones on hand always makes for a quick supper.  Oh, and don't bother buying a mold to make them, all you need is a cookie cutter or even a thin edged drinking glass will do.  A mold will just slow you down and is a waste of money, and they won't look right either.  Mom and I had some of the Mennonite Style cottage cheese varenyky with rhubarb and white sauce for a night time snack with tea.  They were perfect, soft and warm, and not too sweet!  You could use any other fruit sauce that appeals to you.
      Varenyky Dough
      (makes about 150)
      5 cups flour
      1 tsp salt
      100g butter, melted
      1 cup evaporated milk
      1/2 cup water (as much is needed)

      Mix the flour and salt in a large bowl.  Add the butter and milk and mix together.  Add water as needed to form a soft dough.    Remove dough to a board and knead until soft, about 10 minutes(mom likes to knead a tbsp of melted butter into the dough by pouring it onto the kneading board before she starts kneading the dough).  Oil a bowl and roll dough in it to coat the dough.  Set aside to rest for at least 30 minutes. Take 1/4 of the dough to roll out on a floured board until 1/8 inch thick.  Cut with 3" round cutter dipped in flour to prevent sticking.  Fill each circle with 1 tsp of filling, and fold dough in half around the filling.  Pinch closed around the half circle to seal in the filling.  You must be careful not to get any wet filling touching the edges to be sealed or they will not seal and may break open during boiling.  Remaining scraps can be kept and rerolled at the end or may be cut up and boiled to serve as a noodle served with butter and seasonings.  Drop 12 varenyky into salted boiling water and give the pot a gentle stir to prevent sticking to the bottom.  Let boil one minutes more after they rise to the top of the pot.  Strain and rinse briefly and toss with melted butter to prevent sticking.  Keep these cooked varenyky in the oven at low heat until ready to serve.
      Cottage Cheese Filling
      2 cups cottage cheese, (dry cottage cheese, not wet)
      1 beaten egg
      salt to taste, if needed
      1 tsp chopped fresh dill
      Mix all ingredients, and chill until needed.  The filling must be stiff enough to not flow.  If it is runny it will be difficult to work with, so be careful in the amount of egg you add.  If you wet the edges of your circle with the filling, it will not seal.  You might want to add half just to make sure the filling is stiff enough.  Chilling helps to keep it firm.
      Rhubarb Sauce
      2 cups chopped fresh or frozen rhubarb
      1/2 cup sugar, (or to taste)
      4 tbsp water
      Put rhubarb and water into a sauce pan and heat to a gentle simmer.  Add 1/2 of the sugar and let simmer another 15 minutes.  Check for sweetness and add remaining sugar if necessary.  Once sugar is dissolved set aside to cool.

      White Sauce
      3 tbsp butter
      3 tbsp flour
      1 cup half n half cream (10%)
      In a small pan heat butter and flour to make a roux.  Let bubble a few minutes, but do not burn the flour.  Whisk in the cream and bubble gently for a few minutes cook away the starchy flavour. Your sauce should be smooth and pourable.  Add additional cream to thin it out if necessary.

      Serve cottage cheese Varenyky with warms white sauce and  warm rhubarb sauce.  Something a little different......at least for a Ukrainian French Canadian girl:)

      Friday, August 13, 2010

      What do You do with your Green Tomatoes??

      I love that we get all four seasons here.....I really do.  It's even hard for me to pick which season I enjoy the most....because they each offer something special to enjoy.  I love winter for it's crisp fresh snow, warm fires, knitted sweaters and of course the fact that Christmas falls right in the middle of it is just the icing on the cake for me.  I'll agree that once Christmas is over....somewhere around the end of January.....I can get a little anxious about spring.  What's not to love about spring???  All those pretty spring bulbs and puddles to play in......and then comes summer with (hopefully) beautiful,warm long days and all the good things that grow in the summer.  Summer is nearing it's end here and it is perhaps my favourite part now.  All the things that I have patiently waited for have grown and some are even ready to be picked!  Yeah!  It's canning season:)  I absolutely love canning season.........I know....I know....everybody loves canning season right:)  I can see out my front door that the dill I planted is ready.......so I'm hoping pretty hard....that the pickling cucumbers are ready in the store for me to go and buy, so I can can up enough pickles to get me through the next year.......'cause I love me some pickles.  And this year I want to make some salt water dills as well as my usual vinegared pickle recipe.  After two weeks of eating mom's salt water dills at home, I think I'm going to need some here too!  You just cannot buy that kind in the store.......and they are dead easy!  Hmmmm I think I'll get Ike to make them......that's how easy they are.  More on that in a few days!
      While up at my parents camp, (which also has it's own little gardens) we were watching the abundance of green tomatoes developing.  I do love fried green tomatoes...yes I surely do......But I've also always wanted to try making a Green Tomato Pie!  (Ever since I read about it in a Laura Ingalls Wilder book when I as little).......It seems that 'pa' could not tell that it wasn't an apple pie......sounded good to me.  Since we had the pizza oven all heated up......no point in wasting all that heating!  So I gathered five nice sized and brilliantly green tomatoes from the tomato plants outside grampa's workshop and set off to try a recipe.  Pie was out of the question since we had no lard in the cupboard........but how about an apple crisp???   We did have nearly all the ingredients needed.....with the exception of the nutmeg.....but we just substituted with more cinnamon.......we were at camp after all.  Undaunted by the sceptical looks from my family, I forged ahead.  It got the thumbs up from everyone in the end (and some of them still think it was apple crisp).  So if you have a huge crop of green tomatoes.........go make some green tomato crisp....you probably have everything else you need already.   I think you could pretty much use them as an apple substitute in lots of different recipes.....as long as they contain some spices to flavour them......What would you try?
      Green Tomato Crisp
      (Recipe adapted from an old Betty Crocker Cookbook)

      4 large or 5 medium firm green tomatoes, chopped (about 4 cups)
      3/4 cup packed brown sugar
      1/2 cup all-purpose flour
      1/2 cup quick-cooking or old-fashioned oats
      1/3 cup butter or margarine, softened
      3/4 teaspoon ground cinnamon
      3/4 teaspoon ground nutmeg


      Print these coupons...


      About Concordance™


      1. Heat oven to 375ºF. Grease bottom and sides of 8-inch square pan with shortening.
      2. Spread apples in pan. In medium bowl, stir remaining ingredients except cream until well mixed; sprinkle over apples.
      3. Bake about 30 minutes or until topping is golden brown and tomatoes are tender when pierced with a fork. Serve warm with ice cream.

      Sunday, August 8, 2010

      Camp is All About Food and Fishing!

      Do you have a cabin or cottage that you enjoy time at in the summer??  Now that I live on the other end of the country......it's a 6 hour plane ride plus connection times......to get out here for a visit.  I have been very lucky these past two summers to be able to get out and spend nearly a week each summer out at the camp with Ike.  Ike is becoming more interested in finshing and spent a good bit of time catching fish this year.  In my family, fish is most likely to be pan fried, smoked or canned, depending on the type of fish caught.  Mom cans fish in her pressure canner each summer to deal with extra fish. 

      It's a very simple process and is good to eat in sandwiches.  She packs each jar with the cleaned fish, leaving the bones in the meat.  Once the jars are full, she adds 1/2 tsp of salt, 2 tbsp vinegar, and 2 tbsp ketchup to each jar.  She then processes the jars at 10 lb pressure in her pressure canner for 1 1/2 hours. 

      Some of the other fish that were caught were smoked and shared with the neighbours.  Mom and Dad and I also spent a few hours out picking blueberries since they are right in the middle of picking season here now.  I was interested in taking some home to make syrup since I'll be missing the picking season at home this year.  After a few hours we had picked nearly 4 gallons to take home....yum!

      Friday, August 6, 2010

      A New Pizza Oven

      We are all back from a week away at camp.  We had lots of fun there and ate lots of delicious things.  I was especially excited to see mom's new pizza oven up and running.  We gave it a good try with pizza, rye bread, and even some baked crumble.  Everything tastes better when cooked with a wood fire.......at least I think so.  Now I REALLY want to have one of these in my back yard!  The list of things you could make in it is only limited by your imagination.  We prepared the pizza dough before going to camp so it sat in the fridge until we were ready for it. 
      There were periods of intermittent and heavy rain, but we worked around the weather pretty well.  Dad managed to get the oven heated up with a good roaring fire, and mom got the pizza in before any of the serious rain happened.
      Fortunately we did have a big umbrella to help recover the cooked pizza and bring it into the kitchen for dinner unharmed. 
      Do you have a pizza oven or other wood fired outdoor oven at your house??? What do you like to make in it???  I'm just thinking about all the yuumy things I could make if I had one.........one of these days!

      Monday, August 2, 2010

      Those Sheets were the Grooviest!

      While collecting the vintage sheets I needed to work on this quilt project, I found sheets that were the same as ones that I remember having as a child.  The blue version of them is in this quilt in a few places.  That was probably one of the most fun things about this project.  Well as I am back at mom and dads house...I had to poke around at old photos and what did I find....but a photo of me sitting on my bed.....with those very same sheets...too funny....we were so groovy...now weren't we??  Now I'm actually OK to show you this photo because I actually look much better here than in most old photos.  Mum would have curled my hair in this one as it was poker straight and usual kept short (in a pixie cut....UGG) or in pony tails.