Monday, December 23, 2013

Merry Christmas to Me


Finished up a little project I started a year ago.  A big project for me as I really don't know much about crochet. It ended up taking me over a year to finish it since I stuffed it in a box over the summer and forgot about it.  Happy enough with the way it turned out for keeping for myself.  I'll have to make another one now.  Size is just over 20 inches in diameter and the pattern is from Decorative crochet. You can find it on Picasa Web if you do a search for Decorative Crochet Magazine.


Since I finished it just in time for Christmas....this is my present to me:)  Merry Christmas everyone!!

Monday, September 23, 2013

Baked Potato Soup for a Chilly Day

I just love the fall.  The opportunity to do all kinds of new things is there.  Cold weather cooking, preserving, and starting to craft Christmas gifts.....Not  to mention the change in scenery.  With my son returning from a weekend camping trip....I decided to try my hand at a soup he had enjoyed at Red Robin a few weeks ago.  I'm happy with the way it turned out and will definitely be making it again as it was tasty, and didn't require anything that you wouldn't have on hand......with the exception of optional instant mashed potatoes.

Baked Potato Soup
4 strips of bacon, chopped
1/2 large cooking onion, chopped
1 stick celery, diced
3 cups chicken stock
1 1/2 cups milk
2 medium sized russet potatoes, diced
1/2 large carrot diced
salt and pepper to taste
1/4- 1/2 cup instant mashed potato flakes (optional)

Garnish with sour cream, onion greens and shredded cheddar cheese

In heavy bottom dutch oven fry chopped bacon, onion, and celery until bacon is nearly crisp over medium heat...stirring often so as not to burn the bacon.  Add in chicken stock and milk and potatoes.  Simmer until potatoes are fork tender.  Add in carrots and cook until done to your liking.   Season with salt and pepper to taste.  To thicken soup, add instant mashed potatoes  a heaping tbsp at a time until desired thickness is reached. 

Wednesday, June 5, 2013

A Sewing Project for Teacher's Gift


This little project caught my eye some time ago, so I set up a swap to trade them.  Since my partner has already received this swap....I think I'm pretty safe to post the photo here now.  It was made using the pattern here, and was a pretty quick and, I think,....pretty cute project too.  If you pull the leaves at the top, the keys move up inside of the owl so you can hang them up without keys marking up your wall.  I think I may just make another for an end of year teacher's gift........What do you think??

Saturday, May 11, 2013

An Easy Knitting Project

The weather has finally turned around here and there is lots going on.  We had a nice visit from a good friend that we had not seen in a while.  I made her some socks to take home for her upcoming winter months using the Ann Budd pattern "First Time Tube Socks".  The pattern has become so simple now.....I made another pair in brown as well.  Still enough yarn to make a second pair in blue......I'll save that for a rainy day:)
Now I just need to find someone with a ladies size six foot to take the brown ones.  Know anyone?

Thursday, May 2, 2013

What Have You Been Making?


Recently I ran a swap to make a simple wallet using the tutorial from Noodlehead.  This is a photo of the one I sent out to my partner. (It has arrived at my partner so it is safe to post this here without risk of spoiling the surprise)

It was a great little tutorial and I will be sure to make some more in the future using a little stiffer fabric the next time.  I was, in the end, very pleased with the end result and would highly recommend the tutorial.  It's especially nice for a kids wallet as you can pick a suitable print for the look you'd like and it is basic with only 4 card slots and a spot for paper money as well.  

Monday, April 29, 2013

Well Hello There!....Tan Slice

Sometimes life is just so busy with so much going on that you hardly have time to breath.  But eventually....(hopefully) the skies clear and everything looks brighter, happier and more hopeful.  We are coming out (finally) of our very long winter here and Spring brings a change in outlook that makes one happy to be alive.....don't you think?

Since there has been a lot of low carbing going on in our household.....there has not been as much baking as there typically would be.  However, I did need to make some baking for a thank you tea put on by my son's Scouting group for one of their sponsors.  I decided to make Ginger Crunch....because I love it......and I also decided to try something new (well new for me)......and that was Tan Slice.  If you like caramel...this is a great one to try and it is super easy and quick too!  I am definitely adding this to the list of Easy Bakes.  It's handy for me as it is nut free.....so it's great for school lunches:)  In no time at all...this was all that remained of the two recipes.....  Both recipes are winners in my book.....I would recommend them both and love that they are both equally fast when you are in a pinch for baking and each call for very standard ingredients.  Try them both....and let me know which one is better!!

Tan Slice
(recipe from Chelsea Sugar company)

180 grams butter, softened
90 grams white sugar
1/2 tsp vanilla
300 grams flour
1 tsp baking powder
1/2 cup chocolate chips

Caramel
1 tin sweetened condensed milk
100 grams butter
2 Tsbp golden or corn syrup

Cream the butter and sugar and add vanilla.  Stir in the baking powder and then the flour until well combined.  Mixture should hold together when pinched.  Press 2/3 of the dough into a lined 23cm baking tin.  Mix chocolate chips into the remaining 1/3 of the dough and reserve to sprinkle over the caramel topping.

To make the caramel, mix all three Caramel ingredients into a heavy bottom saucepan.  Heat over medium heat while stirring until the mixture become thickened and golden.  You need to allow the golden colour to develop to have the flavour turn to tasting like caramel, and no longer tasting like condensed milk.  If in doubt....give it a taste (after cooling it...it will be hot!)  This took me about 15 minutes.  Once your caramel is ready, pour it over the pressed base and spread evenly into all corners.  Sprinkle reserved chocolate chips and dough evenly over the top and bake at 360F (180C) for 18-25 minutes or until the top has become golden in spots.  Let cool slightly before slicing, and leave in pan to cool completely.

Saturday, February 9, 2013

Slow Cooker Black Bean Pork Ribs

Country Style Port Ribs were on sale at the grocery store last week.  I don't often buy that cut, but for a change I did. I decided that I wanted to try something with black bean sauce......and  a quick search brought me to this recipe.  I know Mary's recipes always look good so I was not at all hesitant to try it out.  I was out of fresh ginger and did substitute with powdered....and I was not disappointed at all.  It's a quick to prepare slowcooker recipe, and the results were tender and delicious.  I will most definitely be making this one again.....maybe even on a larger scale and with some fresh ginger too.  I would recommend it for a potluck dish to bring along.  It's simple to make and looks like more effort was involved than there actually was.  This dish was so easy....I think I may get my son to make it next time.

Slow Cooker Black Bean Pork Ribs

3-4 lbs country style pork ribs cut in bite size pieces
3 Tbsp black bean sauce
2 Tbsp Chinese soy sauce
1/4 cup chicken stock
1 Tbsp honey
1 Tbsp grated fresh ginger ( I used 2 tsp ground ginger)
3 cloves garlic minced
1/2 tsp szechuan pepper, ground
1 Tbsp tapioca starch
For after cooking to prepare the sauce
2 tsp sesame oil
1/4 cup chopped green onion

Place bite sized pieces of pork in you slow cooker.  Mix the next 8 ingredient in a bowl and pour over the meat in the slow cooker.  Cook on low setting for 5-6 hours....no more.  Remove meat after 6 hours (or when the meat is tender to your liking) and cover with foil to keep warm while you prepare the sauce.  Strain the sauce and transfer it to a pot.  now is a good opportunity to skim off any fat that has accumulated on top of the sauce and discard.  Bring sauce to a boil, and simmer about 15 minutes or until the sauce has reduced to nearly half the volume and begins to thicken.  Add in chopped green onion (reserving a few Tbsp to sprinkle on the top if you wish), and sesame oil to the sauce and pour over ribs in your serving dish.  Sprinkle with reserved onion greens and serve.

Saturday, February 2, 2013

Bar Sugar Cookies

We had a nice time ice fishing with my son's scouting group last weekend.  Always wanting to bring along a little something to share....and always pressed for time.....I decided to give another bar cookie recipe a try.  They ended up being pretty nice and I would make them again.  Quite a few kids said they liked them.  Perhaps they are very polite.....or not very picky.....who knows.  In any case, I liked these.  Be careful to bake only long enough to have a bit of golden colour around the edges.  Then they will be chewy and not dry.  The recipe is very handy if you are in a rush like me:)

Sugar Cookies....Bar Type

1 cup butter softened
2 cup sugar
4 eggs
2 tsp vanilla
4 1/2 cups flour
1 tsp salt
1/2 tsp baking soda

Cream butter, and sugar.  Beat in eggs one at a time until incorporated, and stir in vanilla.  Mix dry ingredients together and add to  wet until combined.  Press into a lined or greased 13"X 18" pan.  Bake at 375F for 10-15 minutes or until lightly golden at the edges for a chewy cookie...a few minutes longer if you don't like chewy.

Sunday, January 27, 2013

Catching Up

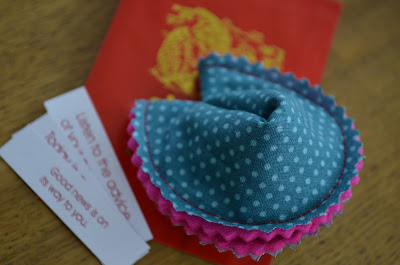
So it's been a while right?  It's has been so busy here since returning from Christmas break!!  It's always amazing how quickly the time passes by.  We have been fortunate to be enjoying beautiful temperatures for January.  It's been right around freezing.  Let's just keep our fingers crossed that it remains that way.  It makes skiing, snow boarding, snowshoeing, and skating so much more enjoyable:)  Aside from that I've been keeping busy with crafting swaps as well.  One that I just sent off was for these adorable fabric fortune cookies.  They are so darned cute (IMHO) and so very quick and easy to make....it's hard to stop making them.  You may already have on hand what you need to make them.  With Chinese New Year coming up....I thought it might be nice to have some around to give out, or to keep for decoration:)  If you  feel the need to make some.....go here and check out the very simple tutorial and get started!!  You might just find it difficult to stop:)