Sunday, April 17, 2011

Lemon Barley

Lately, I've noticed friends ordering a glass of water with a splash of Lime cordial rather than the usual slice of lime.  I had to try this for myself and discovered that it is really quite good.  It reminded me of a drink concentrate that my friends in Tauranga gave me over Christmas.  This all got me to thinking.....and all that thinking......an abundance of lemons in my fruit bowl.......and a six hour lack of internet service this morning lead to this.........Lemon Barley Water.
Little did I know....Barley Water is the official drink of Wimbledon.  While it is usually fruit flavoured......lemon appears to be very common. Now, although I am really happy with the way this turned out....... I am very curious to revisit this experiment with limes.
Lemon Barley Cordial

4-5 lemons (enough to make 1 cup of juice)
1/2 cup pot or pearl barley
1 1/3 cup sugar

Soften lemons by microwaving each one for 15 seconds.  Take and set aside the zest of 2 lemons.  Juice all lemons and set aside the juice which should be about 1 cup of liquid.  You may save the zest of the remaining two lemons for another use....it freezes well.
Put barley in a small sauce pan and cover with cold water.  Bring to a boil and then strain and discard the water.  Return the barley to the pot and add 1 1/2 cups boiling water to the strained barley.  Add the zest of two lemons to the pot and bring to a boil.  Cover pot and reduce heat to simmer and simmer with the lemon zest for 40 minutes.  This time strain the barley and keep the strained water.  You can discard the barley at this point or set it aside for another use.  Return the liquid to the pot and add sugar.  Stir to dissolve and boil for just a few minutes.  Add the lemon juice and return to a boil.  Bottle........an empty wine bottle works well for me.  Dilute cordial with water or soda water to taste.  I use about 4 to 5 parts water to 1 part syrup.  Keeps refrigerated up to 2 weeks.

Thursday, April 14, 2011

Baked Eggs in Tomato

After a lot of thought about this month's challenge.......I settled on this recipe for baked eggs in tomato shells.  It is easy, straight forward, a little bit fun and kid friendly too.
Renata of Testado, Provado & Aprovado! was our Daring Cooks’ April 2011 hostess. Renata challenged us to think “outside the plate” and create our own edible containers! Prizes are being awarded to the most creative edible container and filling, so vote on your favorite from April 17th to May 16th at http://thedaringkitchen.com!

Baked Eggs in Tomatoes
4 large eggs
4 medium tomatoes
1/4 cup grated cheese
2 Tbsp crumbled bacon
pinch of parsley
pinch of salt and pepper

Slice the tops off of the tomatoes and scoop out and discard the insides.  Divide the grated cheese and bacon between each tomato and sprinkle inside.  Crack an egg into each tomato and top with parsley and salt and pepper.  Set in a shallow pan and bake at 425F for 20-35 minutes depending on how set you want the yolk to be.

Wednesday, April 13, 2011

Pink Hearts Doily

I've never been very fearful of trying to knit beyond my abilities.  After all, for the most part...... it's just purl or plain.  I just plug along and follow the instructions one after another until I'm done.  Crochet is a slightly different story for me.  My grandmother spent certainly more time knitting with me.......I must have been around 13 years old by the time I asked her to show me how to crochet.  The first thing I made was a huge zigzag afghan.  I had made a mistake on the bottom corner and it took me a few more rows to realize my mistake.  But, by that point..... there was no stopping me.... I carried on and finished that afghan and it sat in my mom's house for many years with it's odd extra floppy bit hanging off the corner.  I did not crochet another thing until 3 years ago.  Like knitting, I figured with only one live stitch......I could probably figure it out.  While I am 'good' at neither knitting or crochet....I get by.  I find you tube videos most helpful when I get stuck, and try to understand what the pattern is trying to accomplish to help understand what it is trying to get across.  I had a heck of a time understanding what the last row of this latest project meant........but I think I figured it out by staring at the photo of the finished project......and now it's done.  I was over, catching up, with Lazy Kate when the gorgeous job she had done on her crocheted doily prompted me to try something simple...which started my search for an easy project like this one.  I have been working my way down in thread size......almost to the point of using those nasty steel crochet hooks.  Yes, I am feeling a bit intimidated.....but I'll get there sooner or later.   I do have an enormous stash of crochet thread collected from thrift shops over the last few years....and it seriously needs to be used up. Crochet thread really is expensive!  Hmmmm.....I'm starting to sound like my grandmother already:)
This pattern was found at Purple Kitty Yarns on the internet for free.  It looked to be pretty basic, and quick. With the heavy (it called for a 3.5mm hook) cotton thread I used, it finished up at 8 inches in diameter.   Next I will try it again (now that I think I know what I'm doing) with a slightly smaller thread size.  When I finished this doily last night..... the first thing that I thought of was 'Oh... I'd better starch this before I take a picture of it....or grama would be mortified'.  So I pinned it to my ironing board and sprayed it to dampen it and then gave it a little spray with the spray starch.  Not as starched as grama's, but it did neaten it up a bit........So grama wouldn't have to be so embarrassed for me.

Thursday, April 7, 2011

Raspberry Smacks

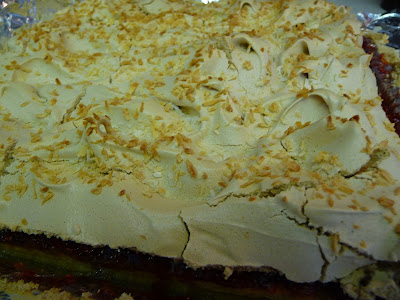
With four years of bringing baking to my school's PAC (parent advisory council...or PTA) meetings.....it is becoming more difficult to find recipes to bring that I haven't already brought.  Well this month I took a gamble and tried a new recipe....which is always a bit risky.  Good thing I did, because these were....and still are.... delicious.  The recipe is slightly modified from it's original form as I could not bring baking with nuts into the school.  If you like raspberry....and pavlova....this could be just the thing for you!  It came together with very little effort and is pretty to look at as well......Plus they have the added bonus of an interesting name.  I cannot tell you the number of times I've been tempted to give someone a little smack......and now I can. 
Raspberry Smacks
1 1/2 cups flour
1/2 cup brown sugar
1/2 cup softened butter or margarine
1 tsp baking powder
1/4 tsp salt
2 egg yolks
1 tsp vanilla

1 cup raspberry jam for filling

Topping
2 egg whites
1 cup brown sugar
3 Tbsp shredded coconut
Crumble the first 7 ingredients together until mealy.  I just put it all in the stand mixer with the paddle attachment starting with the dry ingredients, then the butter and finally the wet ingredients., and mixed until it was all uniform.  Line pan or use a pan with a removable bottom if you have one.  I don't so I lined the pan with aluminum foil so I could remove the squares for easier cutting. A removable bottom would be better as I cracked the topping as it bent while I pulled out the bars. Press into bottom of the ungreased pan (9X9inches).
Carefully spread the jam over the bottom, being careful not to tear up the nicely pressed bottom.  I stirred up the jam first very well to make sure it would spread.
Topping:
Beat egg whites until frothy.  Add the 1 cup of brown sugar 1/3 at a time beating until stiff.  Spoon the beaten egg whites over the jam layer.  Bake at 350 F (180 C) for 25 minutes until golden.  Cut when cool with a sharp knife dipped in hot water between each cut.  Cut into 36 squares or less if you like larger pieces.

Monday, April 4, 2011

Finished Objects- Fingerless Gloves

Funny how some projects can sit around with only very little left to complete them.  Somehow....this happened to these fingerless gloves that I set out to make over a year ago.  I got to a part in the pattern that I needed to look up instructions on how to do......and set them down for a year.  Finally yesterday, with an hour on my hands while watching a movie.......I googled the instructions I needed and did finish them off.  Including finishing a picot trim cast off on the second glove, picking up and knitting both thumbs, and weaving in all the loose ends......I was done within the hour.  Silly that I waited so long to finish them off.  They are pretty darned cute...... fetching in fact.  So much so that I am tempted to make some more.  With the snow slowly leaving now....it's just the right time of year for them here.  Is it just me or do you have unfinished objects hiding in your craft stash too???  I'm hoping it's not just me:)
I used the pattern for 'Fetching' from Knitty, but used Bernat Alpaca rather than that specified in the pattern.  To compensate I used smaller needles....a size 2 3/4 mm to get the right gauge.  It was a pretty straight forward pattern which I will likely try again!