Tuesday, June 29, 2010

A Chocolate Pavlova Baker's Challenge

The June 2010 Daring Bakers’ challenge was hosted by Dawn of Doable and Delicious. Dawn challenged the Daring Bakers’ to make Chocolate Pavlovas and Chocolate Mascarpone Mousse. The challenge recipe is based on a recipe from the book Chocolate Epiphany by Francois Payard
After trying a Pavlova on my own just a short time ago, the Daring Baker's announced their June Chocolate Pavlova Challenge last month.  While I do love chocolate, I was very skeptical about this chocolate version.  While we all LOVED the traditional version we tried here......I knew that the chocolate version would be entirely a different thing.  The traditional version topped with flavoured whipped cream and fruit is light and summery.  The chocolate version is dense and rich and is a hit of extreme chocolate.  Based on the amounts of filling required for the traditional Pavlova I reduced the size of the chocolate mousse filling recipe by 1/2 as the recipe as stated would make way too much filling for a 3 egg Pavlova.  The amount of Creme Anglaise drizzle required is also way more than is required for the recipe so I scaled it back to 1/5 of the original making just over 1/2 cup of glaze.  Not being able to find any mascarpone cheese meant that I did have to make my own again as we did back in the Tiramisu challenge over here.....and it turned out beautifully again.....this time I used just regular grocery store whipping cream without any problems.
Over all, I found the dessert so completely changed by the addition of the chocolate and the heaviness of the mascarpone mousse filling (compared to a whipped cream filling) that I would not describe it as a Pavlova......it's not the same kind of dessert experience at all.  If you like super intense chocolate flavour you may well like this dessert.  If you love traditional Pavlova this will be different.  Since I love traditional Pavlova....I think I would just leave well enough alone and continue to make it in the traditional manner as it is really not to be improved upon for me.  I would be tempted to make the chocolate Pavlova base again.....but not the mascarpone mousse nor the Creme Anglaise drizzle.  I much prefer the lightness of the traditional whipped cream filling with fresh fruit and could do without all the added steps required for the fillings as presented here.  The challenge has pointed out some options to try as far as making some alterations from the traditional recipe that I never really thought about before.....so for that I really enjoyed this challenge.  Plus there's nothing wrong with a good hit of chocolate now and again:)

Recipe 1: Chocolate Meringue (for the chocolate Pavlova):
3 large egg whites
½ cup plus 1 tbsp (110 grams) white granulated sugar
¼ cup (30 grams) confectioner’s (icing) sugar
1/3 cup (30 grams) cocoa powder
Directions:
  1. Place a rack in the center of the oven and preheat to 200º F (95º C) degrees. Line two baking sheets with silpat or parchment and set aside.
  2. Put the egg whites in a bowl and whip until soft peaks form. Increase speed to high and gradually add granulated sugar about 1 tbsp at a time until stiff peaks form. (The whites should be firm but moist.)
  3. Sift the confectioner’s sugar and cocoa powder over the egg whites and fold the dry ingredients into the white. (This looks like it will not happen. Fold gently and it will eventually come together.)
  4. Fill a pastry bag with the meringue. Pipe the meringue into whatever shapes you desire. Alternatively, you could just free form your shapes and level them a bit with the back of a spoon. (Class made rounds, hearts, diamonds and an attempt at a clover was made!)
  5. Bake for 2-3 hours until the meringues become dry and crisp. Cool and store in an airtight container for up to 3 days.
Recipe 2: Chocolate Mascarpone Mousse (for the top of the Pavlova base):
1 ½ cups (355 mls) heavy cream (cream with a milk fat content of between 36 and 40 percent)
grated zest of 1 average sized lemon
9 ounces (255 grams) 72% chocolate, chopped
1 2/3 cups (390 mls) mascarpone (don't forget we made this a few months ago - get the printable .pdf HERE)
pinch of nutmeg
2 tbsp (30 mls) Grand Marnier (or orange juice)
Directions:
  1. Put ½ cup (120 mls) of the heavy cream and the lemon zest in a saucepan over medium high heat. Once warm, add the chocolate and whisk until melted and smooth. Transfer the mixture to a bowl and let sit at room temperature until cool.
  2. Place the mascarpone, the remaining cup of cream and nutmeg in a bowl. Whip on low for a minute until the mascarpone is loose. Add the Grand Marnier and whip on medium speed until it holds soft peaks. (DO NOT OVERBEAT AS THE MASCARPONE WILL BREAK.)
  3. Mix about ¼ of the mascarpone mixture into the chocolate to lighten. Fold in the remaining mascarpone until well incorporated. Fill a pastry bag with the mousse. Again, you could just free form mousse on top of the pavlova.

    Recipe 3: Mascarpone Cream (for drizzling):
    1 recipe crème anglaise
    ½ cup (120 mls) mascarpone
    2 tbsp (30 mls) Sambucca (optional)
    ½ cup (120 mls) heavy cream
    Directions

    1. Prepare the crème anglaise. Slowly whisk in the mascarpone and the Sambucca and let the mixture cool. Put the cream in a bowl and beat with electric mixer until very soft peaks are formed. Fold the cream into the mascarpone mixture.
       

      Recipe 4: Crème Anglaise (a component of the Mascarpone Cream above):
      1 cup (235 mls) whole milk
      1 cup (235 mls) heavy cream
      1 vanilla bean, split or 1 tsp pure vanilla extract
      6 large egg yolks
      6 tbsp (75 grams) sugar
      Directions:
    1. In a bowl, whisk together the egg yolks and sugar until the mixture turns pale yellow.
    2. Combine the milk, cream and vanilla in a saucepan over medium high heat, bringing the mixture to a boil. Take off the heat. 
    3. Pour about ½ cup of the hot liquid into the yolk mixture, whisking constantly to keep from making scrambled eggs. Pour the yolk mixture into the pan with the remaining cream mixture and put the heat back on medium. Stir constantly with a wooden spoon until the mixture thickens enough to lightly coat the back of a wooden spoon. DO NOT OVERCOOK.
    4. Remove the mixture from the heat and strain it through a fine mesh sieve into a bowl. Cover and refrigerate until the mixture is thoroughly chilled, about 2 hours or overnight.
    Assembly:
    Pipe the mousse onto the pavlovas and drizzle with the mascarpone cream over the top. Dust with confectioner’s sugar and fresh fruit if desired.

    Friday, June 25, 2010

    ARRGHH It's a Pirate Party!

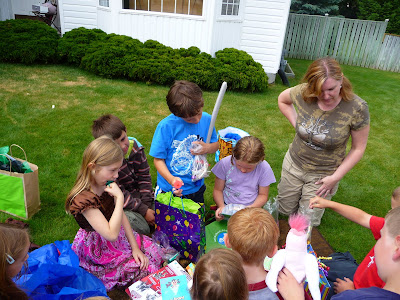
    Wow.....how much work could a children's birthday party be anyway???  After 4 years of getting off easy by having Ike's party at the waterslide (it just doesn't get much easier than that)......it was time for another at home birthday party.  Thank goodness the rain stopped long enough for all the outdoor activities!  All said and done I think (I hope) that the kids had lots of fun! 
    Ike got it into his head that he wanted to have a treasure hunt at his party, which prompted him to think that a pirate party would be an appropriate theme.  So after a bit of thought we decided that the 'treasure' at the end of the hunt would have to be a treasure chest filled with good pirating booty.  I fashioned a rather quick treasure chest out of a hinged top shoe box and filled it with chocolate coins, ring pops, candy necklaces, mardi gras beads, play tiaras, gem stone rings,  tootsie pops and little butter finger bars. 
    First the kids searched the front yard for 'gold nuggets' (spray painted landscaping rocks) with which to buy their foam pirate sword and eye patch. Then the treasure hunt started.
    The kids found 10 hidden clues.....each leading to the next until they found the map which revealed the location of the chest.  It worked out quite well and more organized than I'd imagined as they took turns in a circle choosing an item from the chest to put in their 'booty bags' to take home....until the chest was empty. 
    Then we played pass the present, crush the canon ball, and a few games of hot potato.  After pizza, cake and ice cream.....the swords created all kinds of entertainment.  As a word of caution....ten 9 years old kids with swords do need a bit of supervision:)  We'll see if we all feel up to this next year.  The party started at 2:45pm (right after school) and the last two guests departed at nearly 8pm.  I think they had a good time!

    Saturday, June 19, 2010

    Red Red Rhubarb and a Beautiful Day

     
    It's a beautiful morning here...perfect weather for really enjoying yard work.  I've spent quite a bit of time out in the yard......weeding and transplanting and pruning.....and today feels like another good day to spend in the yard.  My rhubarb plant which I inherited from Aunt Dorothy needs to be moved to a sunnier spot this year......it's not as large as it should be by now.  After picking all the stalks I could.....I found I still needed to go foraging for more rhubarb from friends who don't use their own rhubarb plants.  And now....I almost have enough for the coming year.  Today will be spent cooking for the neighbourhood pot luck BBQ later today, and cleaning for the arrival of a house guest.  If time permits.....maybe I'll get a chance to do some more yard work....such a nice day to be outside!  Hopefully your day will be just as nice.  
    And as the giveaway is now over.......Congratulations to commenter number four!  Ana Belen from Spain was commenter number four.  Anna, your number was chosen by random.org as the winner for the vintage china pincushion.  Your package will be on it's way to Spain soon.  I hope you enjoy it, and thanks to all who entered.
    Now.....I just need to  think up some good rhubarb recipes to try!  If you have any favourite rhubarb recipes.....I'd love to hear what they are!

    Random Integer Generator

    Here are your random numbers:
    4
    Timestamp: 2010-06-19 16:05:28 UTC

    Thursday, June 17, 2010

    Kefir Rhubarb Streusel Muffins

    Blogger up and changed their templates just as I was trying to figure out what I wanted to do with my look and layout......doesn't that just figure:)  You wouldn't believe how many hours you can fritter away trying this template with that colour......well.....I'm still playing.  I apologize for not knowing what I'm doing......there is a lot more of that to come.  After hours of positively wasted time.....I did manage to get outside (a beautiful day it was) and do quite a bit of yard work.  It was a very unsafe feeling wielding an electric hedge clipper wearing only a sun dress and thongs (I mean the shoes....not the underwear....but yes I had underwear on too).  I had to be very mindful not to lower the vibrating blade down too low as it made me worry for my pedicure....and my toes.  Too lazy to run in and change.  
    I had spent some time earlier in the morning over a friends house who has the most amazing perennial gardens ever.....I mean OMG....I should have taken my camera.  I was over there to 'SHOP' for some perennials to transplant over to my yard....I'm  afraid I've left her with quite a list....now I just need to find space to put them all. 
    Yard work out of the way, I took a try at a recipe which promised to be the most delicious  muffin I've ever laid a taste bud to and it also called for buttermilk (I'll be using Kefir) and rhubarb (fresh from the garden).  While it was not the best muffin I'd ever tasted....with some work...I bet it could be, so I'm keeping the recipe to fiddle with.  The texture of the muffin was fabulous, but I found the sugar level way too low for a rhubarb muffin.  It may be fine with a sweeter fruit like a blueberry....but the tart rhubarb needs more sugar....I'm guessing 1/2 cup more.....at least.  Regardless....this is not a sweet muffin recipe.....so compare it to ones you might normally make for a sweetness comparison.  Also the amount of fruit called for did not leave the muffins overflowing with fruitiness.  I would add 1/4 cup more fruit than is listed the next time.  

    Rhubarb Kefir Muffins
    1/2 cup oil
    3/4 cup packed brown sugar
    1 1/2 tbsp orange zest
    1 egg beaten
    2 tsp vanilla
    1 cup kefir
    2 1/2 cup flour
    pinch of salt
    1 tsp cinnamon
    2 1/2 tsp baking powder
    1/2 tsp baking soda
    2 cups rhubarb (or other fruit)

    Topping
    1 tbsp cold butter
    1/3 cup brown sugar
    1/2 tsp cinnamon
    1/2 cup finely chopped pecans or walnuts
    Preheat oven to 400F and line 12 cup muffin tin with paper liners.  Mix all dry ingredients in a large bowl and set aside.  In another bowl  combine the oil, sugar, orange zest, and the lightly beaten egg.  Once combined, stir in the milk kefir and the vanilla.  Add this wet mixture to the dry mixture and stir just until combined.  Batter should be stiff enough to scoop and not be runny.  Add a few tbsp extra flower if necessary.  Spoon batter into 12 muffin cups .....cups will be very full. (see second photo...that is unbaked) Sprinkle tops with lots of streusel topping and bake for 15 minutes.  Reduce temperature to 350F and bake an additional 10 minutes.  Cool on wire racks.  Muffins are done when tops spring back when touched.  Check at least 5 minutes before the end of recommended cooking time just in case your oven is hotter.

    Monday, June 14, 2010

    Seafood Pate with Baguettes....an After School Snack

     Our hostesses this month, Evelyne of Cheap Ethnic Eatz, and Valerie of a The Chocolate Bunny, chose delicious pate with freshly baked bread as their June Daring Cook’s challenge! They’ve provided us with 4 different pate recipes to choose from and are allowing us to go wild with our homemade bread choice.
    This month's Daring Cook's Challenge posed a lot of interest for me.  Ever since I had read a Fine Cooking Magazine feature on pate a few years back......it has been on my to do list.  My only problem with making pate is that I am likely the only person in the house who would eat it......and maybe Kitty too....depending on the flavour....she's very picky:)  So for my needs.....a very small serving size would be in order and I would have to stick to the seafood variety for increasing the probability that DH would even give it a try......and if it wasn't well received by the humans......at least that's a flavour that Kitty favours.
    While researching all the aspects of what I could do.....I came upon this site and really liked the idea of pate prepared in small jars using a pressure canner.  If you own a pressure canner....you really should give this a look!  I'm going to have to try it and see what the texture of product ends up being like in the end.   I just loved the method as it would allow me to prepare pate in small (I would use salmon canning jars in the 1 cup size) containers that would be ready for company with no notice at all, and I could make a batch size that would not make me feel like I'd been wasting my time.  I have yet to try this, but it is now on my to do list for Christmas time.  They do advise in their video that the pate will take on flavours from the spices as it sits in the jars and recommends a few weeks shelf time for best flavour development.  Had I found that site a few weeks ago.....more than likely that is the route I would have chosen.  However, for this challenge I have chosen to make a salmon and shrimp (that's just what I had in the freezer) pate served with fresh baguettes.  Again I spent a lot of time considering what bread to try....I'm not very adept at bread making....so this was a useful challenge for me.  In the end I decided to give the baguette recipe a try having never made them before and having a baguette pan sitting in my basement with packaging still attached.  I am pleased to be able to tell you that I have now tried out the pan and was more that satisfied with the end result.  I worried about the dough recipe as my starter was more of a dough and not very loose at all, and the completed dough was fairly stiff even after I added the maximum suggested amount of water.  When all was finished.......I could not complain about the bread.  It had a beautiful firm crust and a deliciously moist interior.  We ate a whole baguette just sliced with butter before the pate was even ready.  I think it turned out beautifully and would not hesitate to make it again. 
    I was so 'challenged' by this challenge that it has definitely been one of my favourites and I do intend to revisit it and the canning link above during the holidays.  I also loved that this was done with no trips to the grocery store as it was made with common ingredients producing a very practical dish.
    I bet you want to make some now too...don't you....and you should!  My only changes to the recipe below was to scale it down in size, I used salmon rather than trout and Cointreau rather than Gran Marnier.  I also roughly chopped 1/2 of the shrimp before sauteing and mixed them into the pate rather than layering it.  I wanted it to be easier to spread.  Ike decided in the end that his after school snack was 'delectable' although he did find the crust on the baguette a bit of a challenge:)

    Trout and Shrimp Pâté
    Yields one 6x3 inch (15x7,5 cm) terrine or loaf pan
    1 tbsp / 15 ml butter
    1/4 lb / 4 oz / 120g medium raw shrimp, deveined, shelled and tailed (about 12 medium shrimp)
    1/8 cup / 30ml Grand Marnier (or cognac, or another strong liqueur of your choice) (optional)
    1/2 lb / 8 oz / 240g trout filet, skinned and cut into thick chunks
    1/4 lb / 4 oz / 110g raw shrimp, deveined, shelled and tailed (any size)
    3/4 cup / 180ml heavy cream
    Salt, to taste
    Green peppercorn, coarsely ground, to taste
    Chives, for garnish
    Preheat oven to 375ºF (190ºC).
    In a heavy, flameproof frying pan, melt the butter over medium-high heat. Sauté the 1/4 pound of medium shrimp, stirring often, until pink and cooked through. Remove the pan from heat. (NOTE: These shrimp will be used to form layers within your pâté. If you feel they are too thick – like the ones in the photograph, you might want to slice them in half lengthwise.)
    Pour the Grand Marnier over the cooked shrimp. Light a match and carefully ignite the alcohol, to flambé the shrimp. Wait for the flames to go out on their own, carefully tilting the pan to ensure even flavoring. Set aside.
    Put the trout and the remaining raw shrimp in a food processor and pulse. Gradually pour in the cream and keep pulsing until you obtain a smooth mixture that is easy to spread, but not too liquid (you may not need to use all the cream). Season with salt and green pepper.
    Butter a 6x3 inch (15x7,5 cm) loaf pan or terrine, then line it with parchment paper. Spoon in half the trout mixture, and spread it evenly. Place the flambéed shrimp on top, in an even layer, reserving 3 or 4 shrimp for decorating. Top with the remaining trout mixture.
    Prepare a water bath: place the loaf pan in a larger, deep ovenproof dish (such as a brownie pan or a baking dish). Bring some water to a simmer and carefully pour it in the larger dish. The water should reach approximately halfway up the loaf pan.
    Put the water bath and terrine in the oven, and bake for 35 minutes. The pâté should be cooked through and firm in the center.
    Remove the pan from the water bath and let cool. Carefully unmold onto a serving platter. Decorate with the reserved shrimp, and sprinkle with chopped chives. Cut into thick slices and serve at room temperature, with crusty bread.
    French Baguette
    yield: Three 16" baguettes
    Starter
    1/2 cup / 120 ml cool water
    1/16 teaspoon active dry yeast
    1 cup / 240 ml flour
    Dough
    1 tsp / 5 ml active dry yeast
    1 cup to 1 1/4 cups / 240 ml to 300 ml lukewarm water*
    all of the starter
    3 1/2 cups / 840 ml flour
    1 1/2 tsp / 7 ml salt
    *Use the lesser amount in summer (or in a humid environment), the greater amount in winter (or in a dry climate), and somewhere in between the rest of the year, or if your house is climate controlled.
    Make the starter by mixing the yeast with the water, then mixing in the flour to make a soft dough. Cover and let rest at room temperature for about 14 hours; overnight works well. The starter should have risen and become bubbly.
    Mix active dry yeast with the water and then combine with the starter, flour, and salt. Mix and knead everything together—by hand, mixer or bread machine set on the dough cycle—till you've made a soft, somewhat smooth dough; it should be cohesive, but the surface may still be a bit rough. Knead for about 5 minutes on speed 2 of a stand mixer.
    Place the dough in a lightly greased medium-size bowl, cover the bowl, and let the dough rise for 3 hours, gently deflating it and turning it over after 1 hour, and then again after 2 hours.
    Turn the dough out onto a lightly greased work surface. Divide it into three equal pieces. Shape each piece into a rough, slightly flattened oval, cover with greased plastic wrap, and let them rest for 15 minutes.
    Working with one piece of dough at a time, fold the dough in half lengthwise, and seal the edges with the heel of your hand. Flatten it slightly, and fold and seal again. With the seam-side down, cup your fingers and gently roll the dough into a 15" log. Place the logs seam-side down onto a lightly greased or parchment-lined sheet pan or pans.
    Cover them with a cover or lightly greased plastic wrap, and allow the loaves to rise till they've become very puffy, about 1 1/2 hours. Towards the end of the rising time, preheat your oven to 450ºF (240ºC).
    Using a very sharp knife held at about a 45° angle, make three 8" vertical slashes in each baguette. Spritz the baguettes heavily with warm water; this will help them develop a crackly-crisp crust.
    Bake the baguettes until they're a very deep golden brown, 25 to 30 minutes. Remove them from the oven and cool on a rack. Or, for the very crispiest baguettes, turn off the oven, crack it open about 2", and allow the baguettes to cool in the oven.

    Friday, June 11, 2010

    Ribbon Flowers....Ribbon Leaves

    Here are the instructions for making the ribbon flowers and leaves I used in making the china pincushion from the giveaway in my last post.  If you need a pincushion don't forget to leave a comment on the  previous post.  I really do love how these turn out and have used them to embellish bags, pin cushions, garter belts and dolls so far.  I'm sure their uses are many more than I have tried.  Maybe you can think of some even better ones....they are dead easy, so give them a go if you think of a good use for them.
    Ribbon Flower
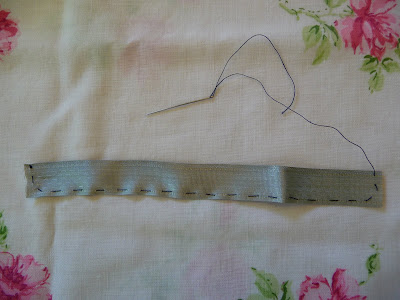
    • Cut a piece of ribbon with a length 9 times it's width. I really like to find soft ribbon for these...you can even use wired ribbon...but remove the wire from the side along which you will be sewing.  The remaining wired edge will allow you to shape the outside edge of the flower nicely.
    • With a thread colour that matches the ribbon, tie a knot in the end of the thread. (I have used a contrasting thread here as it is easier to see in the photo)
    • With ribbon laying flat,(for descriptive purposes only......hold it how ever you like when you sew it)  sew with large running stitches starting at the top left and moving down, then across the bottom and finally up the right side as shown in photo. Don't make delicately small stitches here....long ones will gather better!
    • Now gather the ribbon down by pulling on the thread and needle and bunching the ribbon towards the knotted end where you first started stitching.
    • Move the ribbon with your fingers into a circular shape with the ends of the ribbon tucked on the underneath side.  (Ideally you will treat the ends of the ribbon with fray check to prevent unsightly threads from unraveling from your flower)
    • Once you flower is shaped the way you like....stitch a few stitches on the back side of the flower to knot everything securely.  Leave the long length of thread hanging from the back and use this to attach your flower when you are ready. 
    •  You can also use this thread to attach beads to the front of the flower at center and then return the thread to the back side for later attachment.
    Ribbon Leaf


    • Cut a piece of ribbon with a length 6.5 times or more it's width.  
    • Treat ends with fray check or even white glue will do.
    • Fold the ribbon in half (as in photo above left with fold on the left and cut ends on the right)
    • Take a piece of matching thread with a knot in the end and sew long running stitches starting at the fold and running along the bottom edge (sewing the two layers together) all the way to the cut ends.
    • Now, gather  the long edge and sew a few back stitches to hold the ribbon in place, (so it remains gathered and then sew running stitches (smaller ones this time as this will be a seam and if not gathered) up along the cut edges (sewing the two layers together).
    • Back stitch to fasten......but do not gather the cut ends.
    • Open leaf with stitching to back and finger press to the shape you like.
    • Use remaining thread to attach leaf by hand stitching to its final position.
    • Now open up leaf and press it into shape with your fingers
    When it comes time to sew your flowers and leaves onto your chosen background......keep in mind that the leaves should be sewn into position first, then the flower last......so place them where you'd like with pins first and then start sewing with the leaves.

    Thursday, June 10, 2010

    China Pincushion......Free to a Good Home:)

    This Giveaway is now closed. Thanks to all who entered!
    Remember this little project???  Well I did eventually finish it, and finally the little china pin cushion is complete and waiting for a new home.  The project was made in a very similar manner as making a china cup and saucer pincushion........only on a little smaller scale.  I'm pretty pleased with the end result though and it was nice to use up something that I might have just thrown out anyway since the little sugar bowl was cracked.  
    Maybe you have a little damaged china that you'd like to make into a pincushion??  If that's the case....then have a look here for a bit more detail.  For this little bowl:
    • I started with repairing the break with two stage epoxy.......and I really glopped it on to give it renewed strength.
    • Then I cut a circle of velvet about 2 1/2 times the diameter of the little bowl and centered on the back of it....a circle of steel wool slightly larger than the diameter of the bowl and two thick pieces of batting a tiny bit smaller.
    • Then I used large basting stitches around the edge of the velvet to pull tight and gather it all into a tightly stuffed ball.  You can add or remove stuffing to get it to a size that looks right for your cup.
    • Once the size was right, I secured the gathers with a few stitches and glued the velvet ball into the cup with a hot glue gun and held it firmly down in place while the glue set up.
    • I then used a scrap of gimp which I tea dyed and glued with white glue around the base of the velvet ball.
    • Next, I embellished the velvet with a few ribbon flowers and leaves and a little metal trinket all hand stitched in place.
    Tomorrow I'll post a few pictures to show how to make the ribbon flowers.  I use them a lot for a quick little bit of embellishing and they are quick and dead easy as well.....lots of uses for those:)

    So...on with the Giveaway Details....
    Well....... now this little pincushion needs a new home.  So if you'd be kind enough to offer her a good home, please leave a comment on this post letting me know that you have the perfect spot for her, and on Saturday June 19th a winning comment will be chosen using random.org.  You can leave a comment until midnight Friday June 18th, and I will ship anywhere so everyone is free to leave a comment.  Only one comment per person.......unless you are a kind follower in which case you should leave a second comment as well.  Please make sure that there is a way for me to contact you should your comment be chosen.  If I cannot contact the person with the winning comment by June 21, I will have to select a new winning comment.

    Tuesday, June 8, 2010

    Canadian Health Care Adventures

    Time always seems to race by and this past weekend was no exception.  Before it all hit the fan........I did manage to squeeze in my annual birthday pedicure.  What promised to be a weekend with a relaxing pace quickly turned into a frantic balancing act to juggle volunteer time and cooking commitments with two visits to emergency followed by 2 days of back and forth to visit poor DH for his hospital stay.  Finally after  2 years of continuous back pain, 4 weeks of curious abdominal cramping and unusual bowel habits, the abdominal pain reached levels which brought DH to the door of the emergency room.  On Thursday there was a visit to the family doctor who set up some initial tests.  Then the next day (night actually...2am Saturday more specifically driving like an idiot through every red light with wailing DH) was the first visit to emergency  which resulted in some pain management and an appointment within hours for a CT scan.  The second  emergency visit (also on the weekend more crazy driving and less substantial wailing) thankfully resulted in a consultation with a urologist to assess the results of the CT scan.  Within two hours in emergency, the culprit (a 3mmX 9mm kidney stone) was identified, his pain was managed, DH was admitted, and his name was added to the emergency OR list to have the stone fractured with a laser.  The most inconvenient part for him, I think, (aside from the initial pain that brought him in) was fasting while waiting for his turn in the OR to come up. While he did not make it to the OR that first night, he did make it the next day at 7pm, resulting in a second night stay.  This is poor little DH's second experience with kidney stones and as his symptoms this go around were less typical , was not diagnosed with the same speed as the initial stone 2 years ago.  As with anything, I suppose, we encountered some excellent and some not so excellent doctors and nurses........but overall I think our experience with the health care system was quite positive. Through this whole experience we will see no bills and will spend no money.  The hospital stay was just long enough.........plenty of ipod entertainment, family visiting, Ike's night time homework to do, and all kinds of action in the public ward room he was in as the 3 other patients were fairly entertaining.  Although we do have extended health care through work.......we did not bother to see about having a semi private room.  He most likely would not have been nearly as well entertained.  The care we received is that which is given to any who find their way into the hospital system here.  We live in a country with universal health care, and while it may not be perfect....... for the most part....it's pretty damned good, and we are very luck to have it.  While no doubt there is waste within it, (as with anything government run) it is well worth the effort to be diligent in working towards reducing it so that these services continue to be available to all who need it, regardless of their ability to pay. Now we wait to see if the back pain, which he had assumed was a separate issue, is cleared up as the kidney stones make their exit.   Life is pretty good:)

    Thursday, June 3, 2010

    Vintage Luggage Weakness

    I am, as anyone who knows me well could probably confirm, quite a little pack rat.  It is very difficult for me to throw out anything.........I ALWAYS have some notion of what future use it might have.......and throwing it out would be simply wasteful!  Right??  Hmm I wonder if that has anything to do with the difficulty I have in keeping the house tidy..........na......probably not:)
    I am trying to be a bit better about throwing out things that I might never get around to 'turning into a project'........but I admit....it's hard:)  Quite a few years ago I spotted these beautiful vintage pieces on the internet and thought about making one for myself.....How hard could it be ?????  Really!!  As yet I have not got around to it, but I have managed to find a few vintage suitcases.......should I ever get all the questions in my head answered about how to complete the project.  
    For now......I'm just using this vintage case to hold some sewing supplies......sometimes.......I just like to open it up and look inside.   It makes me smile:)

    Wednesday, June 2, 2010

    Pretty Yellow Things

    Thrift shops are one of my big addictions but  at the same time...... I sometimes find them very annoying.  I've been certain on very many occasions that whoever is in charge of setting their pricing needs their head examined.  I've picked up kids t-shirts to find the price tag reads $5-$6, I've found cups and saucers marked at $20-$25 (many with hairline cracks which makes them worth nothing at all), and nothing special items marked at similar pricing to purchasing them new.  My biggest complaint is with our 'big box' thrift store in town.  At least all of the other thrift shops are run by volunteers with a higher percentage of the proceeds going to good charities and if I pay a bit more than I think I should for something at least I know the money is going to a good cause.  In these stores......I'm even apt to let them keep the change.  
    Sadly, it is the 'big box' store which has the most merchandise to choose from so I do stop in now and again and sometimes I find what I believe to be a good deal.  Today was such a day and for the effort of 30 minutes of poking around the aisles I came home with two pretty items.  I found a beautiful and unusual Paragon cup and saucer with a floral handle for $15 and a pretty Royal Albert Pastella Cake serving plate for $2.  And I suppose it's that kind of luck that keeps me coming back.......until next time.

    Tuesday, June 1, 2010

    Kefir Angel Biscuits

    I have been at a bit of a loss deciding on meals for supper these last few weeks.......and most days......making my decision at the last minutes.  Yesterday.....we had a stew that my DH loves.....a beef, beer and onion stew.  It was delicious.....one of our favourites now.  Along with it I decided to try another recipe from the Company's Coming cookbook for 'Muffins and More'.  Angel Biscuits have a small amount of yeast in them which made for a nice light biscuit which I really liked.......even the next morning with tea:)  I chose to try this recipe as it was another opportunity for me to use up more milk kefir as a straight substitute for buttermilk.

    Angel Biscuits
    1 pkg dry active yeast
    1/4 cup warm water

    5 cups flour
    3 tbsp sugar
    3 tsp baking powder
    1 tsp baking soda
    1 tsp salt
    1 cup butter, cold
    2 cups buttermilk (I used milk kefir)

    Combine the yeast and warm water and set aside to dissolve for 10 minutes.  Measure flour, sugar, baking powder, soda, salt and butter into a large bowl.  Cut in the butter until crumbly.  Stir in the yeast and buttermilk.  Knead just enough to make a dough that holds together.  Roll on floured surface 3/4 inch (2cm) thick.  Cut out with cutters.  Bake on ungreased sheets in 400F oven for 15 minutes.  Makes 2 1/2 dozen biscuits.
    To Turn these into a more savory biscuit, Add 1 cup grated cheddar, 3 Tbsp chopped onion green, and 4 oz (125g) finely chopped ham into the dry ingredients after cutting in the butter and proceed as normal.