Saturday, August 29, 2009

A Vintagey Yellowphant

Finally, I've made something from one of those vintage patterns I cannot seem to stop collecting. I was not able to make up my mind on what sort of stuffy I should make for a swap I signed up for. It is a swap to take part in a Toy Society toy drop which I had heard of, but never taken part in before. For more information on the Toy Society or to join.....click here. It's kind of a PIF where you make a toy, and leave it in a public place for someone to find and claim.
Well after much thought and indecision.....I decided (and not a moment too soon) that I should make a pattern from this vintage set. I decided that I liked the elephant the best.....and good thing too.....as it was the only pattern inside the envelope. That's the risk you take when you buy a pattern from a thrift store I guess:( Fortunately for me the elephant pattern pieces and instructions were all there. And I decided to use up some fleece scraps from making Ike's Halloween costume last year so it would be soft. Just as I was about to sew up the final seam in his back........my son informed me that I had forgotten something. Two eyes....two ears.... one tail......"What did I forget Ike?" "You forgot to put in a heart" he tells me. So, Ike cut out a nice little pink felt heart for me and stuffed it inside before I stitched him up.

Well......my little Yellowphant is all done now and just needs to be dropped off...... somewhere???? Now I can obsess about the best place to drop it off....which may be a bit of a challenge as we are headed out for another week away.

I'm thinking now that it might look cute in some vintage fabric......hmm I do have some laying around that just might be groovy enough:) Maybe we'll try just one more elephant:)

Update: Were are back from out little vacation week and here are the photos from the toy drop.
I made up some little tags and an introduction letter from the files provided by the toy society to include with the toy, and left the toy in one of the children's play areas as Fairmont Hotsprings just in time for the swap deadline. While I didn't see who picked up the toy, I do know it was picked up within a few hours. Hopefully it has found a good home......I'll be watching the Toy Society drop #640 site to see if anyone reports on picking it up.

Hey... There's a Quilt Fabric Giveaway

Since the demise of the Bloggy Giveaway carnival.....I've been missing the opportunity to enter these fun things. I accidentally came across this one. Go check it out! Frummie is generously offering two 2 yard cuts of quilting fabric for a lovely giveaway. Thanks so much Frummie...you can count me in too:)

Thursday, August 27, 2009

Daring Baker's Dobos Torte

The August 2009 Daring Bakers' challenge was hosted by Angela of A Spoonful
of Sugar and Lorraine of Not Quite Nigella. They chose the spectacular Dobos
Torte based on a recipe from Rick Rodgers' cookbook Kaffeehaus: Exquisite
Desserts from the Classic Caffés of Vienna, Budapest, and Prague.


You guessed it......it's Daring Baker's Challenge time again! I was particularly interested to try this month's challenge as I love tortes and am very comfortable making them. A very good family friend shared her recipe with us many years back and it is a good one which I have made quite a few times. The torte my family makes is also a white cake, but it is layered with red currant jelly and a filling/frosting made with thick custard and butter whipped together. We make large layers each the size of a cookie sheet and once all the layers have been used up assembling the cake,.....we cut what looks like a huge sheet cake into loaf sizes and wrap and freeze them. They are handy to have in the freezer when company drops by for tea and can be sliced with very little defrosting. I had also made a chocolate torte version from the Australian Women's Weekly Chocolate cookbook many years ago with a girl friend for her birthday.....Do you remember that Jeannie???

For the challenge, we were allowed to change the flavours of the cake and I toyed with the idea of brushing each layer with coffee but the idea did not meet with the approval of my family....but I did get their approval on spreading a thin layer of Raspberry jam between each layer.

I found the intense chocolate flavour to be good, but too over powering and quite distracting from the fact that you were actually eating cake. Almost like eating chocolate mousse with a bit of cake in it. (The sponge cake BTW is very good) I think I might have preferred a non chocolate version....but for that matter I might have just as well made the recipe from our family friend.......Hmm I should make that again! Also.......I found that for all the effort and steps required it made really quite a small amount. This recipe is easily less than 1/3 the size of the one I'm used to making........and after all that work........I'd prefer to have some extras sitting in the freezer.

If you are in the mood for a really chocolatey dessert......you might want to give it a try. It is a bit time consuming......but it is straightforward and you can do some steps a day in advance to make it all less of a chore.


Dobos Torte

Equipment

  • 2 baking sheets
  • 9” (23cm) springform tin and 8” cake tin, for templates
  • mixing bowls (1 medium, 1 large)
  • a sieve
  • a double boiler (a large saucepan plus a large heat-proof mixing bowl which fits snugly over the top of the pan)
  • a small saucepan
  • a whisk (you could use a balloon whisk for the entire cake, but an electric hand whisk or stand mixer will make life much easier)
  • metal offset spatula
  • sharp knife
  • a 7 1/2” cardboard cake round, or just build cake on the base of a sprinfrom tin.
  • piping bag and tip, optional

Prep times

  • Sponge layers 20 mins prep, 40 mins cooking total if baking each layer individually.
  • Buttercream: 20 mins cooking. Cooling time for buttercream: about 1 hour plus 10 minutes after this to beat and divide.
  • Caramel layer: 10-15 minutes.
  • Assembly of whole cake: 20 minutes

Sponge cake layers

  • 6 large eggs, separated, at room temperature
  • 1 1/3 cups (162g) confectioner's (icing) sugar, divided
  • 1 teaspoon (5ml) vanilla extract
  • 1 cup plus 2 tablespoons (112g) sifted cake flour (SUBSTITUTE 95g plain flour + 17g cornflour (cornstarch) sifted together)
  • pinch of salt

Chocolate Buttercream

  • 4 large eggs, at room temperature
  • 1 cup (200g) caster (ultrafine or superfine white) sugar
  • 4oz (110g) bakers chocolate or your favourite dark chocolate, finely chopped
  • 2 sticks plus 2 tablespoons (250g) unsalted butter, at room temperature.

Caramel topping

  • 1 cup (200g) caster (superfine or ultrafine white) sugar
  • 12 tablespoons (180 ml) water
  • 8 teaspoons (40 ml) lemon juice
  • 1 tablespoon neutral oil (e.g. grapeseed, rice bran, sunflower)

Finishing touches

  • a 7” cardboard round
  • 12 whole hazelnuts, peeled and toasted
  • ½ cup (50g) peeled and finely chopped hazelnuts

Directions for the sponge layers:

NB. The sponge layers can be prepared in advance and stored interleaved with parchment and well-wrapped in the fridge overnight.

1.Position the racks in the top and centre thirds of the oven and heat to 400F (200C).
2.Cut six pieces of parchment paper to fit the baking sheets. Using the bottom of a 9" (23cm) springform tin as a template and a dark pencil or a pen, trace a circle on each of the papers, and turn them over (the circle should be visible from the other side, so that the graphite or ink doesn't touch the cake batter.)
3.Beat the egg yolks, 2/3 cup (81g) of the confectioner's (icing) sugar, and the vanilla in a medium bowl with a mixer on high speed until the mixture is thick, pale yellow and forms a thick ribbon when the beaters are lifted a few inches above the batter, about 3 minutes. (You can do this step with a balloon whisk if you don't have a mixer.)

4.In another bowl, using clean beaters, beat the egg whites until soft peaks form. Gradually beat in the remaining 2/3 cup (81g) of confectioner's (icing)sugar until the whites form stiff, shiny peaks. Using a large rubber spatula, stir about 1/4 of the beaten whites into the egg yolk mixture, then fold in the remainder, leaving a few wisps of white visible. Combine the flour and salt. Sift half the flour over the eggs, and fold in; repeat with the remaining flour.
5.Line one of the baking sheets with a circle-marked paper. Using a small offset spatula, spread about 3/4cup of the batter in an even layer, filling in the traced circle on one baking sheet. Bake on the top rack for 5 minutes, until the cake springs back when pressed gently in the centre and the edges are lightly browned. While this cake bakes, repeat the process on the other baking sheet, placing it on the centre rack. When the first cake is done, move the second cake to the top rack. Invert the first cake onto a flat surface and carefully peel off the paper. Slide the cake layer back onto the paper and let stand until cool. Rinse the baking sheet under cold running water to cool, and dry it before lining with another parchment. Continue with the remaining papers and batter to make a total of six layers. Completely cool the layers. Using an 8" springform pan bottom or plate as a template, trim each cake layer into a neat round. (A small serrated knife is best for this task.)

Directions for the chocolate buttercream:

NB. This can be prepared in advance and kept chilled until required.

1.Prepare a double-boiler: quarter-fill a large saucepan with water and bring it to a boil.
2.Meanwhile, whisk the eggs with the sugar until pale and thickened, about five minutes. You can use a balloon whisk or electric hand mixer for this.
3.Fit bowl over the boiling water in the saucepan (water should not touch bowl) and lower the heat to a brisk simmer. Cook the egg mixture, whisking constantly, for 2-3 minutes until you see it starting to thicken a bit. Whisk in the finely chopped chocolate and cook, stirring, for a further 2-3 minutes.
4.Scrape the chocolate mixture into a medium bowl and leave to cool to room temperature. It should be quite thick and sticky in consistency.
5.When cool, beat in the soft butter, a small piece (about 2 tablespoons/30g) at a time. An electric hand mixer is great here, but it is possible to beat the butter in with a spatula if it is soft enough. You should end up with a thick, velvety chocolate buttercream. Chill while you make the caramel topping.

Lorraine's note: If you're in Winter just now your butter might not soften enough at room temperature, which leads to lumps forming in the buttercream. Male sure the butter is of a very soft texture I.e. running a knife through it will provide little resistance, before you try to beat it into the chocolate mixture. Also, if you beat the butter in while the chocolate mixture is hot you'll end up with more of a ganache than a buttercream!

Directions for the caramel topping:

1.Choose the best-looking cake layer for the caramel top. To make the caramel topping: Line a jellyroll pan with parchment paper and butter the paper. Place the reserved cake layer on the paper. Score the cake into 12 equal wedges. Lightly oil a thin, sharp knife and an offset metal spatula.
2.Stir the sugar, water and lemon juice in a small saucepan. Bring to a boil over a medium heat, stirring often to dissolve the sugar. Once dissolved into a smooth syrup, turn the heat up to high and boil without stirring, swirling the pan by the handle occasionally and washing down any sugar crystals on the sides of the pan with a wet brush until the syrup has turned into an amber-coloured caramel.
3.The top layer is perhaps the hardest part of the whole cake so make sure you have a oiled, hot offset spatula ready. I also find it helps if the cake layer hasn't just been taken out of the refrigerator. I made mine ahead of time and the cake layer was cold and the toffee set very, very quickly—too quickly for me to spread it. Immediately pour all of the hot caramel over the cake layer. You will have some leftover most probably but more is better than less and you can always make nice toffee pattern using the extra to decorate. Using the offset spatula, quickly spread the caramel evenly to the edge of the cake layer. Let cool until beginning to set, about 30 seconds. Using the tip of the hot oiled knife (keep re-oiling this with a pastry brush between cutting), cut through the scored marks to divide the caramel layer into 12 equal wedges. Cool another minute or so, then use the edge of the knife to completely cut and separate the wedges using one firm slice movement (rather than rocking back and forth which may produce toffee strands). Cool completely.

Angela's note: I recommend cutting, rather than scoring, the cake layer into wedges before covering in caramel (reform them into a round). If you have an 8” silicon round form, then I highly recommend placing the wedges in that for easy removal later and it also ensures that the caramel stays on the cake layer. Once set, use a very sharp knife to separate the wedges.

Assembling the Dobos

1.Divide the buttercream into six equal parts.
2.Place a dab of chocolate buttercream on the middle of a 7 1/2” cardboard round and top with one cake layer. Spread the layer with one part of the chocolate icing. Repeat with 4 more cake layers. Spread the remaining icing on the sides of the cake.
3.Optional: press the finely chopped hazelnuts onto the sides of the cake.
4.Propping a hazelnut under each wedge so that it sits at an angle, arrange the wedges on top of the cake in a spoke pattern. If you have any leftover buttercream, you can pipe rosettes under each hazelnut or a large rosette in the centre of the cake. Refrigerate the cake under a cake dome until the icing is set, about 2 hours. Let slices come to room temperature for the best possible flavour.


Tuesday, August 25, 2009

Mount Robson Hike

Two months ago my neighbour mentioned that she wanted to hike the Mt Robson Berg Lake Trail, and I asked if I could tag along. The hike is 42 km in total with a few extra options for day hiking trails once up at Berg Lake. The hike intrigued me as I had never backpacked an overnight hike before and of course, the scenery would be beautiful. I drive through Mt Robson several times each year with my family, but have never stopped to spend much time there other than to grab a bite to eat.
This was a very fun 'one person at a time' suspension bridge along the trail. I took a ridiculous amount to pictures so I'm culling it down to just a few here......

Preparing for the hike was new for me and I did a lot of research to see what kinds of things might be useful to bring along. Although I found the recommended weight to pack is 25% or less of your body weight........focusing on the 'or less' amount tended to be my goal. I borrowed an excellent Bora 70 Arcteryx back pack from a friend, as well as a nice MEC bag and tent. These three items alone weighed in at 20 pounds combined....not leaving much room for food, water, clothing and other supplies. Since I could not find anyone to share my two man tent with......at the last minute I ran to the store and picked up a cheap 1 man tent. It saved me almost 7 pounds so I was feeling better about being able to handle the pack weight, and committed to going on the trip. My total pack weight ended up at just over 30 pounds.
A small detour off the trail and you are right to the base of Emperor Falls. Did I mention it was scenic?? I only wish I was a better photographer:(

I'm super happy that I completed the hike carrying all my own gear.......the scenery was absolutely beautiful and (most of) the small amount of rain we encountered managed to occur when it was time to pack it in for the night anyway.

There are seven camping sites along the Berg Lake Trail. We chose to start our hike late Thursday and only hiked in 7km to the first available camp site on Kinney Lake....if we had had more hours of light we would likely have gone a little further (another 4 km) to Whitehorn. Kinney Lake, Whitehorn, and Berg Lake are the only three campsites equipped with shelters which is very handy if the weather turns to rain during the day time. On the Friday we hiked from Kinney to the Marmot camp site at the South end of Berg Lake which we used as our base camp for the next day's day hike up to a ranger station near Robson Pass. Most definitely the challenging part of the hike was the section from Whitehorn to Emperor Falls as the elevation change is 1700ft (518m) over 5km of switch backs.
The reward was getting to Berg Lake to see glaciers calving into the lake below. They make an amazing lengthy thundering roar when they fall into the lake and it is awe inspiring to say the least. It is a humbling experience to spend the night on a mountain snuggled in a sleeping bag and tent listening to glaciers calving, thunder booming, rain drops pelting your tent, lightening flashing and wondering where the bears are sleeping tonight. I am very small in a big world.
Once these fallen glacier chunks hit the water, they float silently across the lake where interested hikers can scoop them up. Some hikers even made snow cones with them.

With a few more unseen trails up at Berg Lake....I may be back next year:)


Thursday, August 20, 2009

Super Quick Chenille Project

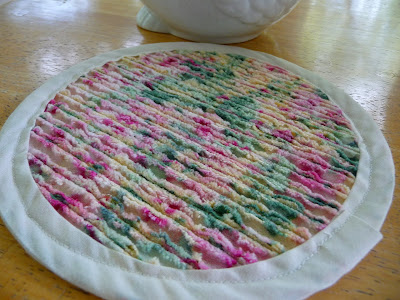
As promised.....here is another little chenille project. This one however, is pretty quick. It's for making a chenille hot mat or trivet. For this project, I cut 5 layers of fabric 6" by 6" square and sewed through all layers from one corner to the opposite one. Then repeated every 3/8" until the square is 'quilted' with parallel channels 3/8" apart. I organized my top layer (the one I would not be cutting through) to be facing up with all other layers facing down. Once the sewing was complete, I cut through all but the top layer between each line of stitching. Then for this project I cut the square into a 6" circle and sewed double fold bias tape around the edge. Then it was ready for the washer and dryer to fluff up the chenille. You could do what ever size or shape you'd like and could even make a hanging loop with the bias tape.
A friend of mine had a set of hot mat and coasters made in this chenille and I have copied the idea from her set. I would have preferred a different colour bias tape for the edge but it's what I had on hand and it didn't really clash. Lots of different options with this project and it makes for a quick project for gift giving. Please read this post for more detailed instructions on making chenille, if you need to, as I've brushed over it quite quickly here.

Sunday, August 16, 2009

Make a Vintage Sheet Faux Chenille Scarf

I think I've mentioned before that I have been accumulating vintage sheets for a project for about a year now. I think I have enough variety to start my project now.....but I do have a few odd sheets that don't quite 'get along' with the others for what ever reason......be it weight of fabric, content, colour, or design. One of these odd ducks that didn't seem to quite fit in was the softest fabric ever, but it's weight and faded colour was making me feel it didn't have a place in the planned project. So I had an idea to use it up on its own. I thought it might make a nice chenille scarf.........and I think it did....What do you think?

Four years ago, I took a class to make a sewn chenille scarf shown at the bottom of this post. The class required that you buy your project supplies from the local quilt shop that was hosting the class, so it was quite a pricey little project. Perhaps more money than I'd typically spend to make a gift for a friend or neighbour. Plus it's just a scarf......and to my mind anyway $40 for supplies alone, was kind of steep. In the store's defense...their fabric was beautiful yarn dyed stuff....the kind that looks just as deep in colour on the back as it does on the front. I did manage to catch a killer sale at the local fabric store and stocked up on enough plaids (that was what my original scarf was made of) to make 4-5 more scarfs for gifts. But for this one I did not have any plaid in the colour I needed to try and.......I wanted to see how a vintage sheet would do anyway. The project took me about 4 hours to cut, pin, stitch and slit the fabric. The finished scarf is 60 inches in length and 7 inches wide including a 6 inch fringe at either end. Fabric cost for this project was about $2.00.....the results....priceless:)......well pretty darned cute anyway.

If you are interested to try this project...here are the steps and instructions.
Faux Chenille Scarf

Materials:
  • 2m fabric (I did this with cottons in both situations but I've read that silk and rayon also fluff up well)
  • scissors or rotary cutter and cutting mat, makes life easier
  • pins
  • matching thread
  • slash cutter if you have one...but scissors will do as well
The strips of fabric for this project are cut on the bias or diagonally and are cut 7 1/4 inches wide. You will need to cut 5 layers of fabric. So cut up 7 1/2 inch wide strips on the diagonal until you have enough for 5 layers. I started by cutting off one of the corners at a 45 degree angle., then proceeded to cut 7 1/2 inch strips Using the single longest piece, lay this one on the table flat either side up....doesn't matter which. Then lay two more layer exactly on top both right side up. Pin along the edges to secure the layers, alternatively you could use fabric adhesive if you have it to 'glue' the layers together. (If some lengths are not long enough, overlap the edges with the next piece by 1/4 inch and trim away any excess length at the scarf ends.) Note that the overlapped join should be at a 45 degree angle, not straight across the scarf.  Joining pieces in this manner will not be noticeable at all in the finished product if done on the 45.  Now flip over the whole thing. Do the same on the back side....layering 2 more layers both right side up......adding to length with a second piece if necessary. Pin at outside edges or secure with spray fabric glue. Trim across both ends to the length of scarf you would like. Starting at one end, sew along the length of the layers right down the middle of the long rectangle.
I marked the center line with a washable kids marker for a nice straight line to follow. Make sure the fabric rectangle is lined up straight and is not curved when you do this. I also found it useful to use a walking foot attachment when sewing through all 5 layers. Now starting from the opposite end this time....sew another straight line 3/8 inch away from the center line. Turn your piece and sew another straight line 3/8 inch away and parallel to the last one......and so on until you reach the end. Continue in the same manner on the other side of the scarf until it is covered in parallel stitched lines 3/8 inches apart. Now you can trim along the long edges of the scarf and remove any uneven bits. Trim parallel to the last stitching line leaving a little less than 1/4 inch of fabric outside the last stitching line.
Now it is time to slash the fabric between the lines of stitching. Using a slash cutter or a pair of good fabric scissors, cut ONLY THE TOP TWO layers of fabric down the full length of the scarf between each set of stitching lines. You will do this on both sides of the scarf. Remember that there are 5 layers so your goal is to leave the middle layer uncut. If you cut the middle layer at any point....you will create a hole in your scarf..... so be mindful before you start cutting. Now if you'd like a fringe at the ends of your scarf, draw a line across the scarf at the point where you'd like your fringe to stop.......cut through the middle layers up to that point.
Now it's time to wash and dry your scarf. After washing and drying (with a pair of jeans helps with the fluffing) your scarf may need a bit more fluffing. You can give it a good brushing with a stiff bristle brush and a little misting of water and a bit more brushing to finish it off.

Now if you found that difficult to follow take a look at this lady's photos outlining the process. The scarf we made in class was wider, but the process was the same. I can't say if I remember folding the fabric the way it's done in the photos, but it does sound familiar and it looks easier than what I did......which was start a 45 degree cut off one end and just start cutting my 7 inch strips. Mind you I was working with a double wide sheet and not a 45 inch wide piece of fabric. Also make certain all selvedge is removed when trimming the ends as it will not fluff well. I hope that is all clearer than mud. Next post...............another chenille project:)....I think!

Friday, August 14, 2009

Another Winning Recipe with the Daring Cooks:)

Well it was another seafood recipe for the Daring Cooks Challenge this month. This time the dish was Rice with mushrooms, cuttlefish and artichokes. After last month's boldness in trying the Skate With Powders Recipe....even I was a little squeamish. Although my family is a huge fan of calamari....I am not certain how they would receive a non calamari version. So rather than rock the boat too much I opted to substitute with shrimp. The recipe was along the lines of a Paella with fish stock, artichokes (yum), mushrooms and it required you to first slow fry up a batch of Sofregit. The Sofregit was a little time consuming, but not much work other than a bit of chopping. I made a half batch of Sofregit as that was more than enough for the recipe. When I measured out 3 generous tbsp of Sofregit to add to the dish......there were only 2 more generous spoonfuls left.......so I added them all. It was delicious! Definitely a keeper and worthy of making for company. It really comes together quickly (especially if you make the sofregit and allioli ahead of time) so it would be a perfect meal to make when your guests have already arrived and you are plying them with liquor/wine. Oh and since I made mine with a 300g package of shrimp, I removed them to a side dish after they changed colour and added them back into the rice in the last 2 minutes to they wouldn't get tough. OGM...they were good. Recipe serves (with 2 cups rice) 4 very hungry adults as a main with possible left overs.

There was also the requirement to make some allioli to accompany the meal. I started to make the traditional version......but I think I added too much oil and made it too runny. So I then made the modern mayo type version which is easy peasy with a hand blender. My husband quite enjoyed the addition of the mayo version as an accompaniment to the dish.......and although the traditional allioli was a bit runny it tasted perfectly delicious with it as well. No point in wasting it! Probably would have helped to have a mortar and pestle:)

Without too much more rambling.....here is the hosts introduction to the challenge:

Hi all, this is Olga from Las Cosas de Olga and Olga’s Recipes and I’m pleased to be your host at August Daring Cooks Challenge. I’ve chosen a delicious Spanish recipe, Rice with mushrooms, cuttlefish and artichokes by José Andrés, one of the most important Spanish Chefs at the moment.

Rice with mushrooms, cuttlefish and artichokes
Cooking time: 45 minutes
Equipment:

  • 1 Chopping Board
  • 1 knife
  • 1 medium saucepan
  • 1 Paella pan (30 cm/11” is enough for 4 people. If not available, you may use a simple pan that size)
  • 1 Saucepan

Ingredients (serves 4):

  • 4 Artichokes (you can use jarred or freezed if fresh are not available)
  • 12 Mushrooms (button or Portobello)
  • 1 or 2 Bay leaves (optional but highly recommended)
  • 1 glass of white wine
  • 2 Cuttlefish (you can use freezed cuttlefish or squid if you don’t find it fresh)
  • “Sofregit” (see recipe below)
  • 300 gr (2 cups) Short grain rice (Spanish types Calasparra or Montsant are preferred, but you can choose any other short grain. This kind of rice absorbs flavor very well) – about 75 gr per person ( ½ cup per person) Please read this for more info on suitable rices.
  • Water or Fish Stock (use 1 ½ cup of liquid per ½ cup of rice)
  • Saffron threads (if you can’t find it or afford to buy it, you can substitute it for turmeric or yellow coloring powder)
  • Allioli (olive oil and garlic sauce, similar to mayonnaise sauce) - optional

Directions:

  1. Cut the cuttlefish in little strips.
  2. Add 1 or 2 tablespoon of olive oil in a frying pan and put the cuttlefish in the pan.
  3. If you use fresh artichokes, clean them as shown in the video in tip #7. Cut artichokes in eights.
  4. Clean the mushrooms and cut them in fourths.
  5. Add a bay leaf to the cuttlefish and add also the artichokes and the mushrooms.
  6. Sauté until we get a golden color in the artichokes.
  7. Put a touch of white wine so all the solids in the bottom of the get mixed, getting a more flavorful dish.
  8. Add a couple or three tablespoons of sofregit and mix to make sure everything gets impregnated with the sofregit.
  9. Add all the liquid and bring it to boil.
  10. Add all the rice. Let boil for about 5 minutes in heavy heat.
  11. Add some saffron thread to enrich the dish with its flavor and color. Stir a little bit so the rice and the other ingredients get the entire flavor. If you’re using turmeric or yellow coloring, use only 1/4 teaspoon.
  12. Turn to low heat and boil for another 8 minutes (or until rice is a little softer than “al dente”)
  13. Put the pan away from heat and let the rice stand a couple of minutes.
Sofregit (a well cooked and fragrant sauce made of olive oil, tomatoes, garlic and onions, and may at times
different vegetables such as peppers or mushrooms)-

Cooking time: aprox. 1 hour
Ingredients:

  • 2 tablespoons of olive oil
  • 5 big red ripe tomatoes, chopped
  • 2 small onions, chopped
  • 1 green pepper, chopped (optional)
  • 4 or 5 garlic cloves, chopped
  • 1 cup of button or Portobello mushrooms, chopped (optional)
  • 1 Bay leaf
  • Salt
  • Touch of ground cumin
  • Touch of dried oregano

Directions:

  1. Put all the ingredients together in a frying pan and sauté slowly until all vegetables are soft.
  2. Taste and salt if necessary (maybe it’s not!)

Allioli is the optional part of the recipe. You must choose one of the two recipes given, even though I highly recommend you to try traditional one. Allioli is served together with the rice and it gives a very nice taste

Allioli (Traditional recipe)
Cooking time: 20 min aprox.
Ingredients:

  • 4 garlic cloves, peeled
  • Pinch of salt
  • Fresh lemon juice (some drops)
  • Extra-virgin olive oil (Spanish preferred but not essential)

Directions:

  1. Place the garlic in a mortar along with the salt.
  2. Using a pestle, smash the garlic cloves to a smooth paste. (The salt stops the garlic from slipping at the bottom of the mortar as you pound it down.)
  3. Add the lemon juice to the garlic.
  4. Drop by drop; pour the olive oil into the mortar slowly as you continue to crush the paste with your pestle.
  5. Keep turning your pestle in a slow, continuous circular motion in the mortar. The drip needs to be slow and steady. Make sure the paste soaks up the olive oil as you go.
  6. Keep adding the oil, drop by drop, until you have the consistency of a very thick mayonnaise. If your allioli gets too dense, add water to thin it out. This takes time—around 20 minutes of slow motion around the mortar—to create a dense, rich sauce.
Olga’s Tips:
(1) In Spain, rice is not stired as often as it is when cooking Italian risotto. You must stir it once or twice maximum. This tip is valid for all Spanish rice dishes like paella, arròs negre, arròs a banda…
(2) When cooking the alternative style you can change the cuttlefish or squid for diced potato.
(3) If you can’t find cuttlefish or squid, or you’re not able to eat them because of allergies, you can try to substitute them for chicken or vegetables at your choice.
(4) Sofregit can be done in advance. You can keep it in the fridge or even freeze it.
(5) For more information on how to clean and remove the heart of artichokes, please watch this video
(6) To watch how Jose Andres cooks this dish click here.
(7) For more information on how to clean and remove the heart of artichokes, please watch this video
(8) To tone down the taste when you do it by hand in a mortar, then add an egg yolk. If you want to tone it down in the alternative way use milk or soy milk. Anyway, the best alternative way is the original oil and garlic alone.
(9) Allioli must be consumed during the preparation day and preserved in the fridge before using it.
(10) For help on conversion on metric to imperial, visit this page.

Wednesday, August 12, 2009

And Then There Was Raspberry Syrup....

It has been a busy week of canning that's for sure. I finally dealt with the raspberries that I had picked at my friend house. Funny enough......I have raspberries trying to make a go of it in my back yard. I have very limited space to keep them and I started with only 4 canes . They are thornless raspberries which I enjoy....no getting pricked with the thorns that is. I started moving the new shoots this year to make nice rows...but I'm afraid that our long vacation away without watering them didn't do them any favours. The funny part that I'm taking a long time getting around to is.....my friend with the raspberries totally ignores them and has in fact pulled out many of them because they were in his way. They.......aside from NEVER being watered produced an astounding amount of berries. Fortunately for me....my friend had no interest in them.......so I picked them all.

One last item remains on the canning agenda this year......and that is to make chokecherry syrup. I have been looking high and low trying to track down a source for these. Well actually not that hard........ But I did do a bit of poking around and came up with nothing. So I asked this same friend to ask his garden loving friends if they knew of anywhere to get chokecherries. No luck. But when I was over to pick the raspberries at his house....he mentioned the trees in his backyard. Turns out they are chokecherry. Go figure. So in a few more weeks......there will be chokecherry syrup to add to the fruit syrup list this year.

I followed the recipe shown here on this post for Saskatoon syrup but using raspberries instead. I did put all of the raspberries through the food mill rather than using the recipes instructions for juice extraction. This removed a good portion of the seeds but left a large portion of the pulp. I then used this seeded raspberry pulp to make one recipe of jam and used the leftover 1 2/3 cup to make syrup. This produced 3 (250mL) jars of delicious and bright red raspberry syrup. Soon all the canning equipment can return to the basement and I can reclaim the kitchen table...........soon to be covered with sewing projects hopefully:)

Boy you leave the computer for a minute and someone takes your place. She looks pretty settled too. I don't think she'll go. I guess we'll just share the chair then:)
You just cant make Kitty 'cause Kitty won't go!

Tuesday, August 11, 2009

Quick Thrifting and Home in Time for Pad Thai

Thrift store hunting started for me when I was in need of maternity clothes and there were no maternity wear stores in my town. It naturally then spread to baby and toddler clothes for my son, which also worked well for me since there was also no Gap or Old Navy in my town either. Now that Ike is out of the smaller sizes it is more difficult to find clothes there in good condition for him....but I soon discovered that there were more departments that I might find items of interest in. These areas have grown to include the china and glass section (for cups and saucers, platters, swanky swigs), the craft section (for embroidery floss, wool yarn, knitting needles, vintage buttons, rickrack....you never know what you'll find?) and now the linen section (for linen tea towels and vintage sheets). I really like the idea that these items are getting a second chance rather than going to landfill and in a lot of cases these items are well crafted (meant to last) and hopefully stylish in a vintage kind of way. You just never know what you might find and it's kind of exciting when you do find something you'll love. It's even amusing, at times, when you are browsing and come across something that you recognize from your past.

Sometimes you're lucky and sometimes your not when it comes to thrift store hunting. It does take time and persistence. This past week, I managed to pick up a few things.....that I felt I needed. I've been collecting vintage sheets now for the past year and managed to find a few more to round out my collection. One of these days (hopefully today)....I'll get around to cutting some of this up to start my project! I also found some vintage sewing and crochet booklets, crochet thread, buttons, a swanky swig glass and a great little Royal Worchester egg coddler. How much fun is that? After my quick thrifting fix, I squeezed in the door with just enough time for a quick supper.....and you guessed it....it was Pad Thai. The recipe is below and this time I made it with all shrimp....because that's what I had in the freezer. I really like this recipe........well....because I love Pad Thai......and because it's pretty quick! I serve it with a little wedge of lime, ground peanuts, hot sauce, and a spoon of sugar on the side.
Pad Thai
1/4 lb sliced pork
1/4 lb shelled shrimp
1 lb (wet) sen lek (rice) noodles

1 tsp minced garlic
1 tsp minced chili

1 1/2 tbsp fish sauce
1 1/2 tbsp tamarind juice
1 tbsp sugar
1/4 tsp paprika

1/2 cup shredded ginger
1/3 lb bean sprouts
1 tbsp crushed peanuts

Devein shrimp, rinse and drain. Heat 1 tbsp oil and stir fry drained noodles until hot. Set aside.

Heat 2 tbsp oil then stir fry garlic and chili until fragrant; add meat and shrimp, then stir fry until colour changes. Add eggs and stir fry until slightly dry. Add remaining ingredients and noodles then stir fry briefly. May sprinkle on lime juice and serve.

*To prepare (1/2lb) dry noodles. Soak noodles in cold water until softened and doubled in weight. (about 1 hour)
*Make tamarind juice by soaking 2 oz(56g) of tamarind with 1 cup warm water then filter the mixture.

Saturday, August 8, 2009

Pampered by Post

When Ike and I returned from out trip there was quite a little pile of mail waiting for us. I had a few swaps come, one of which is pictured above. This was the Friends Swap which was hosted by Sew Prim Kris who is a wonderful swap host...and I will definitely be keeping an eye open for any future swaps she might host:) It was a sort of 'scavenger hunt' swap where you needed to find items to represent each letter of the words 'friends'. So my partner sent me Fabulous fabrics, Recipes galore, a little pouch for Incidentals, Energy food (peanuts slab, mmmmm, and minties), Note cards (of her very own photographs....absolutely lovely), Doilies and an absolutely gorgeous Summer embroidery (she does beautiful work) My Ike has been into the minties and is quite enjoying them and amazingly enough I still have the peanut slab in the fridge. One night we will all have to share it. Peanut and chocolate is one of my favourites:) In fact I love peanut butter chocolate ice cream is one of my favourites as is peanut butter and chocolate milk shakes. Thanks so much to my partner Kiwicarole for putting together such a great swap:0
Well if that wasn't enough......Ike received a thoughtful birthday package (also from NZ) from our neighbours who left us:( It was filled with all kinds of goodies by Smiggle. (Which I had not heard of before.........it's very kawaii!) And a great souvenir t shirt that Ike has already worn. Thanks heaps! I managed to get a little something in the package for me too....a cute little pouch for a cell phone:) We are spoiled aren't we?
Then I got this mystery package that took me some time to figure out. My good friend Jeannie had this cute little sampler sent to me from Out of the Box. What a great idea! Thanks Jeannie! I am so looking forward to your visit:) The cat absolutely adored the cat nip toy BTW.

Friday, August 7, 2009

I'm a Little Teapot Hiker:)

Today was my first hike up Teapot Mountain. It's just north of Prince George on Hwy 97 near Summit Lake. Ever since I had agreed to make the August weekend hike with my neighbour to Mt Robson, people have been making me nervous about my ability to make such a hike. So I started to wonder if maybe I was biting off more than I could chew. And........since my neighbour took a little trial hike up Teapot.....I started to feel like I needed to as well....just to make sure.
I'm not sure what I learned from my hike, as far as assessing my abilities.......as the teapot hike is a little itty bitty hike. Only 30 minutes to the top and another 10-15 minutes of ring trail around the top before the trail loops back and overlaps to take the original trail back down. It is however, quite steep on the way up and there are a few spots that are slippery with no real footholds or even branches to assist your balance. I had worried about my son making the climb as he's told me many times that he is not so much 'a nature boy', but he did quite well with no complaining. There are spots at the top where he went too close to the edge for my comfort. I myself am not too afraid of heights, but I also think my son over estimates his sure footedness. Usually he is bouncing around and nearly falling over on flat ground. But he didn't want my help, except for a few select spots. Mostly to remove some offensive looking shrubs.
The trail was much more scenic on the way down as we took the time to soak up the scenery and take photos. We saw all kinds of interesting foliage and even Ike enjoyed the scenery. All in all, it was a very nice little day hike! I would definitely like to to it again some time. It's a quick drive to get there and quite scenic along the trail and up on top. This little mountain (it's really tiny and I don't know why they call it a mountain) survived the last ice age due it's Basalt composition and it sticks out of the landscape quite noticeably. Once on top you have a nice spot to have a snack and overlook the beautiful view of Summit Lake below. Well, we all made it back safely and just in time for lunch. Now it's time to make some more syrup........Apricot:)

Wednesday, August 5, 2009

A Berry Good Summer So Far:)

It's berry time again. I had been a little worried that our long trip away this summer would have us missing the berry season all together.....but as luck would have it, we seem to have hit it just right. And we are just about out of Chokecherry syrup, which we just used the last of, for Ike's breakfast above. Huckleberries, Pin cherries, Chokecherries, Blueberries and Saskatoons are all coming into season. After a few days of picking and a few experiments we have some Saskatoon syrup and some unintentional Huckleberry Jelly canned up for the coming year. Don't you just love canning season?
I'm going to try a new syrup recipe this year for Apricot syrup as soon as I catch them on sale.....and I'm on the look out now for pickling cucumbers to make some dill pickles. After eating nearly two whole jars of mom's salt water dills......I think I may need to make some of my own. In any event.....should you be interested in making your own fruit syrup for pancakes this year, here are a few that I have tried and also the Apricot one that I'm about to try too. All of these recipe work equally well with frozen fruit so you need not stress over picking and processing in a short time space. I am short of freezer space right now so am trying to process them so as to not take up any freezer space.

Chokecherry Syrup

8 cups ripe chokecherries, stemmed and unpitted
1/2 cup water
1/2 box of pectin crystals
4 cups sugar

Place the chokecherries in a large saucepan with the water and mash well. Bring to a boil, reduce heat and simmer uncovered for 10 minutes. Remove from heat.

Strain mixture through a jelly bag and measure juice

Add about 4 cups of the strained juice into a saucepan, add the pectin crystals and mix well. Bring to a boil stirring frequently. Stir in the sugar and boil hard for 1 minute. Remove from heat.
Skim away any foam from the surface and pour into hot sterilized jars. Store in the refrigerator.

I canned mine in a boiling water bath for 10 minutes instead of keeping it in the fridge.


And my Saskatoon syrup is just about ready to come out now:)


Saskatoon (Service Berry or June Berry) Syrup

8 cups Saskatoon berries, cleaned
3/4 cup water


For each cup of berry juice,

1 cup berry juice
1 1/2 cups sugar

Mash berries and water in a large saucepan and simmer for 2 minutes. Transfer berries to a jelly bag and strain and squeeze bag to recover the most juice.
For each cup of berry juice add 1 1/2 cups sugar and heat in a large sauce pan bringing to a rolling boil. Boil for only 1 minute. (longer may result in syrup jelling) Transfer into clean hot canning jars and seal. Process in hot water bath 10 minutes.
*Recipe instructions included a thicker recipe by substituting the 1 1/2 cups sugar with 1 1/4 cups sugar plus 1/4 cup light corn syrup plus 1 tbsp lemon juice. I found the syrup quite thick with the original recipe as above. I imagine that this recipe would work for blueberries as well!

Apricot Syrup

2 lbs (1kg) ripe apricots, pitted and chopped
1 cup water

4 cups sugar
2 tbsp lemon juice
1 tbsp corn syrup

Puree the apricots with the water in two batches in a blender. Turn into a large saucepan.

Add sugar, lemon juice and corn syrup. Stir over meduim-high heat until sugar dissolves and it comes to a boil. Boil and stir for 5 minutes. Skim away any foam from the surface. Pour into hot sterilized jars to within 1/4 inch (6mm) headspace. Seal. Makes 6 cups of syrup.
*(From 'Company's Coming Preserves' a very popular Canadian cooking series)
edit August 8/09.......Just loved this Apricot syrup recipe, it is very well flavoured and perhaps not quite as sugary sweet as the berry syrups. Very much like the apricot syrup they serve at IHOP type pancake places.